
If you need to change the SKU values on existing products, for example after a catalogue restructure or a rebrand, you can do this in bulk using the Replace existing SKU values import mode. This is a separate import mode from a standard csv product import: instead of matching data to existing products by SKU, it uses your file to reassign the SKU itself.
ℹ️ Looking to import general product data instead? Check out Importing Product Data from a CSV File.
⚠️ This action changes the unique identifier for your products. Double check your file before importing, as SKU changes cannot be undone by Plytix.
ℹ️ Did you import your catalogue using Shopify's Magic Importer? Your SKUs are currently based on Shopify's internal IDs, see Swapping SKUs after importing with Shopify's Magic Importer below before preparing your file.
Swapping SKUs after importing with Shopify's Magic Importer
*Skip to any section in this article by clicking on the links above
Before you start
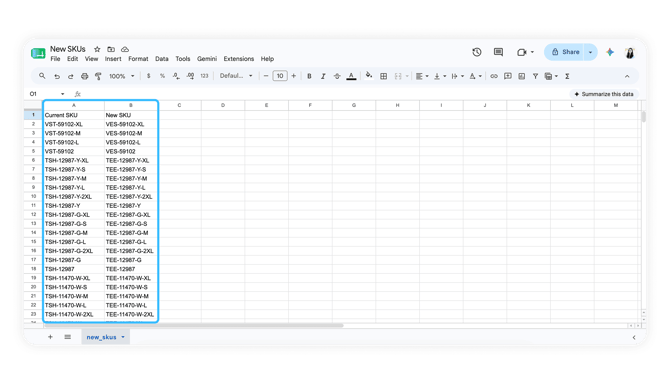
Prepare a CSV file with two columns:
- Current SKU: the existing SKU as it appears in Plytix
- New SKU: the SKU you want to assign
Make sure both columns contain unique values. Duplicate values in either column will cause conflicts during import.
Swapping SKUs after importing with Shopify's Magic Importer
If you brought your catalogue into Plytix using Shopify's Magic Importer, you may notice your SKUs look like long, meaningless strings of numbers instead of something recognizable, for example 6823041982534.
This is expected. At the time of import, Shopify's internal IDs are the only values Plytix can blindly trust to be unique across every product in your store, so they get used as the SKU:
- Parent products are represented by the Shopify product ID
- Variants are represented by the Shopify variant ID
These IDs work fine for keeping your data in sync, but they carry no meaning for your team, your warehouse, or your ERP.
To replace them with your real SKUs, use the Shopify SKU Swap tool. It analyzes your catalogue and generates a ready-to-import SKU Swap file for you.
To use the tool:
- In Plytix, go to Product Overview, select all products, and export them as a CSV.
- Make sure your export includes these columns:
- SKU: the current Shopify-ID-based SKU in Plytix
- Variant Of: identifies parent/variant relationships
- Shopify Handle: the readable product handle from Shopify
- Shopify SKU: the actual stock keeping unit (SKU) set on the product in Shopify
- Drop that export into the Shopify SKU Swap tool. It identifies parents, variants, and single products, and applies the correct logic automatically:
- Parent products → uses the Shopify Handle
- Variants and individual products → uses the Shopify SKU
- Download the resulting file. It's already formatted with Current SKU and New SKU columns, ready to use with the normal Replace SKUs in Bulk steps below.
ℹ️ Not comfortable running this yourself? Reach out to your Account Manager, they can generate and run the SKU swap for you.
How to replace SKUs in bulk
- Go to the navigation menu and click "Products".
- Click "Import" from the dropdown to open the import area.
Step 1: Upload
On the Upload screen, use the Import mode dropdown in the top right (it defaults to "Create or update products") and select Replace existing SKU values.
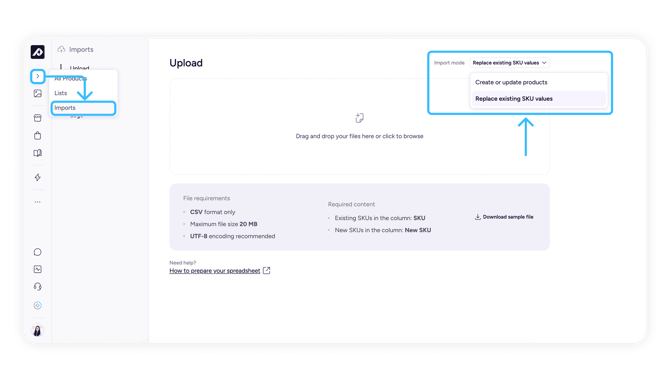
Drag and drop your CSV file into the box, or click to browse and select it. Before you upload, check the requirements shown on this screen:
- File requirements: CSV format only, maximum 20 MB, UTF-8 encoding recommended.
- Required content: a SKU column with unique values, headers for all columns, and one product per row.
💡 Not sure your file is formatted correctly? Use "Download sample file" on this screen, or check how to prepare your spreadsheet.
Step 2: File settings
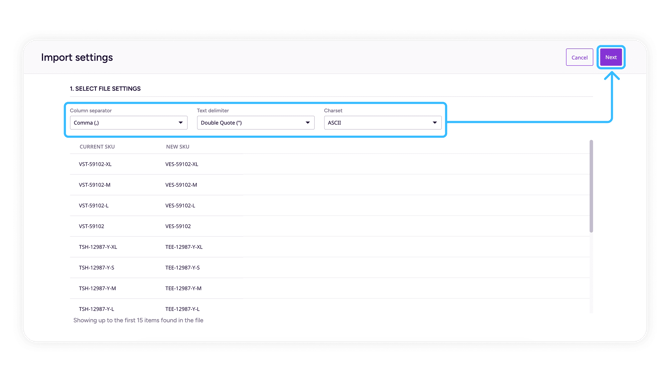
You'll land on the Import settings screen. Confirm the Column separator, Text delimiter, and Charset match your file, these are auto-detected but can be changed here if needed.
Below the file settings, you'll see a preview of your data with a SKU column and a New SKU column, showing up to the first 15 rows found in your file. Use this to confirm the right columns are being read before you continue.
Click "Next" once you're happy with the preview.
Step 3: Data matching
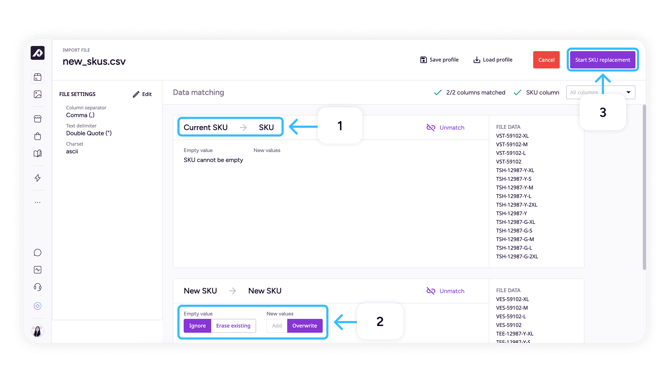
On the Data matching screen, Plytix will attempt to auto-match your file's columns to the SKU and New SKU fields. Check the top right of the screen to confirm all columns are matched and that the SKU column has been detected.
For each matched column, you can review and adjust:
- SKU column: this is the identifier Plytix uses to find the product you're updating. It cannot be empty, if any rows have a blank SKU, they won't be matched to a product.
- New SKU column: choose how Plytix should handle this data:
- Empty value: "Ignore" leaves the existing SKU untouched if the New SKU field is blank for a row. "Erase existing" will remove the SKU entirely if the field is left blank (not recommended, since SKUs are required).
- New values: this is set to "Overwrite", replacing the existing SKU with the new value. "Add" is greyed out and not selectable for this field, since a SKU can't have multiple values.
Once your columns are matched and your settings look right, click "Start SKU replacement" in the top right to run the import.
⚠️ Make sure your CSV contains unique values in both the current SKU and new SKU columns to avoid conflicts during import.
⚠️ Double-check your New SKU column settings before starting. Since this action replaces the identifier Plytix uses to track the product, incorrect settings here can affect which products get updated.
What's Next?
- Check the status of your import with Import Logs
- Learn how to import product data from a CSV file
- Learn how to use and apply filters