Use our Shopify connector to send product content directly to Shopify stores
Sync data between Plytix and your Shopify stores with our direct integration. In this article we will show you how to set up a Shopify channel.
💡 Before setting up your channel, we recommend checking out our best practices guide with helpful tips to keep in mind when sending your data from Plytix to your Shopify store!
*Skip to any section in this article by clicking on the links above
⚠️ This feature isn't available for all accounts yet. Reach out to your customer success manager to get access to this feature.
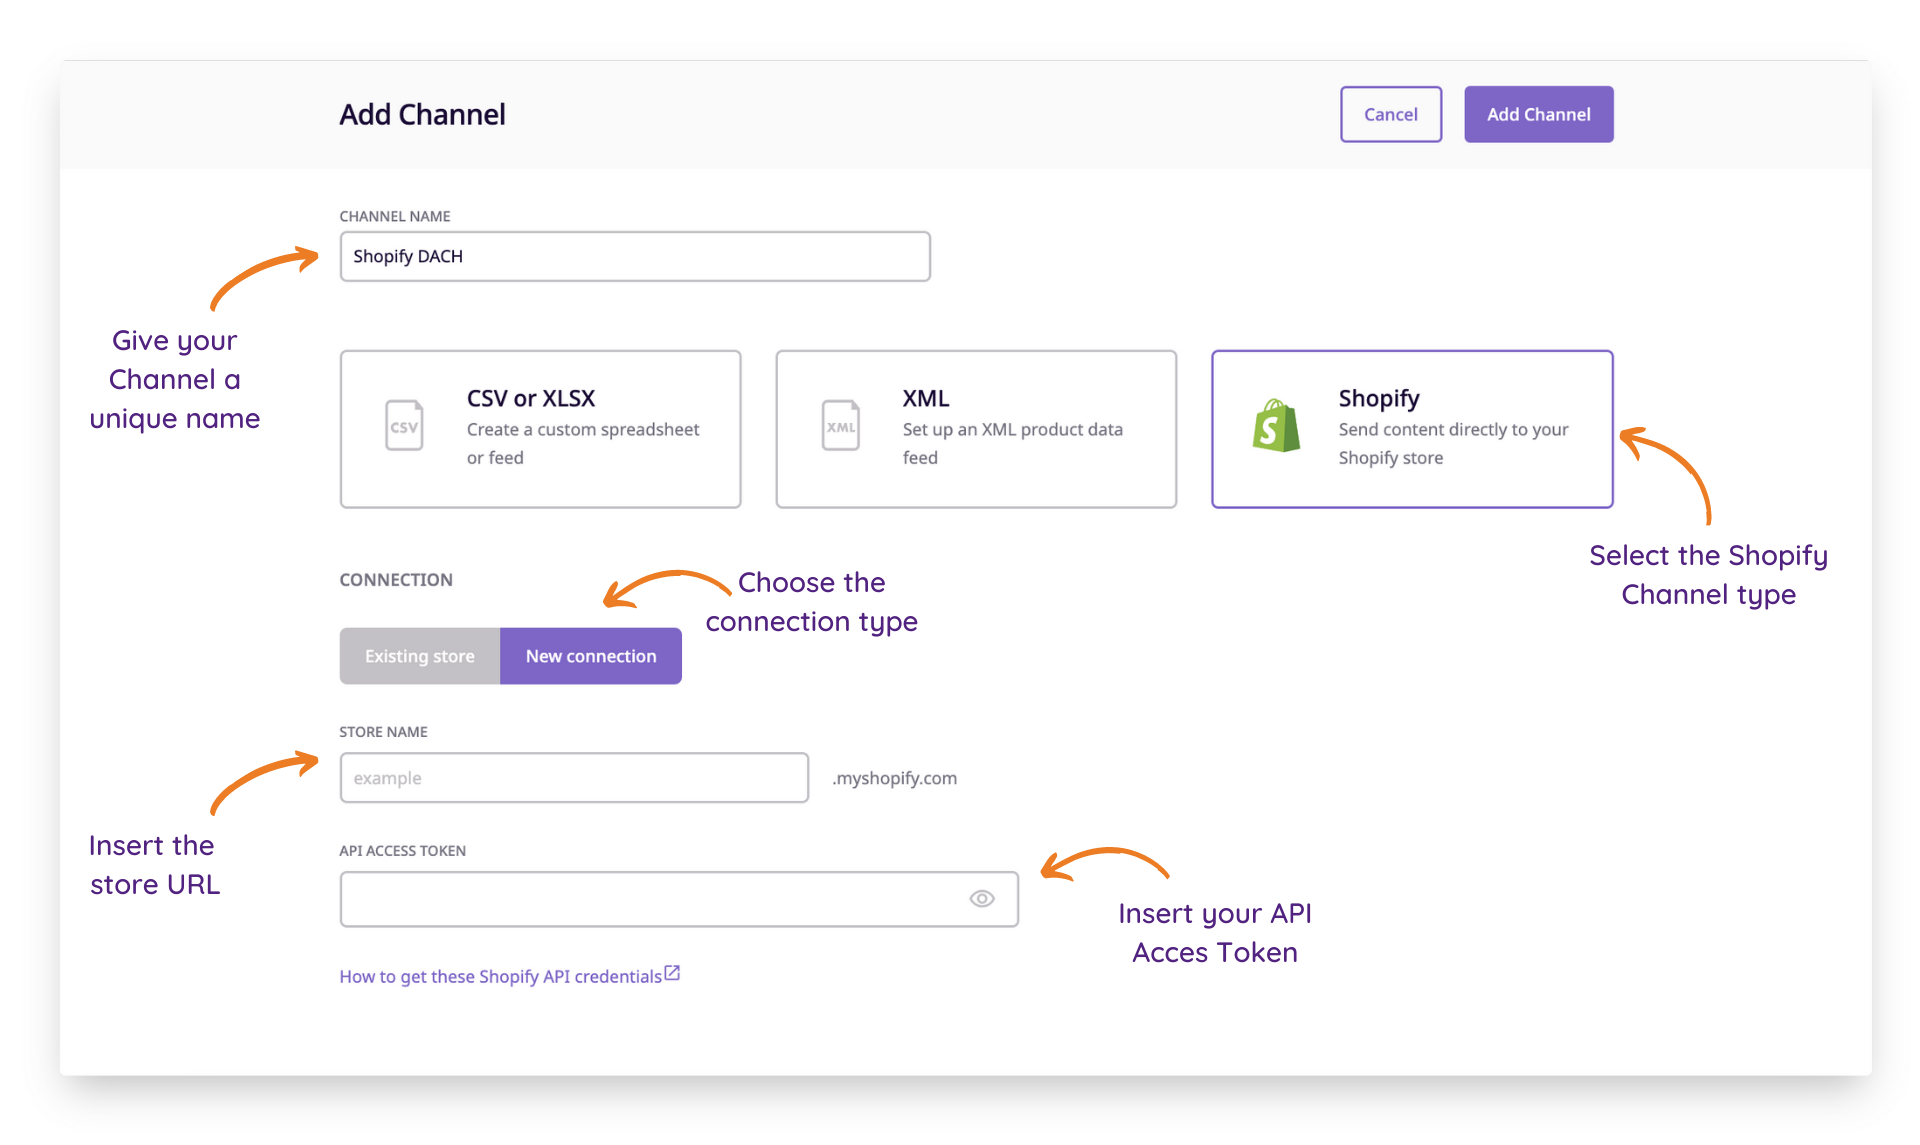
Creating a Shopify Channel
The Shopify connector can be found in the Channels add-on. To create a new Shopify channel:
- Navigate to the "Channels" tab
- Click the 'Add Channel' button on the right
- Give your channel a unique name
- Choose the 'Shopify' channel type
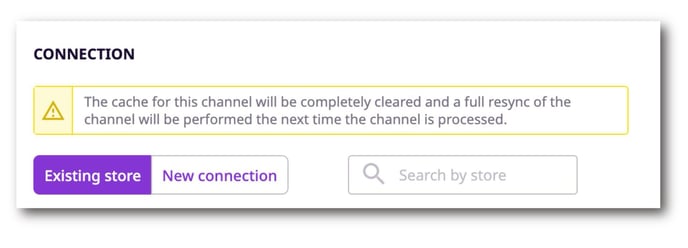
- Choose either an existing connection or connect a new store
- Add the store URL* of the Shopify store you want to connect with
*only insert the root of your domain (without the "https://") - Add the API Access Token you can generate from within your Shopify Store
- Then click 'Add Channel' on the top right
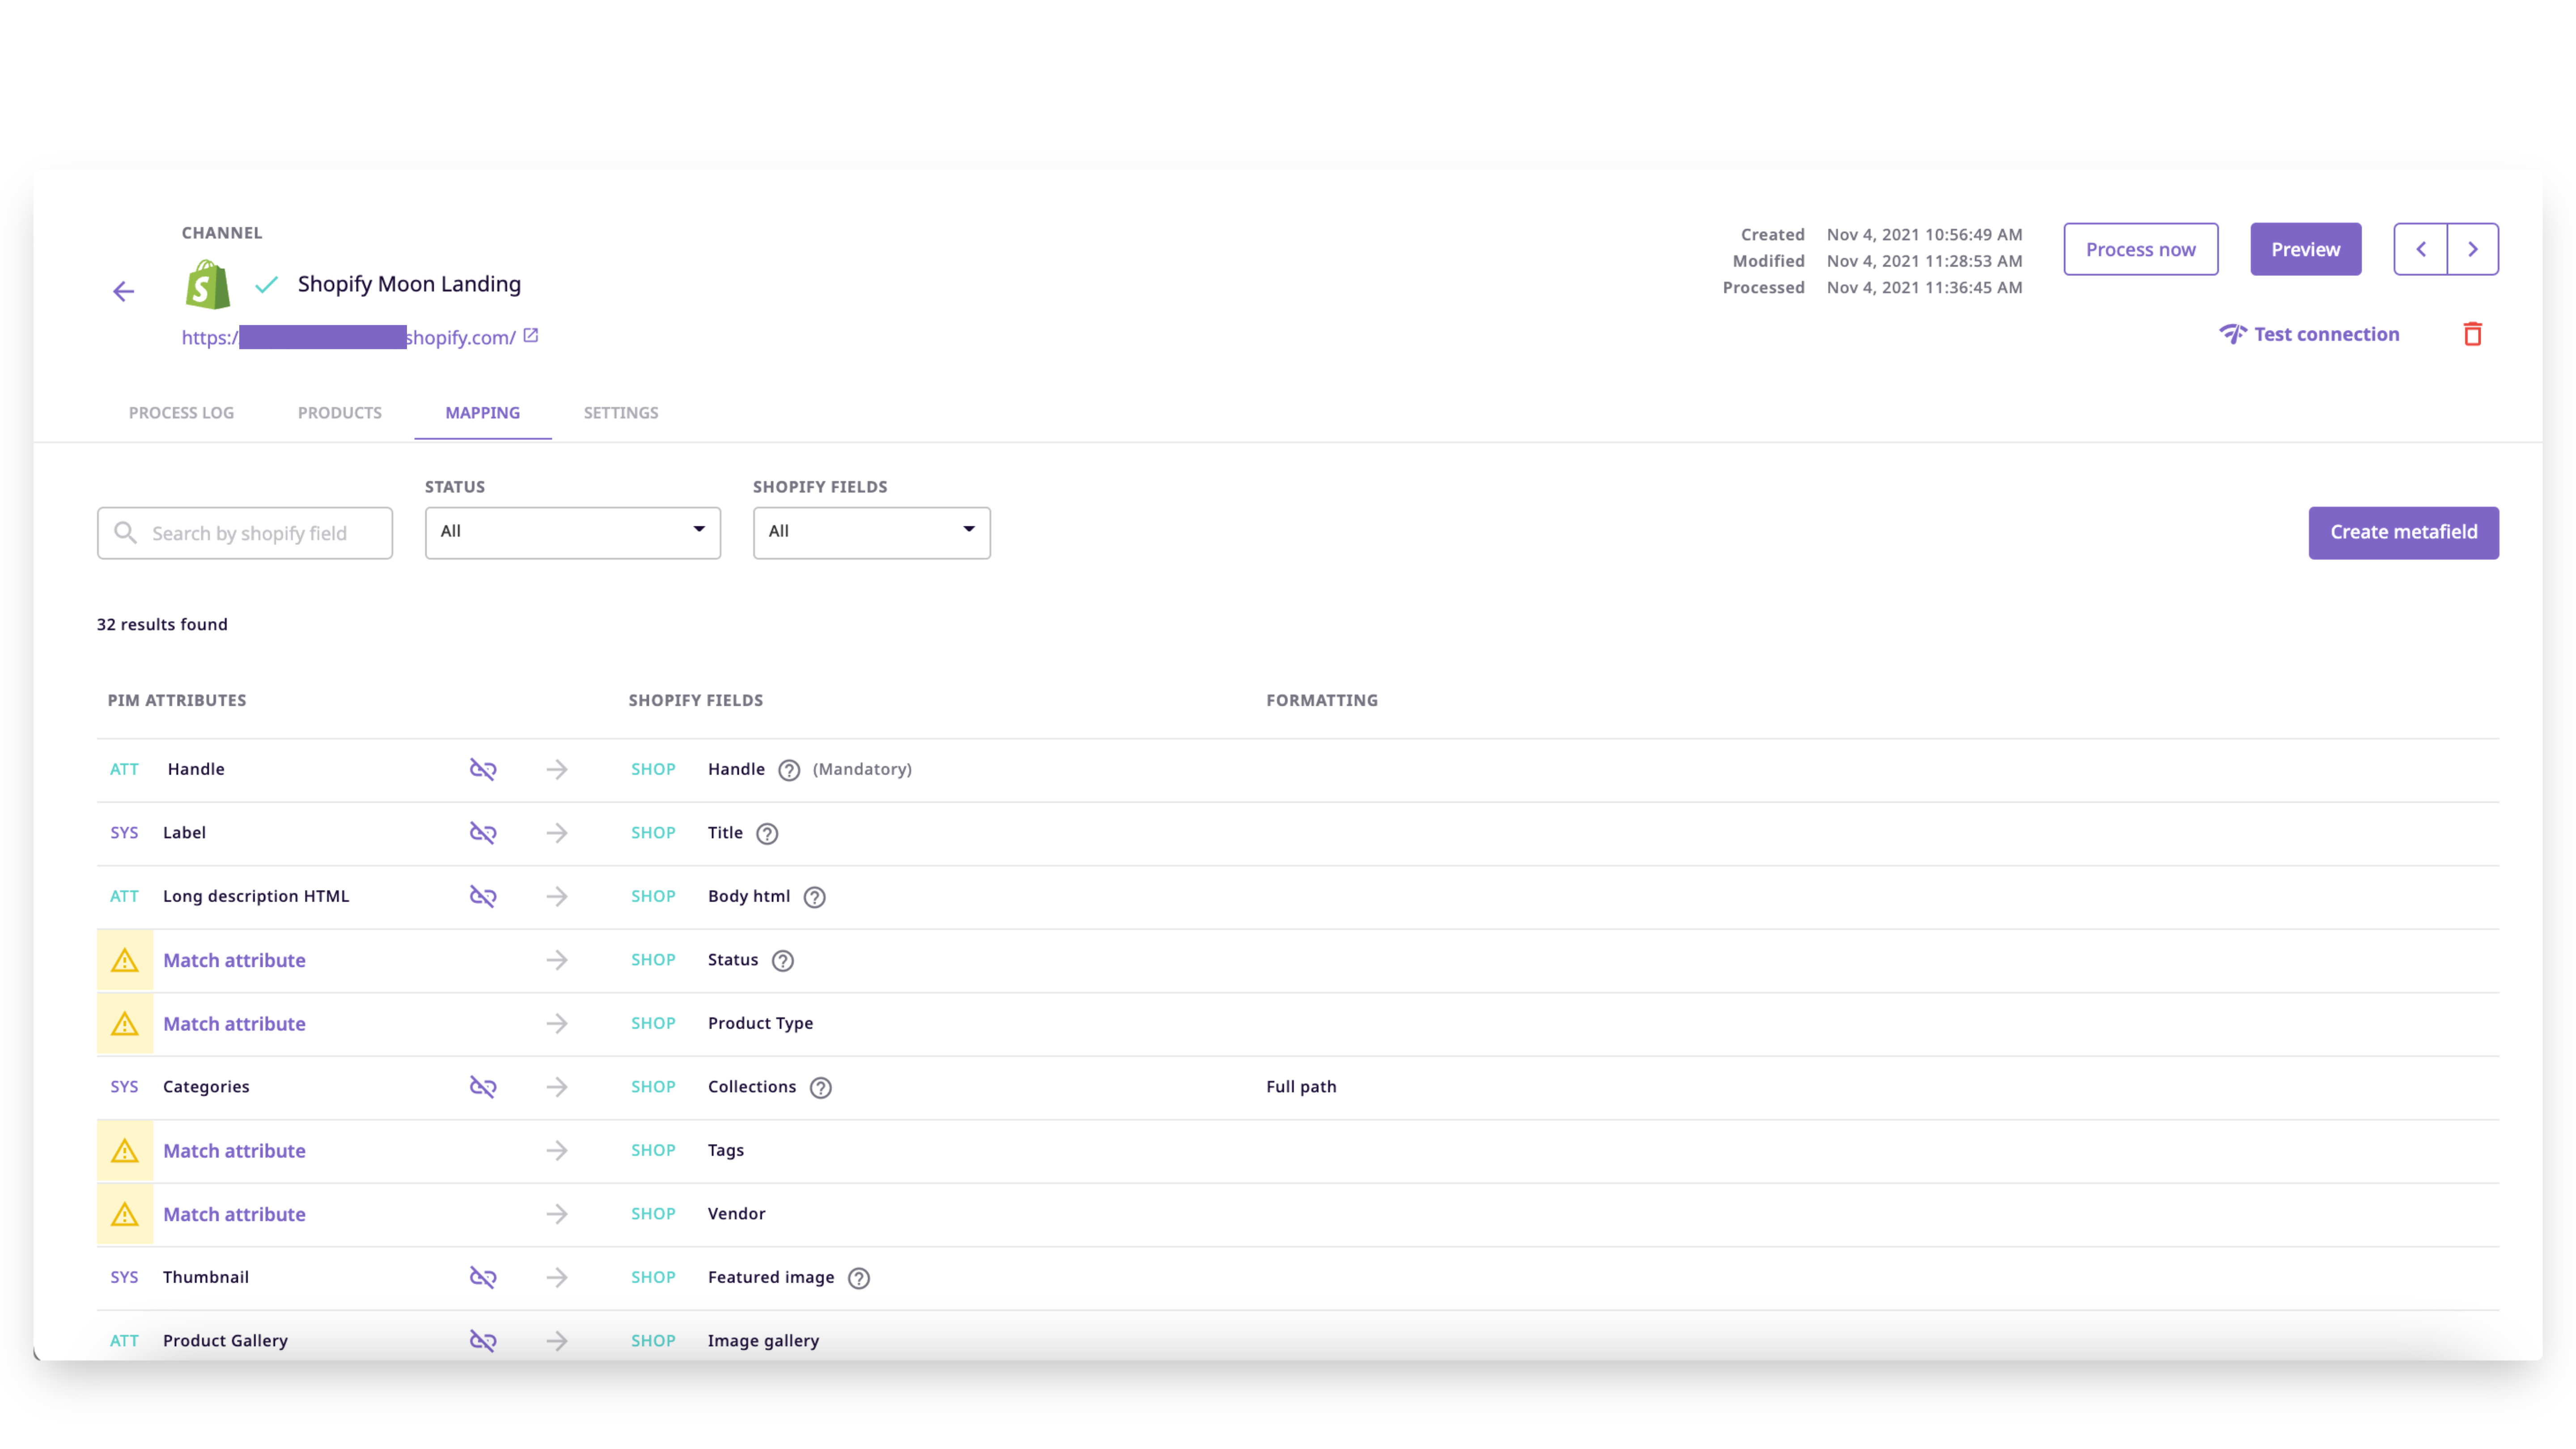
Channel Dashboard
The channel dashboard gives you essential information about the channel. The following are some of the elements you can find on your dashboard:
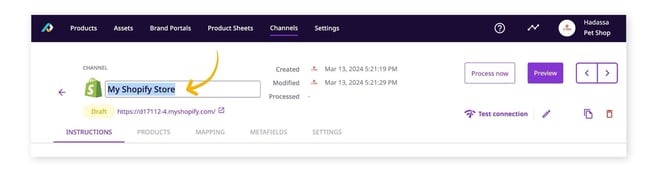
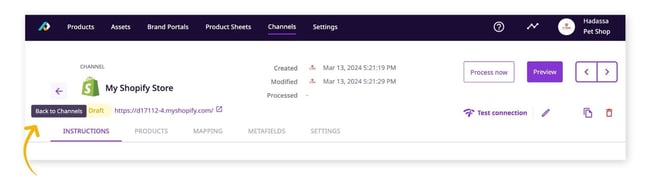
Channel Name and Status
At the top left, you can see a section that shows the channel name and type.
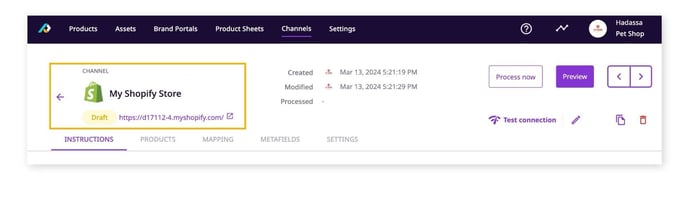
Here you can:
- Change the channel name, then hit "enter" to save.
- Go back to the channel overview by clicking on the arrow
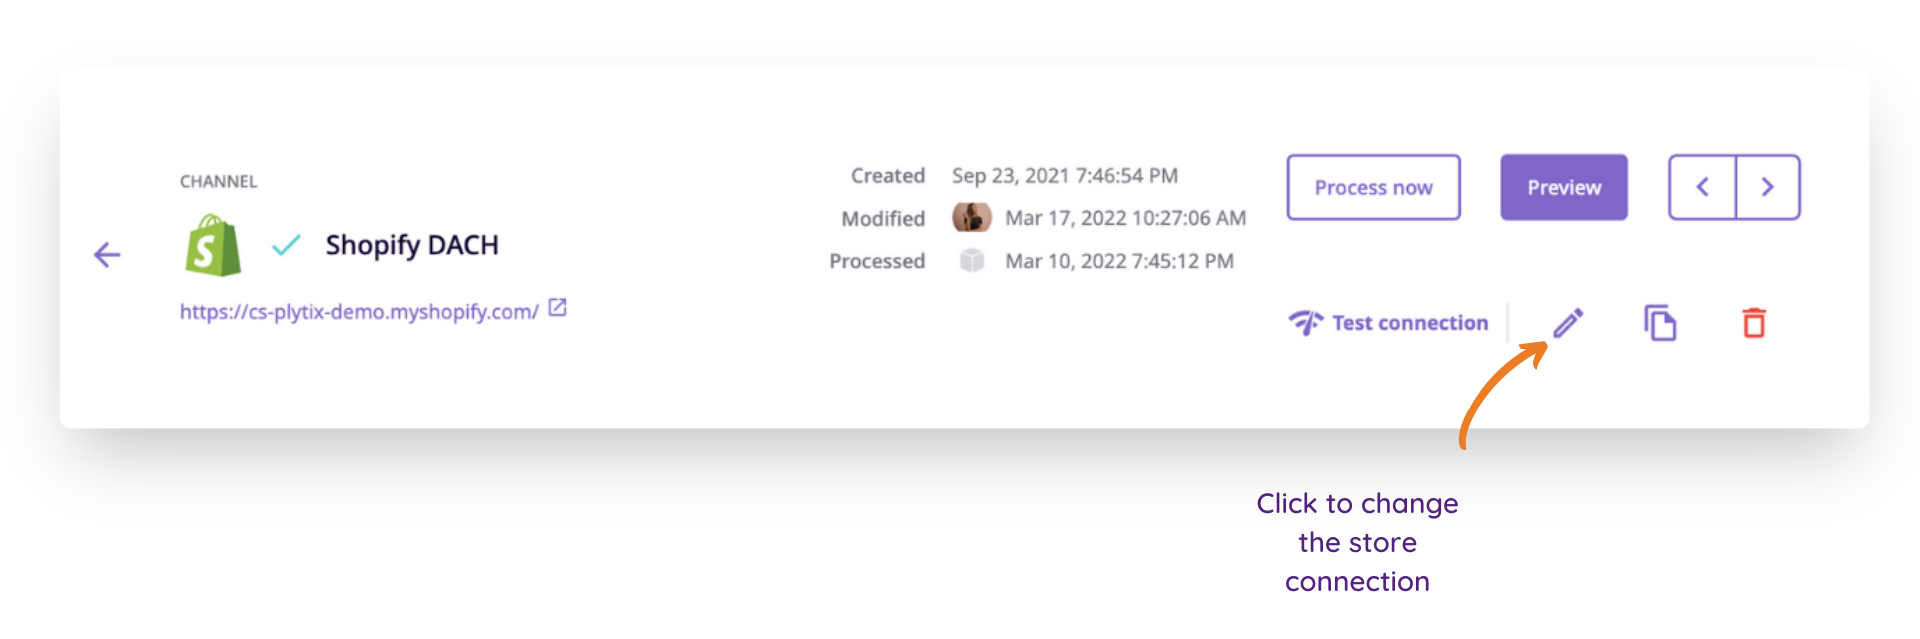
Processing Information
At the top right, you can see information related to processing the channel.
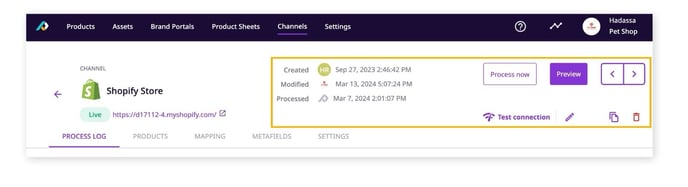
Here there are a few bits of information and some actions you can take.
Information:
- Created: the time the channel was created
- Modified: the last time the channel was updated in any way
- Processed: the last time a channel was processed either manually or on a schedule
Actions:
- Process Now: this will manually process the channel, pushing information to your Shopify store
- Preview: See what your product content looks like before you send it
- Arrows: these arrows will take you to the previous/next channel
- Test Connection: this tests to see if your store connection is still valid
- Pencil Icon: Change the Connection for your Channel
- Page Icon: Duplicate Your Shopify Channel
- Trash Icon: Delete your Shopify Channel
Process Log
The process log shows the records of the last time information was pushed from Plytix to Shopify. If this is your first Shopify channel the log will be empty until you process it for the first time.
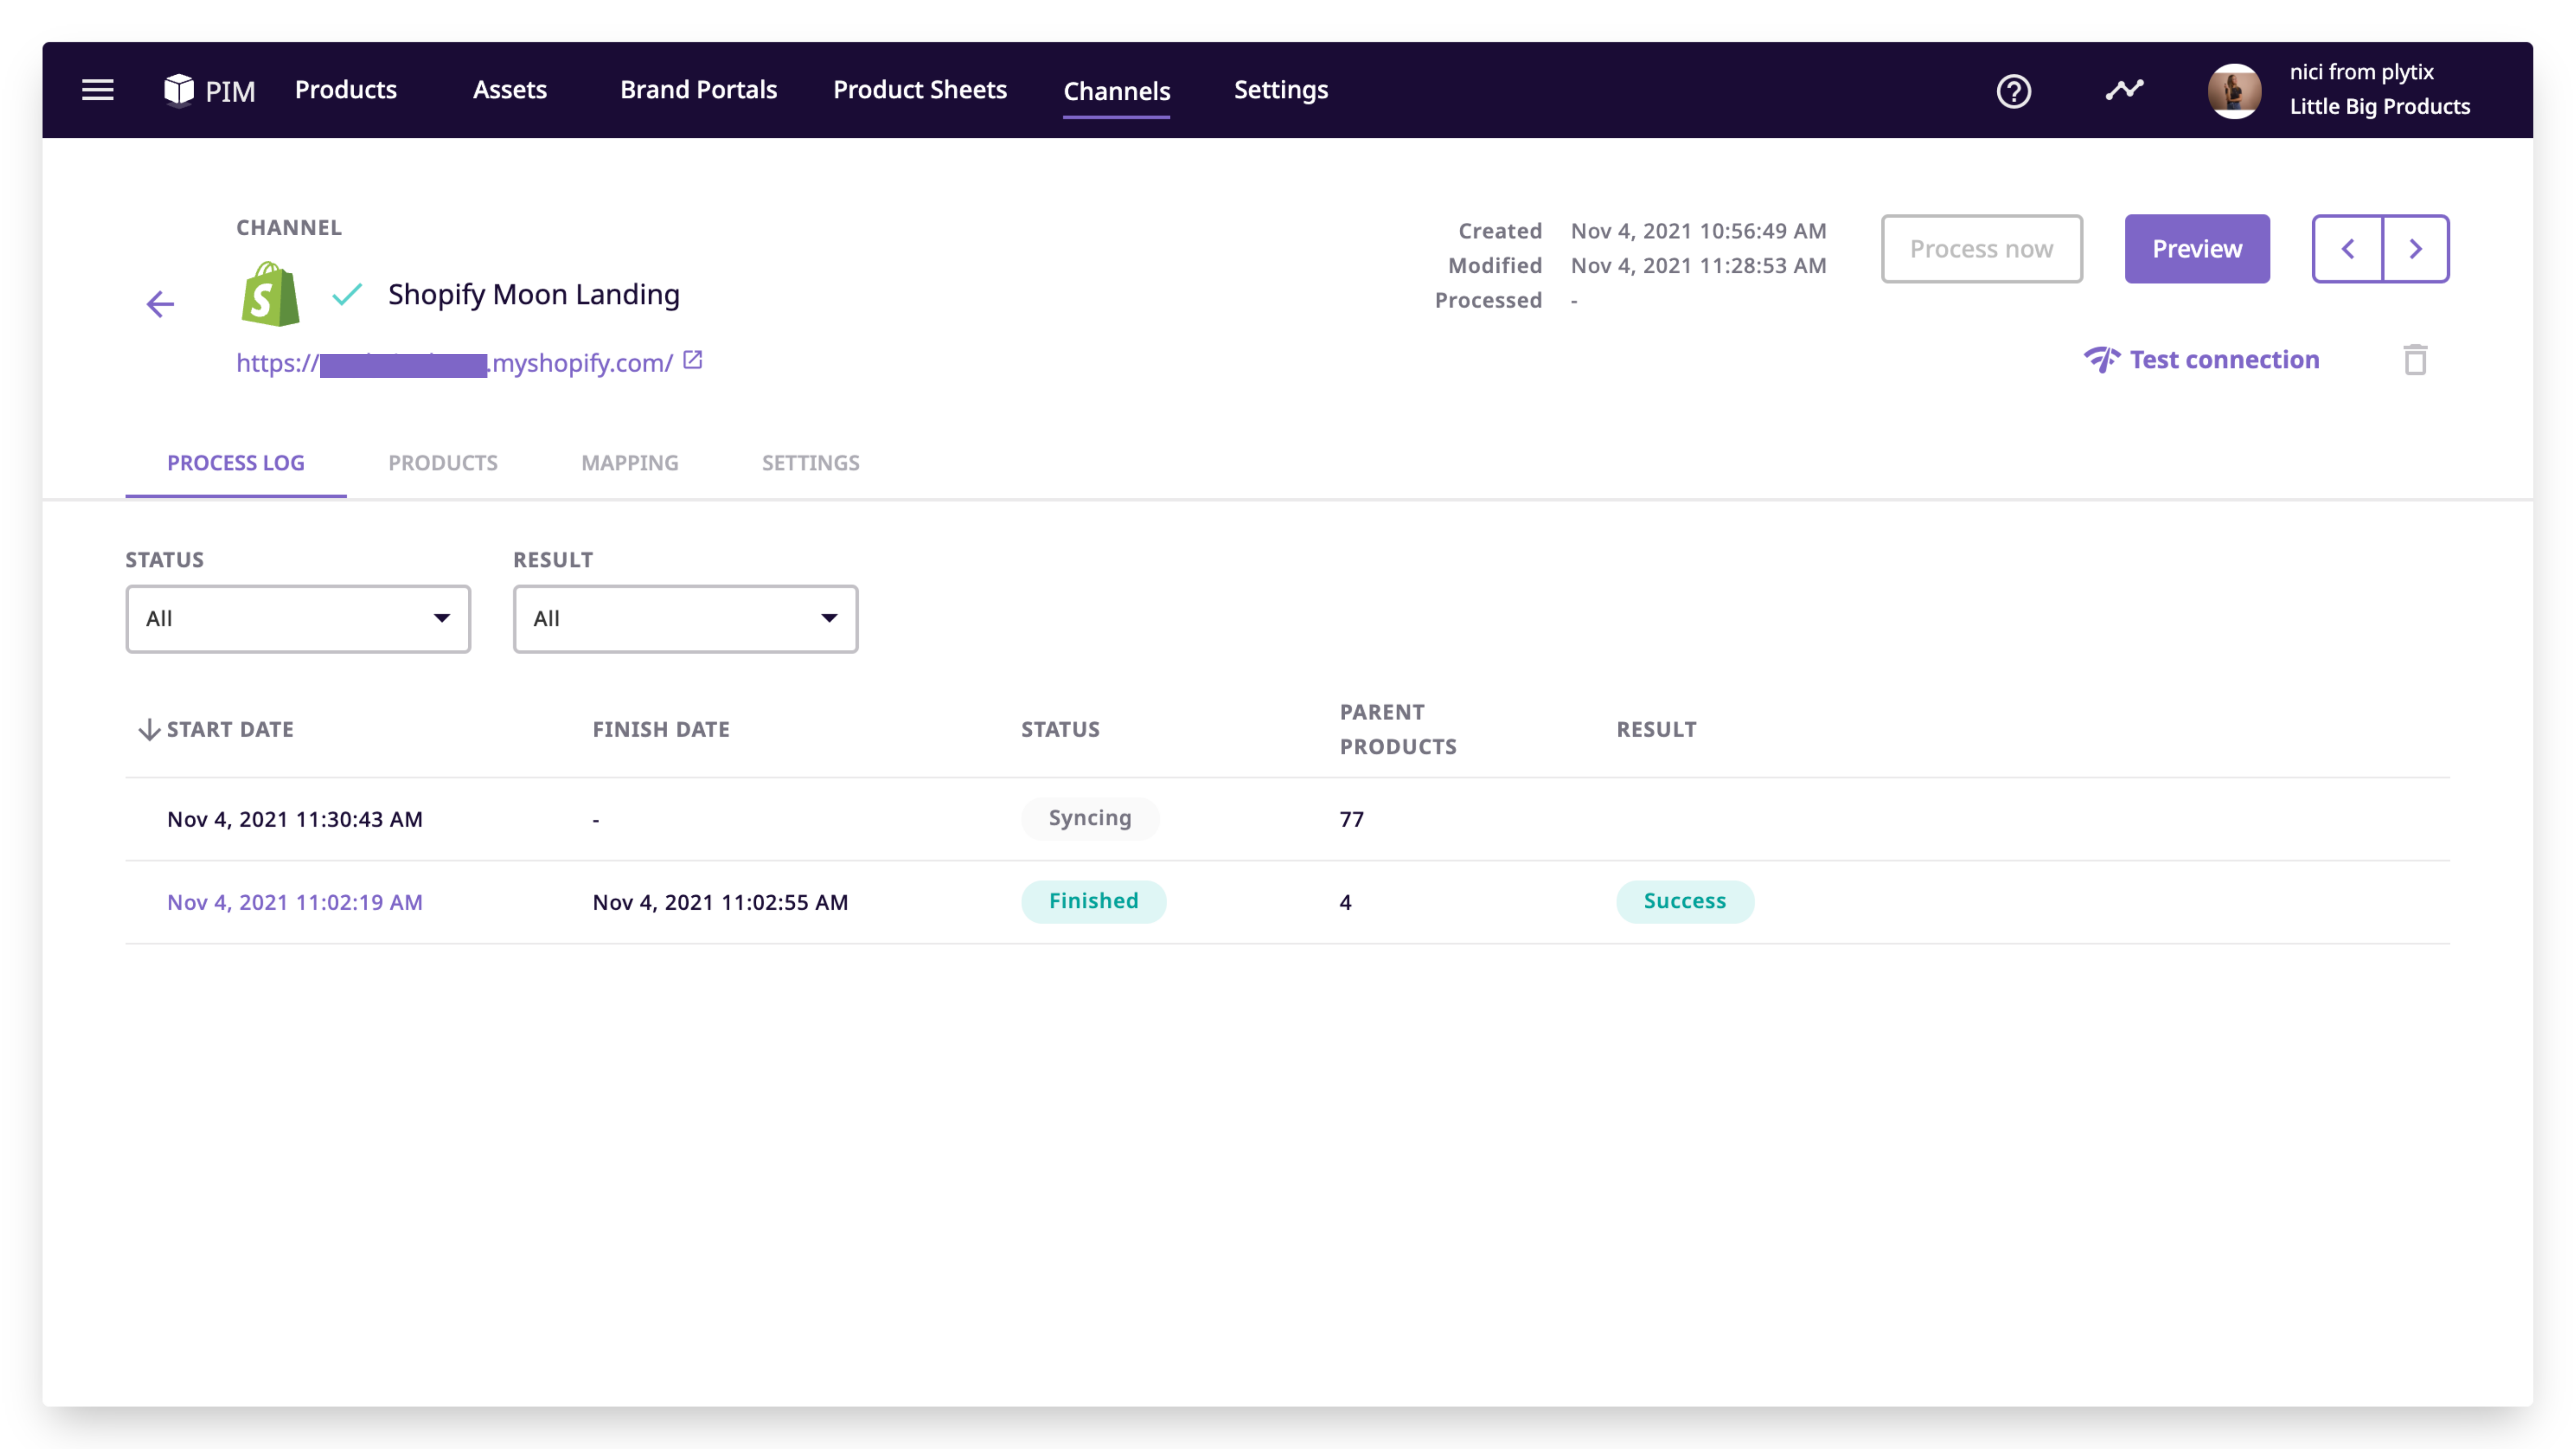
The log shows:
- Start Date: the date and time the process was started
- Finish Date: the date and time the process completed
- Status: if the process is 'Syncing', 'Processing', 'Canceled', or 'Finished'
- Products: how many products were processed
- Result: if the information was sent correctly, as 'Success', if not, as a note with the number of errors the process had.
ℹ️ Once you process a Shopify Channel, the processing is divided into two stages with the caching system: “processing” and “syncing”. During the “processing” stage Plytix scans the products you are sending to your store and identifies those that are new or modified compared to the information stored in the cache. Then, new and modified products are synced into your Shopify and are cached for future reference. Learn more about processing a Shopify Channel here.
Log Detail
If there are any errors in processing, you can check what happened at a product-level by clicking on the 'Start Date' information of a process. This will take you to the log detail.
Here you will be able to review error messages from Shopify to remedy the issue. Click on the 'info' icon to see more information about the error.
In the log detail you can also see:
- Action: If the product was "Created", "Updated", or "Skipped" (a product is "Skipped" after processing the channel, when it was already cached and hasn't experienced any changes since the last sync).
- Result: If a new or updated product was correctly processed, you will see the result as "Success". If there were any errors with processing it to your store, the result will show as "Error". If a product that was already cached is processed again with no updates to it, it will be skipped and thus the result will show up as blank.
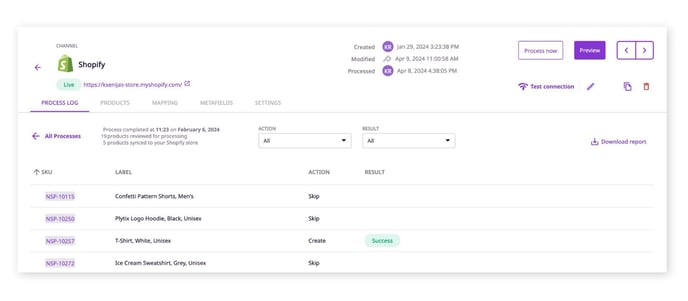
You can also download a report of your processing, either from the log detail page or by hovering over a specific process in the "Process Log" overview page.
ℹ️ Click on the info icon to see a more detailed error message that tells you what exactly caused the error to happen.
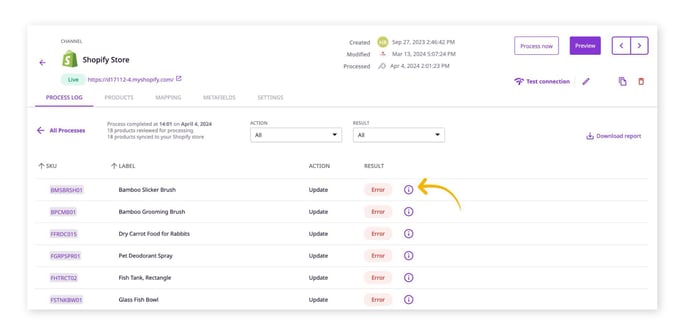
💡 In the log detail, click on the SKU of a product to be redirected to that product's detail page.
Products
In this section, you will assign a product list to your Channel. This product list defines the products that will be sent to this Shopify store.
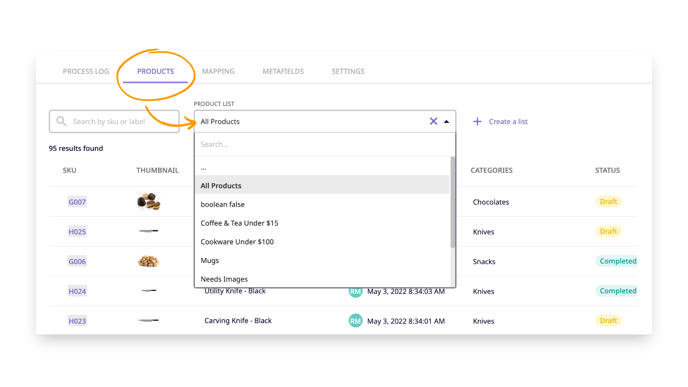
💡 To avoid affecting already existing stored information in the Shopify cache, we highly recommend to make any product changes directly in your Shopify product list, rather than frequently changing the list you're working with.
Mapping
Here you will match attributes from Plytix to Shopify fields.
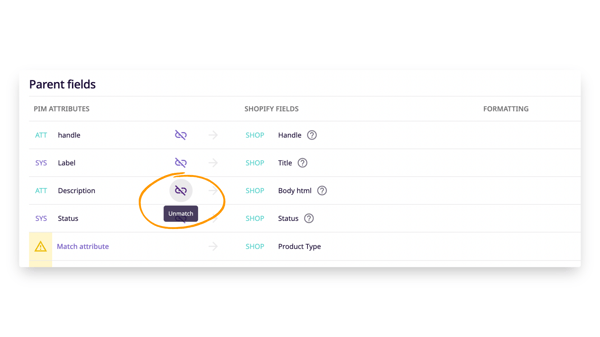
ℹ️ The fields in our connector are separated into two groups: Parent fields and Variant fields. However, this is simply for organizational purposes. If you sell simple products (products without variations) you may match attributes to any of the parent and variant fields, with the exception of Option Name and Option Value.
Shopify Fields
There are a few required fields to make sure your product content gets to your Shopify store:
- Handle
- Title (when creating new items)
As an additional reminder, always remember to make sure all of your sellable products have a value for their key attributes - like price - when you link them in the connector.
💡 Each Shopify field has certain requirements for formatting. 👉 Use this guide 👈 to make sure you match the right content from Plytix to Shopify.
⚠️ Handle and Title are required fields when creating new items.
Mapping Attributes
To map a new attribute:
- Click on 'Match attribute' in the "PIM Attributes" column
- Select the attribute you want to match, or create a Computed Attribute
- Then click 'Apply'
- To save your changes, click 'Save changes' in the save bar that appears at the top
To unmatch, click the 'Unmatch' icon.
Formatting Attributes
Just like with other channels in Plytix, you are able to make attribute transformations for each of your attributes. To do this:
- Hover over the attribute you want to edit
- If it has transformation options available, a "Settings" icon will appear to the right
- Click the "Settings" icon, and all the options will appear
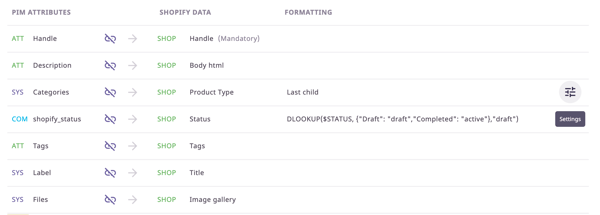
- Make your changes
- Click 'Apply'
- Click 'Save Changes' to save your transformations
Metafields

There are two types of Shopify metafields: metafields with definition and metafields without definition.
To create a new metafield:
- Click on the 'Create metafield' button and a popup will appear.
- Click on 'Definition' (selected by default) or 'No definition'.
- For metafields with definition, choose whether it is a 'Product' or 'Variant' metafield.
- Type a namespace and key name, and select a value type. If creating a metafield with definition, type a definition name. It is optional to type a description. You can also select if you want to 'Expose this metafield to Storefront API requests' or if you want to use the metafield in automated collections.
- Click on 'Create Metafield' in the top right corner of the window.
- After creating your metafield, you can match it to an existing attribute or create a computed attribute to match with it by clicking on 'Match metafield'.
- Select an attribute from the list or click on 'Create computed'.
- Click 'Apply'.
- Click 'Save changes' at the top of your channel to ensure the new metafield is saved.
💡 To learn more about metafields, 👉 Use this guide 👈. Learn more about creating computed attributes in our article, Creating Computed Attributes.
Metafields with definition
Plytix currently supports ten types of metafields with definition:
- Single Line Text
- Multi Line Text
- Integer
- Decimal
- Color
- Date
- Date and Time
- JSON String
- True or False
- URL
Metafields without definition
Plytix currently supports three types of metafields without definition:
- Integer
- String
- JSON String
Settings
The Settings tab lets you set up feed scheduling and how metafields are managed.
Scheduling
To enable feed scheduling, click the toggle next to "Set up periodic processing for your feed." This will open settings to configure when information is automatically sent to your store.
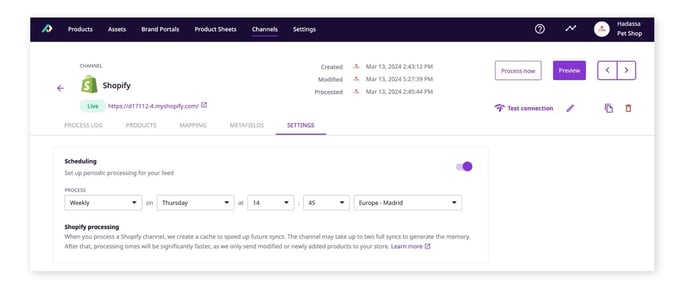
ℹ️ Note that enabling scheduling will automatically change your channel's status from "Draft" to "Live", making it count towards your total number of live outputs.
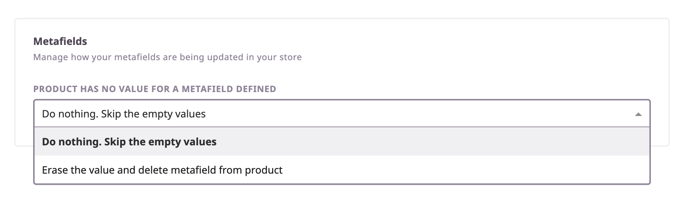
Metafields
This setting tells Shopify what to do with the metafields you have created in Plytix.
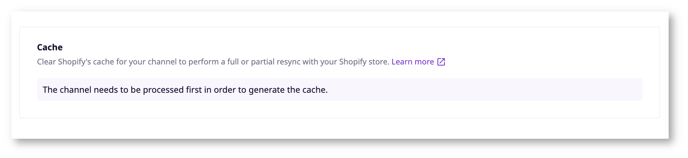
Cache
Clearing the cache lets you perform a full or partial resync of products from Plytix to your Shopify store. Before processing a new channel, it will look like this:
Once you've synced products to your Shopify store by processing the channel, you'll see the option to clear the cache:

Once you click 'Clear cache,' you'll have two options:
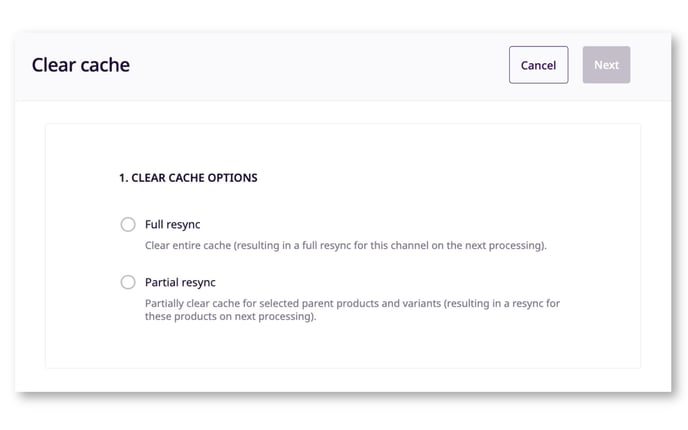
If you choose to 'Full resync,' you'll be asked to confirm in the next step by ticking the box. Click 'Next' once more to clear the cache.

If you choose 'Partial resync,' you'll be asked to select the products you wish to clear from the cache. Once you've selected the products to clear, click 'Next.'
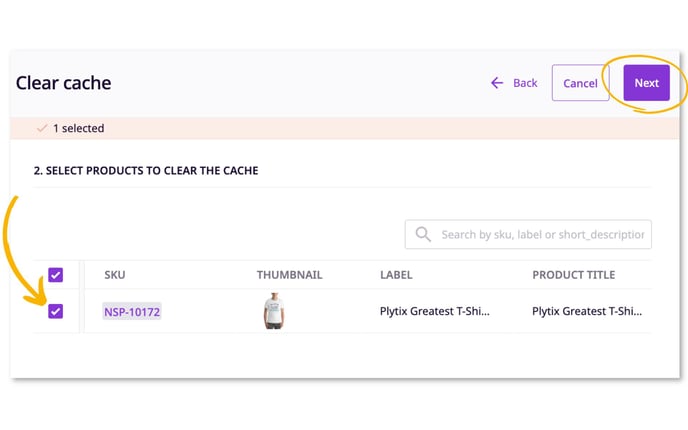
Lastly, you'll be asked to confirm in the next step by ticking the box. Click 'Next' once more to clear the cache.

Once you've selected information and settings for all the tabs in your channel, you're ready to process. Follow the steps in this article to learn how to process a Shopify channel.
Duplicating a Shopify Channel
Whenever you need a similar setup for your store, but you don't want to create an entire Shopify Channel from scratch again, you can simply duplicate any existing Shopify Channel in Plytix.
To do so, simply:
- Enter the Shopify Channel you wish to duplicate
- Hit the 'Duplicate' icon within the Channel

This will duplicate the entire channel including the store connection and mapping options applied.
💡 You can change the store connection in your duplicated channel.
⚠️ Keep in mind that changing your connection will clear out the cache for your channel, which will impact processing times. Learn more about how processing works here.
What's next?
- Learn how to map Shopify fields
- Learn how to import a Shopify CSV template into Plytix
- Learn how to get the API access token from your Shopify store
Is there anything you were hoping to find in this article that is missing? Did this article answer the questions you had? Let us know in our Help Center feedback form! 🙌
If you have any questions just click on the chat box in the bottom-right corner and we'll be happy to answer them...
and please let us know 👇