How to create CSV data feeds for your Facebook and Instagram marketing through the Facebook Commerce Manager
In this article, you'll learn how to set up a CSV feed for Facebook Commerce Manager using Plytix. This requires you to have a Plytix account with the Channels feature enabled.
ℹ️ Please note that this guide is intended as a useful resource for Plytix customers, but Plytix cannot be held responsible for use of third-party tools.
Attributes for Facebook Catalog
Uploading to Facebook (Meta) Commerce Manager
*Skip to any section in this article by clicking on the links above
Setting up a CSV Channel
Like all Channels in Plytix, a CSV Channel lets you customize the products and attributes you want to use to populate your template. To get started, you first need to create a Channel:
- Go to the 'Channels' area in the top navigation menu.
- Click 'Add Channel'.
%20-%20Creating%20a%20CSV%20Feed%20for%20Facebook%20Catalog%20Manager%20(Meta%20Commerce%20Manager)/add-channel.jpg?width=655&height=352&name=add-channel.jpg)
- Select the 'CSV or XLSX' format option and then click the purple 'Add Channel' button.
%20-%20Creating%20a%20CSV%20Feed%20for%20Facebook%20Catalog%20Manager%20(Meta%20Commerce%20Manager)/select-csv-channel.jpg?width=655&height=362&name=select-csv-channel.jpg)
Once inside the Channel, you'll need to select the attributes you want to be included in your Facebook Catalog XML feed.
Attributes for a Facebook Catalog
💡 Before you begin this step, it's best to prepare a CSV that is formatted according to Facebook standards. The instructions in this section will explain how to add attributes using the Facebook CSV template that can be found here.
Please note that Facebook's requirements could change at any time. Please refer to the Meta Business Help Center to have the most up to date information about setting up these feeds.
1. After you've created a new channel, it will open to the 'Instructions' tab, which gives a brief overview of how to set up a CSV channel. Navigate to the next tab over, named 'Attributes', and then click 'Upload CSV template'. %20-%20Creating%20a%20CSV%20Feed%20for%20Facebook%20Catalog%20Manager%20(Meta%20Commerce%20Manager)/upload-template.jpg?width=688&height=345&name=upload-template.jpg)
2. Drag and drop or select a CSV file from your computer, then click 'Next'.
%20-%20Creating%20a%20CSV%20Feed%20for%20Facebook%20Catalog%20Manager%20(Meta%20Commerce%20Manager)/csv-template-uploaded.jpg?width=688&height=315&name=csv-template-uploaded.jpg)
3. This will bring you to a preview of your product data. If your column names appear like those in the image below, click 'Next'.
%20-%20Creating%20a%20CSV%20Feed%20for%20Facebook%20Catalog%20Manager%20(Meta%20Commerce%20Manager)/template-file-format.jpg?width=688&height=387&name=template-file-format.jpg)
4. You will see a message that asks if you would like to auto-match columns with existing attributes. If you check this box, the columns with the same names of attributes you already have in Plytix will be automatically matched. Then, click 'Confirm'.
%20-%20Creating%20a%20CSV%20Feed%20for%20Facebook%20Catalog%20Manager%20(Meta%20Commerce%20Manager)/auto-match-columns.jpg?width=688&height=266&name=auto-match-columns.jpg)
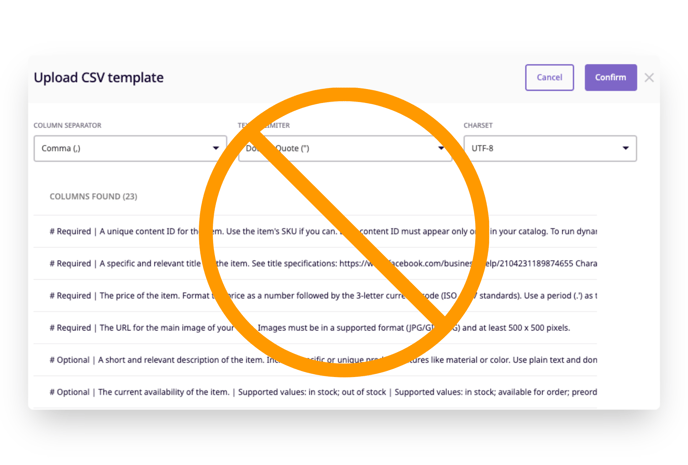
⚠️ If your preview columns look like the following image, you'll need to fix your CSV by deleting the first row. Facebook's template uses this row to describe the purpose of each column, but we need the name of each column to be first in order for Plytix to import the data correctly.
4. Once imported, your product data needs to be matched with Plytix attributes. Click 'Match attribute' to select the attribute that corresponds to each piece of data.
%20-%20Creating%20a%20CSV%20Feed%20for%20Facebook%20Catalog%20Manager%20(Meta%20Commerce%20Manager)/matching-section.jpg?width=688&height=353&name=matching-section.jpg)
5. In this example, we match the the SKU to the "id" column from the template. Confirm your selection by clicking the purple 'Apply' button. Repeat this step to match attributes to all fields.

When all your attributes have been matched, your channel should look something like this:%20-%20Creating%20a%20CSV%20Feed%20for%20Facebook%20Catalog%20Manager%20(Meta%20Commerce%20Manager)/attributes-matched.jpg?width=688&height=381&name=attributes-matched.jpg)
ℹ️ For some fields, you may need to create an attribute transformation - to format information the way that Facebook requires. For example, you can use the CONCAT operation to add a currency code after the price.
Selecting Products
The next step is choosing which products will appear in your catalog. Do this by selecting a product list from the dropdown menu under the 'Products' tab of your channel, or by clicking ' + Create a list'.%20-%20Creating%20a%20CSV%20Feed%20for%20Facebook%20Catalog%20Manager%20(Meta%20Commerce%20Manager)/add-products.jpg?width=688&height=455&name=add-products.jpg)
Settings and Scheduling
1. Now, click on the 'Settings' tab of your channel. Give your feed file a name and be sure that the output format is set to CSV.
%20-%20Creating%20a%20CSV%20Feed%20for%20Facebook%20Catalog%20Manager%20(Meta%20Commerce%20Manager)/file-settings.jpg?width=688&height=279&name=file-settings.jpg)
2. It's also a good idea to set up automatic processing of your feed-- when you add new products or make changes, these updates will appear in your catalog. To do this, scroll down to the "Scheduling" section. Use the switch to activate scheduled processing and choose how often you would like it to occur according to how often you update products.
%20-%20Creating%20a%20CSV%20Feed%20for%20Facebook%20Catalog%20Manager%20(Meta%20Commerce%20Manager)/scheduling.jpg?width=688&height=302&name=scheduling.jpg)
⚠️ Enabling scheduled processing will automatically turn your channel into "Live" and it will be counted towards your total number of Live Outputs.
Processing Your Channel
1. Your channel is almost ready. The last thing you'll need to do is process it by clicking 'Process now'.
%20-%20Creating%20a%20CSV%20Feed%20for%20Facebook%20Catalog%20Manager%20(Meta%20Commerce%20Manager)/process-now.jpg?width=688&height=287&name=process-now.jpg)
2. Click the purple 'Start processing' button.%20-%20Creating%20a%20CSV%20Feed%20for%20Facebook%20Catalog%20Manager%20(Meta%20Commerce%20Manager)/process-options.jpg?width=688&height=265&name=process-options.jpg)
3. When your channel has finished processing, you will see a link appear just under the name of the channel. You can copy the link by clicking the 'Copy' icon.
%20-%20Creating%20a%20CSV%20Feed%20for%20Facebook%20Catalog%20Manager%20(Meta%20Commerce%20Manager)/copy-url.jpg?width=688&height=267&name=copy-url.jpg)
Adding the Feed to Facebook (Meta) Commerce Manager
The last step in this process must be completed by logging into your Meta Business Manager Account. Once you have logged in, proceed to the Commerce Manager tool and select the catalog you'll be using your feed to update.
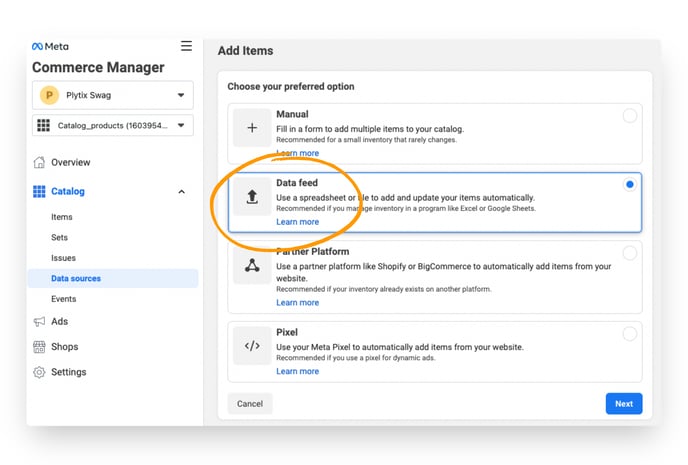
1. In the menu on the left side, click on 'Data Sources', then select 'Data feed'.
2. You'll then be asked "Is your spreadsheet or file ready?" Since we used the facebook template to complete the CSV for our channel on Plytix, select 'Yes' and 'Next'.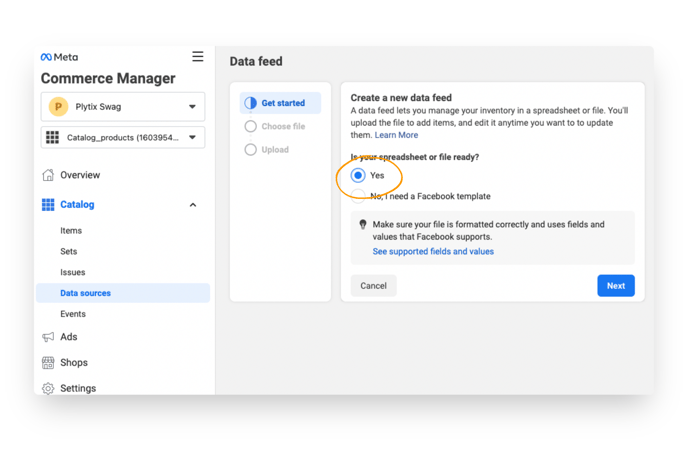
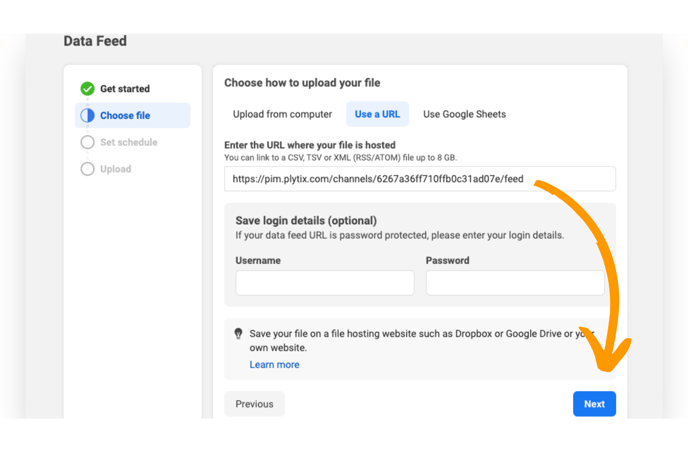
3. On the next screen, select 'Use a URL' and paste the link that you copied from your channel in Plytix. Then click 'Next'.
4. Schedule updates to your catalog by choosing a time hourly, daily, or weekly. You can also opt to add automatic updates when facebook detects a new version of your feed. Click 'Next' again.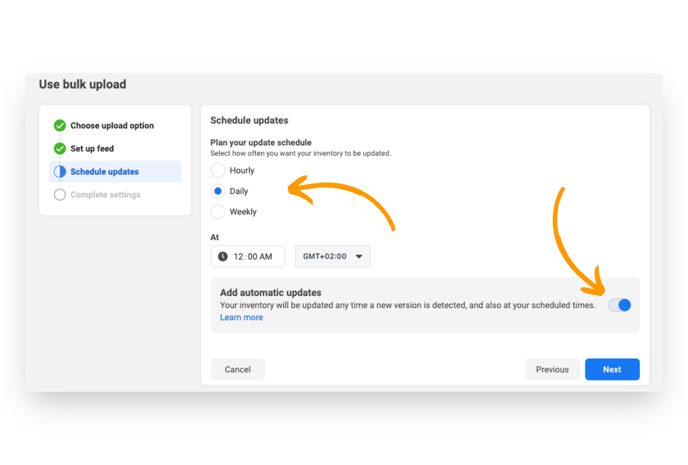
5. All that's left to do is name your data source, select your default currency and click 'Upload'.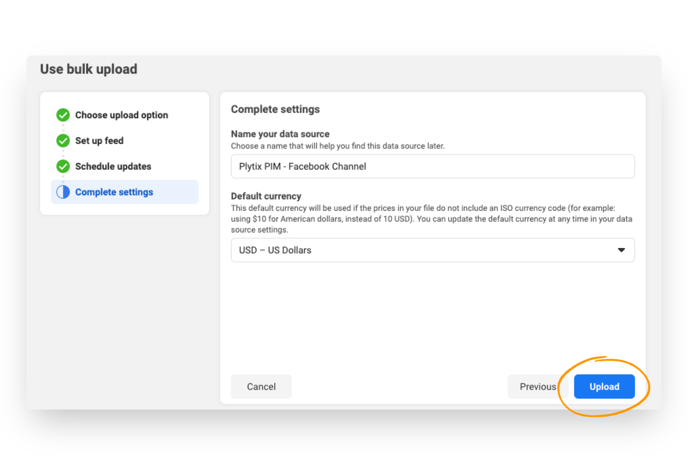
Once your feed has finished uploading, your products will be displayed within your Commerce Manager catalog. If you receive any error messages, simply fix the error in your feed, process it in Plytix, and update again.
What's Next
- Learn how to create a channel
- Learn how to create an XML feed for Facebook Commerce Manager
- Learn how to create a product data feed for Google Merchant Center