
In this article, you'll learn how to set up an XML feed for Facebook Commerce Manager using Plytix. This requires you to have a Plytix account with the Channels feature enabled.
ℹ️ Please note that this guide is intended as a useful resource for Plytix customers, but Plytix cannot be held responsible for use of third-party tools.
Attributes for Facebook Catalog
Customizing the feed for Facebook's specifications
Adding the feed to Meta Commerce Manager
*Skip to any section in this article by clicking on the links above
Setting up an XML Channel
💡 If you already have an XML feed for Google Merchant Center created in Plytix, you can clone it for Facebook and then tweak it from there to work faster.
As all Channels in Plytix, an XML Channel lets you customize the products and attributes you want to use to populate your template. To get started, you first need to create a Channel:
- Go to the 'Channels' area in the top navigation menu.
- Click 'Add Channel'.
- Select the 'XML' format option and then click the purple 'Add Channel' button.
%20-%20Creating%20an%20XML%20feed%20for%20Facebook%20Catalog%20Manager%20(Meta%20Commerce%20Manager)/add-xml-channel.jpg?width=670&height=375&name=add-xml-channel.jpg)
Once inside the Channel, you'll need to select the attributes you want to be included in your Facebook Catalog XML feed.
Attributes for Facebook Catalog
The first tab in your XML Channel setup is called 'Attributes'. This is where you'll add all the content you want to appear in your XML feed.
ℹ️ In this article we demonstrate only basic requirements to set up a Facebook feed. You may wish to further customize your feed depending on your products.
Facebook Reference Material
Facebook's requirements could change at any time. Please refer to these documents provided by Facebook to have the most up to date information about setting up these feeds.
Choosing and Transforming Attributes
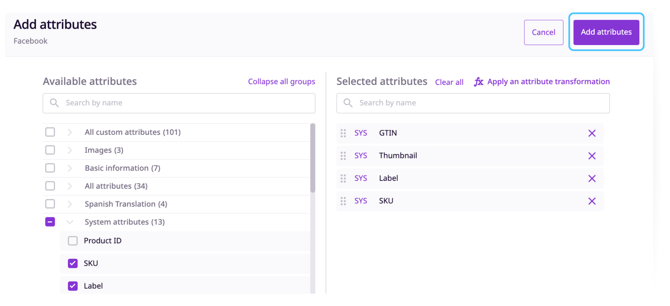
In the 'Attributes' tab, select the attributes you want to make up your feed.
- Click 'Add Attributes'.
- Select the attributes that have the content (not necessarily the name) that matches the content you want to output in the feed. When you are finished, click the purple 'Add attributes' button.
Now that you have selected your attributes, you may need to transform them. To make any transformations, click the 'Options' icon next to the attribute or add a new Attribute Transformation.
💡 All attributes can be configured to show a different output name and other handy options. You can also create new attributes based on formulas by adding an Attribute Transformation.
| Common transformations | Use |
| CONCAT formula | To set up new, competitive titles or descriptions based on other attributes |
| ESCAPEHTML and ESCAPESTYLE operations | To remove formatting to create plain text descriptions for Facebook |
| Image re-formatting from TIFF to JPEG or PNG | To get an acceptable image format output |
| Image resizing | To make sure all high-res images meet the file size requirements |
| Math formulas | To set the right price for Google Shopping |
| LOWER operation | To set options to all lowercase |
⚠️ Note that changing the output labels in the "Attribute" tab will not change the names of the attributes within your feed. We will show you how to change the names directly in the XML feed later on in this article.
Choosing Products
Add a Product list containing the products you want to include in your feed by navigating to the 'Products' tab and choosing a list from the dropdown menu. Alternatively, you may choose to create a new list by clicking ' + Create a list'.
%20-%20Creating%20an%20XML%20feed%20for%20Facebook%20Catalog%20Manager%20(Meta%20Commerce%20Manager)/add-products.jpg?width=670&height=359&name=add-products.jpg)
Customizing the feed to fit Facebook specifications
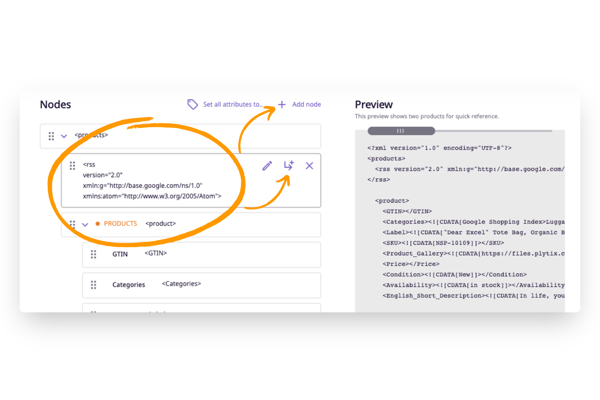
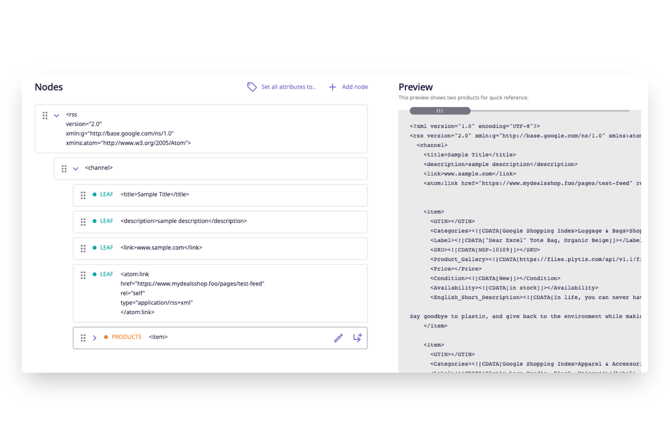
Next, navigate to the 'Format' tab, to set up the feed so it conforms with the specifications set by Facebook. With the loaded attributes and product list, a preview of the feed is generated alongside the "nodes" that contain each piece of information we need.
%20-%20Creating%20an%20XML%20feed%20for%20Facebook%20Catalog%20Manager%20(Meta%20Commerce%20Manager)/format-tab.jpg?width=670&height=360&name=format-tab.jpg)
Below we look at how to further define the XML feed.
ℹ️ Learn more about working with the XML data format in Plytix here: Define Data Format For XML Channels
Example Feed
For this example, we will be using the following sample feed provided by Facebook:
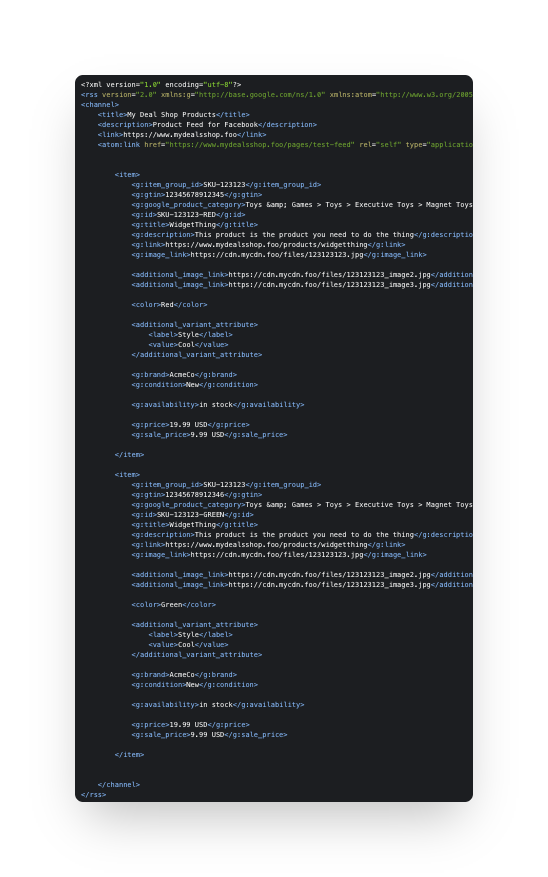
Header
The first part <?xml version="1.0" encoding="UTF-8"?> is automatically applied by Plytix.
RSS Node
Our first task is to add the RSS node. To do this:
- Click the ' + Add Node' button on the top right of the "Nodes" area.
%20-%20Creating%20an%20XML%20feed%20for%20Facebook%20Catalog%20Manager%20(Meta%20Commerce%20Manager)/add-node.jpg?width=655&height=354&name=add-node.jpg)
- An "Edit node" panel will appear where you can customize the node.
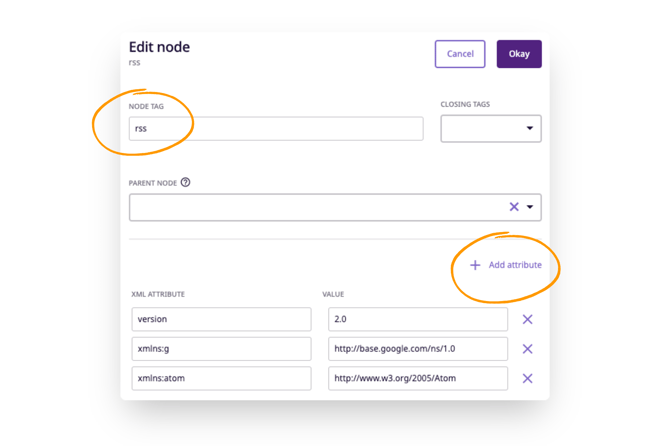
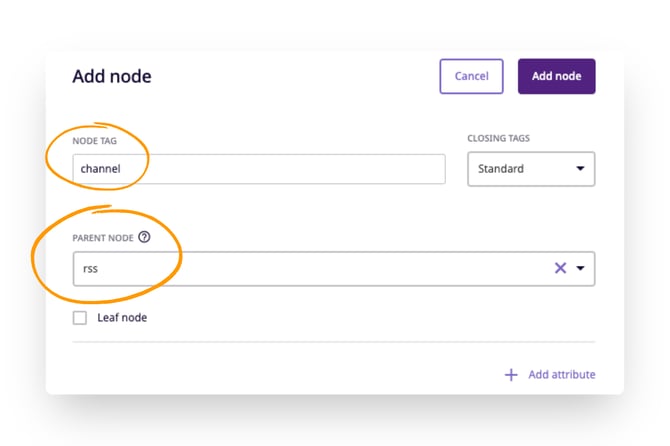
3. In the "Node Tag" input, write "rss".
4. Then we add three additional node attributes by clicking ' + Add attribute ' (below the "Parent Node" dropdown menu) three times and filling them in as follows:
- XML Attribute: version Value: 2.0
- XML Attribute: xmlns:g Value: http://base.google.com/ns/1.0
- XML Attribute: xmlns:atom Value: http://www.w3.org/2005/Atom
6. Finally, press 'Okay' at the top of the panel to add the node to the Feed builder.
Channel
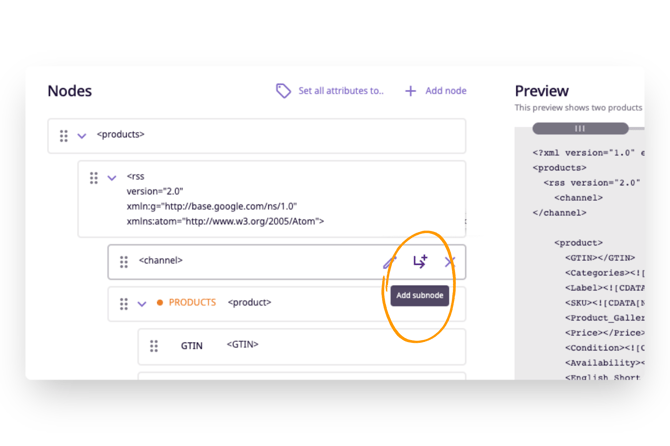
We now add a "channel" node as a sub node to the <rss> node. We do this by selecting the 'Add subnode' icon on the <rss> node or the ' + Add node' button at the top of the feed builder.
In the "Add node" panel, make sure the parent node is set to "rss". We change the "Node Tag" to "channel" and press the purple 'Add node' button.
Leaf Nodes
We can now add title, link and description nodes. These three nodes must all share the <channel> node as parent and they must be created as Leaf nodes.
- On the <channel> node, click the 'Add subnode' icon.
- Add the "Node Tag" which can be something like "title" to signify that this node contains the name of the catalog you are creating.
- Activate the 'Leaf node' switch. This will give us a field where we can write in a value. Here we have used "Sample Title" as the name of our catalog.
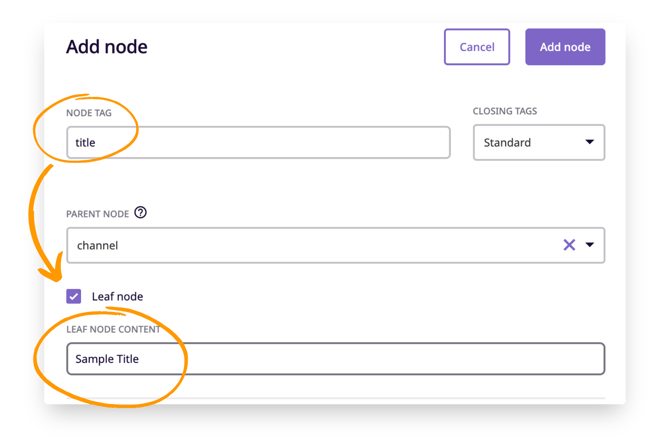
- Click 'Add node'.
- Repeat these steps twice to create "description" and "link" nodes.
- For the last leaf node we have to do something slightly different. Add a subnode to the <channel> node and make it a leaf node as before, but this time change the "Closing Tags" to "Self-closing".
.png?width=670&name=XML%20Feed%20for%20Facebook%20Catalog%20Manager%20(1).png)
- As we did with the rss node, you'll need to add three XML attributes to this leaf node by clicking ' + Add attribute' three times. Label them as follows:
- XML Attribute: href Value: https://www.mydealsshop.foo/pages/test-feed
- XML Attribute: rel Value: self
- XML Attribute: type Value: application/rss+xml
- When you have your three attributes click the purple 'Add node' button. All your leaf nodes will appear below the <channel> node.
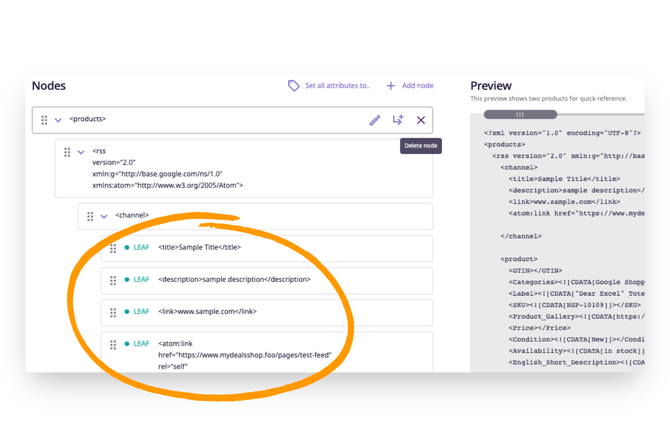
ℹ️ The 'LEAF' text in front of your node values simply indicates what type of node they are; this text will not be included in the feed.
Formatting Attribute Names
As you may have noticed in the example feed above, the names of attributes in our feed do not yet conform to facebook's specifications.
To update this:
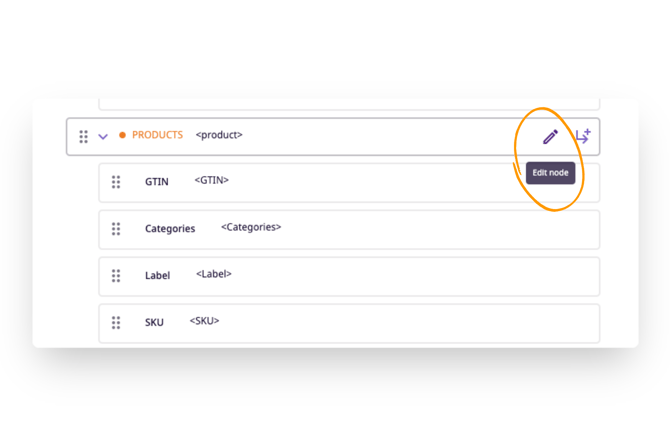
- Click on the 'Edit node' icon on the <product> node with the orange "PRODUCTS" label.
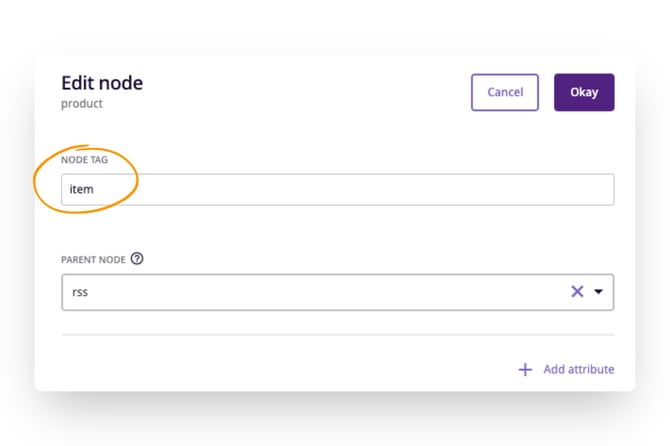
- Change the "node tag" to "item".
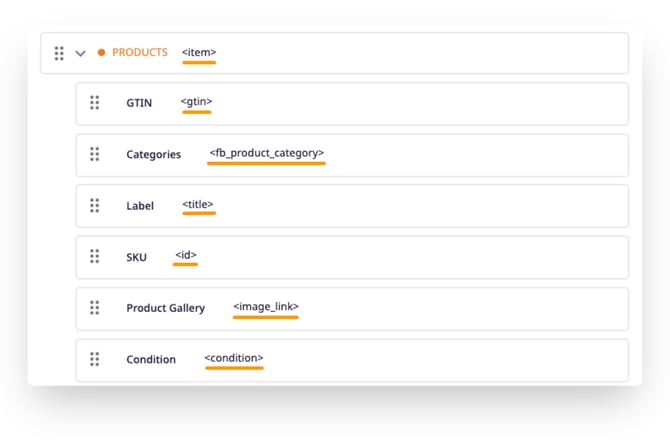
Repeat this for all node tags that require changes to conform to facebook naming conventions. Below is a table of some of the required field (attribute) names used by facebook. All required and optional field names can be found here.
| Name in Plytix | Facebook Requirement |
| SKU | id |
| Label | title |
| Description | description |
| product landing page | link |
| Hero Image | image_link |
| Brand | brand |
| Availability | availability |
| Condition | condition |
| GTIN | gtin |
When you're finished, your feed builder should look something like this:
We also need to delete to topmost <products> node that all of our items current live under.
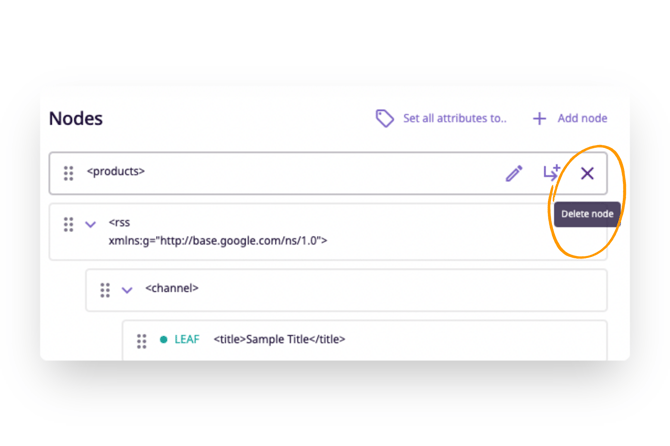
This moves all nodes up a hierarchy level and we can see that our feed content and hierarchy is starting to look a lot like what Facebook wants it to look like:
Processing the feed
Our feed is now complete. All necessary data is included, hierarchy levels are in order, and naming conventions are adjusted for Facebook.
To finalize the feed, you need to process it. This will apply and update all your product information. It will then generate a feed link and file that you can plug into Facebook Commerce Manager.
To process your feed:
- Go to the top of the Channel area.
- Click the
 button. In the next window that appears, adjust settings to update/add products and click
  .
.
Once the feed has completed processing, you will see a link appear below the feed name. Click to copy the link by clicking on the 'Copy' icon. %20-%20Creating%20an%20XML%20feed%20for%20Facebook%20Catalog%20Manager%20(Meta%20Commerce%20Manager)/copy-url.jpg?width=670&height=202&name=copy-url.jpg)
This link can be copied and pasted from Plytix into your Facebook Commerce Manager. Once your feed link is in Facebook, you can update and process your Channel to bring in new updates directly to Facebook Catalog without needing to replace the link.
💡 Schedule recurring processing in the 'Settings' tab of your Channel to automate product content updates. Note that this will automatically turn your channel into "Live", and it will then be counted towards your total count of Live Outputs.
Adding the Feed to Facebook (Meta) Commerce Manager
The last step in this process must be completed by logging into your Meta Business Manager Account. Once you have logged in, proceed to the Commerce Manager tool and select the catalog you'll be using your feed to update.
1. First, select 'Items' under the Catalog menu, then 'Add multiple items' from the 'Add items' dropdown menu. 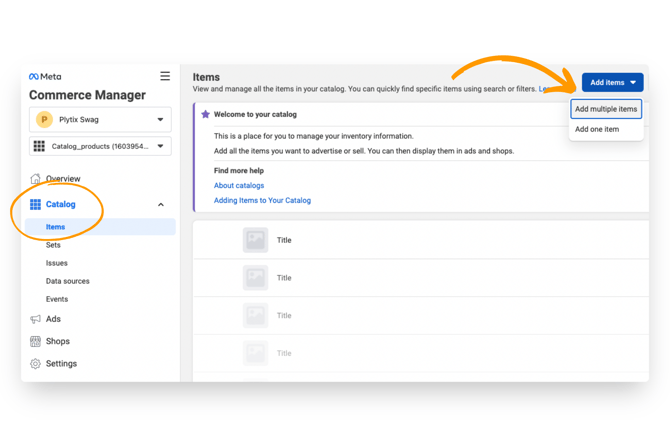
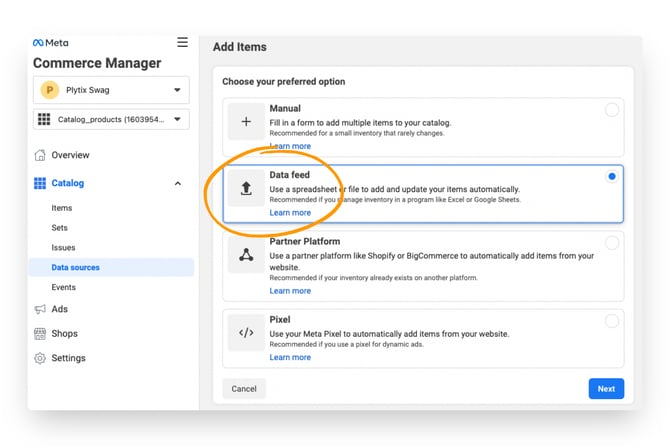
2. Several source options will appear. Select 'Data Feed' and click 'Next'.
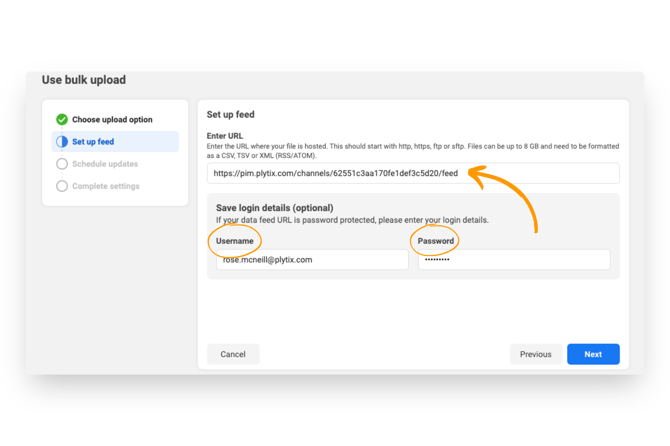
3. Next, you'll add the feed link you copied from your Channel in Plytix. Add login details if your feed is password protected. Click 'Next'.
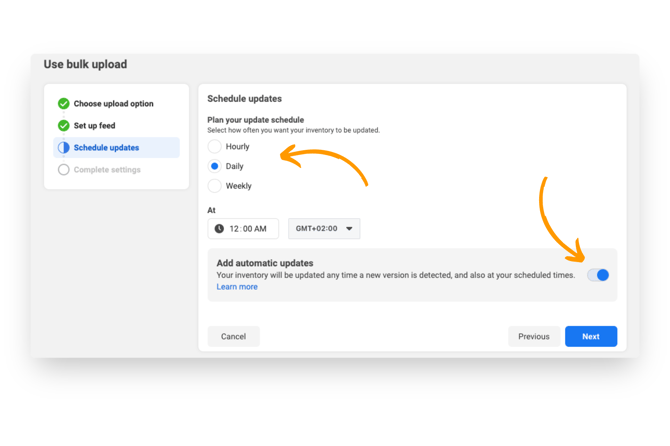
4. Choose how often you want to update your catalog using this feed. Selecting the 'Add automatic updates' option will ensure that each time your feed is processed by Plytix, it is also updated by Commerce Manager.
5. Lastly, name your data source and select a default currency to display prices, then click the blue 'Upload' button.
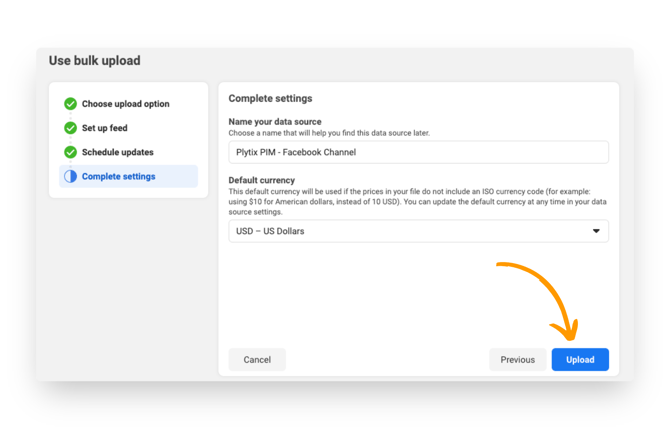
Once your feed has finished uploading, your products will be displayed within your catalog. If you receive any error messages, simply fix the error in your feed, process it in Plytix, and update again.
What's Next
- Learn how to create a channel
- Learn how to create a custom XML feed for Google Merchant Center
- Learn how to sync products to your Shopify store