
Google Merchant Center (GMC) offers different feed options to upload product data into its platform. While Plytix has a designated Google Shopping channel with a set up template to generate a primary product feed, you may want to create different feed types for GMC. In this article, you will find a guide that you can refer to in order to set up custom XML feeds for Google Shopping using Plytix.
Customizing the Feed to Fit GMC Specifications
*Skip to any section in this article by clicking on the links above
Google Reference Material
Google's requirements vary according to the type of product feed you would like to create. To have the most up to date information about setting up these feeds, please refer to these documents provided by Google:
- Specifications: XML product data feed in the RSS 2.0 format
- Product Data Specification
- Google Feed Guide
ℹ️ Plytix cannot be held responsible for the use of third party applications, but our team will be happy to assist you with sharing your data in different outputs.
Setting up your XML Feed
To start setting up your feed, head over to the “Attributes” tab to add your attributes. This is where you add all the content you want to appear in your XML feed.
ℹ️ Some product types or countries have special requirements, so don’t forget to review Google’s specifications to check requirements for your desired product or country you’re selling it to.
In the “Attributes” tab, you need to select the attributes you want to make up your feed.
- Click 'Add Attributes'.
- Select the attributes that have the content (not necessarily the name) that matches the content you want to output in the feed. You can also upload a CSV template of the right attributes you need in your store, and match it with existing attribute sin your PIM.
/add-attributes.jpg?width=655&height=342&name=add-attributes.jpg)
💡 All attributes can be configured to show a different output name and other handy output options, such as different settings per attribute type. You can also create new attributes based on formulas by adding an Attribute Transformation. Common transformations include (but are not limited to!) image resizing, changing date formats, and following a specific naming convention for your product titles.
3. If you would like to create attribute transformations for your XML channel, click 'Add Attributes' and then 'Apply an attribute transformation'.
⚠️ It should be noted that changing the names of attributes in the "Output Label" column will not change the name of the attribute in the XML feed. We will show you how to change the names within the XML feed in a later section on in this article.
After adding your attributes, add a "Product List" containing the products you want to include in your feed or ' + Create a list'.
/add-products.jpg?width=688&height=371&name=add-products.jpg)
Customizing the Feed to Fit GMC specifications
Next, navigate to the “Format” tab, to set up the feed so it conforms with the specifications set by Google Merchant Center. With the attributes and product list selected, the feed already includes the attribute data for each product. Below we look at how to further define the XML feed.
ℹ️ Learn more about working with XML data in Plytix here.
Example Feed
For this example, we will use the following sample feed:
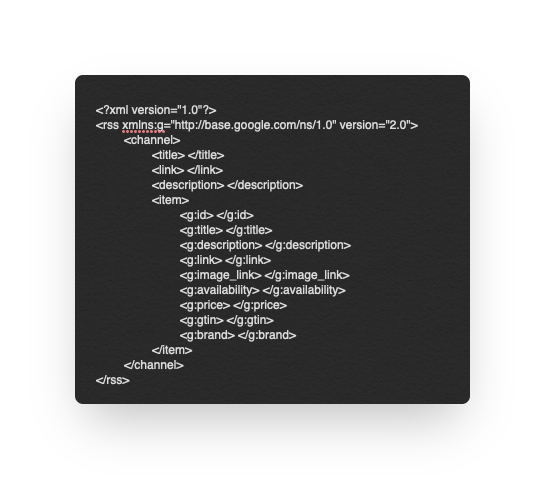
You can see full GMC feed examples here. Refer to these examples as you work with setting up your feed.
Header
The first part <?xml version="1.0" encoding="UTF-8"?> is automatically applied by Plytix.
RSS Node
Our first task is to add the RSS node. To do this:
- Click the '+ Add node' button on the top right of the "Nodes" area.
/add-node.jpg?width=688&height=377&name=add-node.jpg)
2. An "Add node" panel will appear where you can customize the node.
3. In the "Node Tag" input, remove "new_node" and write "rss"./Creating%20an%20XML%20Feed%20for%20GMC-1.png?width=688&name=Creating%20an%20XML%20Feed%20for%20GMC-1.png)
4. Add the additional information that we saw came after "rss" in the example feed shown above. This extra information will be contained in node attributes, which you can add by selecting '+ Add attribute'. A node attribute looks like this: "xmlns:g" and its value is: "http://base.google.com/ns/1.0" We add that information in the "XML Attribute" and "Value" fields as shown below.
/6.png?width=688&name=6.png)
5. Finally click 'Add node' at the top of the settings to add the node to the Feed Builder.
Channel
Our next task is to add "channel" as a subnode to the "rss" node. To do this:
- Add a new node using the 'Add Node' button.
- Set the "Node Tag" to "channel".
- Then, declare a "Parent Node" using the dropdown box to select "rss". This will place the "channel" node below the "rss" node in the Feed Builder. To finish, click the purple 'Add node' button.
/7.png?width=688&name=7.png)
Leaf Nodes
We can now add "title," "link," and "description" nodes. These three nodes must all share the "channel" node as parent and they must be created as Leaf nodes.
1. On the "channel" node, click the 'Add subnode' icon. /8.png?width=655&name=8.png)
2. In the "Add node" panel that appears, add "title" as the "Node tag."
3. Check the 'Leaf node' box. This will give us a field where we can write in the corresponding value. /9.png?width=655&name=9.png)
4. Click on the purple 'Add node' button.
5. Repeat these steps for the "link" and "description" nodes.
This will create the nodes as direct subnodes to the "channel" node.
/10.png?width=688&name=10.png)
The 'LEAF' text in front of your node values simply indicates the type of node; this text will not be included in the feed.
Product Specifications
As you may have noticed in the examples above, the hierarchy for the "products" and "product" nodes does not yet conform to the specifications in the example feed.
To update this:
- Go into the settings of "products", by clicking the 'Edit node' icon.
/11.png?width=655&name=11.png)
- Change the "Parent node" to "channel".
This will move the "products" node and all of its subnodes under the "channel" node.
/12.png?width=688&name=12.png)
By default in Plytix, a product node is called "product", so we need to change this to "item" in order to meet the GMC specifications.
/13.png?width=655&name=13.png)
To do this:
- Click the orange "product" node's 'Edit node' icon.
/14.png?width=688&name=14.png)
- After changing the "Node Tag" to 'item' it should look like this.
/15.png?width=688&name=15.png)
Next, we must delete the topmost "products" node that all our items currently live under. GMC lists all their items one after another (not under an "items" hierarchy level), so we do not need this "products" node.
To do this, click the 'Delete node' icon (X) on the righthand side of the top "products" node.
/16.png?width=688&name=16.png)
Deleting the "products" node moves everything up a hierarchy level, and we can now see that our feed content and hierarchy is starting to take shape:
/17.png?width=688&name=17.png)
Changing Attribute Names
After formatting your XML feed, you will need to change the attribute 'Node Tags' so they match GMC's naming convention.
To follow the correct naming convention for your selected feed type, make sure to check Google’s documentation.
To change your attribute names:
- Click the 'Edit node' icon for each attribute node individually.
- Change the "Node Tag" for each attribute - and a preview of the output name will display beside the attribute names with opening and closing tags (< >).
- Press 'Okay' after editing each node tag and then 'Save changes' at the top of the Channel page.
- Repeat for all attributes requiring a name change.
/18.png?width=688&name=18.png)
Processing the Feed
After following these steps, your feed will be completed! All your necessary data is there, your hierarchy levels are in order, and naming conventions are adjusted for GMC.
To finalize the feed, you need to process it. This will apply and update all your product information and generate a feed link and file that you can plug into GMC.
This can be copied and pasted from Plytix into your GMC account. Once your feed link is in your account, you can update and process your Channel to update products directly in GMC without needing to replace the link.
💡 Schedule recurring processing in the “Settings” tab of your Channel to automate product content updates or send your product data to an FTP connection. Note that enabling scheduled processing will automatically turn your channel "Live" and it will be counted towards your total number of Live Outputs.
What's next?
- Learn how to create a product data feed using Plytix’s Google Shopping Template
- Learn how to upload a CSV template into your CSV or XML channel
- Learn how to define the data format for XML channels