
ℹ️ This article is about Smart and Static lists for products. If you want to organize your assets into lists, check out the article on Smart and Static lists for assets.
Understanding the differences between Smart and Static Product Lists
Creating a Static Product List
Loading a Product List on the Product Overview
Deleting and Duplicating a Product List
*Skip to any section in this article by clicking on the links above
Uses for Product Lists
Both Smart and Static product lists can be used for internal product management and workflows as well as for presenting products for customers externally.
Here are some examples of common uses for product lists:
- Organize products: You can narrow down the products you’re working with on the Product Overview page by organizing them into segments.
- Create workflows: We know managing products is not a single-person job; just like you’re managing different products, you are probably managing different teams that interact with your products differently. Therefore, you may want to create different product lists with only attributes or requirements that are relevant for the different teams you manage.
- Brand Portals: You will be required to have at least one product list to get started with creating a Brand Portal with Plytix
- Channels: Whether you want to get started on features like creating a direct export feed for only a specific set of products, generating an export of important products to backup their data, or managing Plytix’s direct integration with Shopify, you will need at least one product list to access the different channels available on your PIM.
Understanding the Differences between Smart and Static Product Lists
In this section we will help you understand the differences between Smart and Static product lists as well as their common uses, so that you may choose which option best suits what you are trying to achieve.
Smart Lists: A smart list is dynamic; products that appear on the list depend on the conditions you set, using product filters. The list will update automatically, adding products that meet those conditions or removing them if they don’t fulfill the requirements.
This is a good option for when you are assessing factors like product completeness, working with optimizing your product information, or want to make sure that products that are sent to a specific channel are updated with the needed information to avoid incomplete fields.
|
For example:
If you want to identify which products are ready to post to your web store, you might add the filters:
1. Basic info completeness is equal to 100
2. Status is equal to Completed
3. Availability is equal to in stock
Anytime a product meets these conditions, it's added to the list. You can then use this list in a channel where it will automatically send these products to your web store. This way you never send a product with missing information.
|
Static Lists: Static lists do not update automatically; products in the list are added and removed manually. This is a good option when you only want to share a specific set of products with a client, want to gather information about a select number of products, or if you would rather manually add or remove the information you are working with.
How to create a Smart Product List
There are two ways of creating a Smart list with your products:
From the Product Overview:
- To get to the product overview, click on 'Products' in the main navigation bar, then select 'All products' from the dropdown.

- Set the filter conditions in the "Filters" menu on the right side of the screen.

- Click 'Save filters' in the left Filters menu.

- Choose a list to update or choose 'Create new list' and name it. Then click 'Save.'

Your list is now created and can be found on the Product Lists page.
From the Product Lists page:
- Click on 'Product' in the main navigation bar and select 'Lists' from the dropdown.

- Click 'Create a list.'

- Select 'Smart' from the "List Type" dropdown and give your new list a name. Then click 'Create List.'

- Creating the new list brings you directly to the list's page. Here you can choose filters by attribute or relationship to create your list.

- As you add filters, the list will automatically update to show products that match those filters.

How to create Static Product List
Unlike Smart lists, Static lists do not update automatically. Products in this list are added and removed manually. These lists are great when you only want to share a group of products with clients.
There are two ways of creating a Static product list:
Upon import:
When importing a CSV, you can create a Static list.
- Follow the steps to import a CSV.
- Under "Import Settings" check the box 'Create a static list from all imported products'.

ℹ️ A new list will be created upon completion of the import. You can find this list by navigating to 'Products > Lists' from the main navigation bar. Products added to this list will reflect the setting chosen under 'Import Products' ("add new," "update existing," "add new & update existing").
From the Product Lists page:
To create a Static list:
- Click on 'Products' in the main navigation bar. Select 'Lists' from the dropdown.

- Click on 'Create a list.'

- Choose 'Static' from the "List Type" dropdown. Give your list a name and then click 'Create List.'

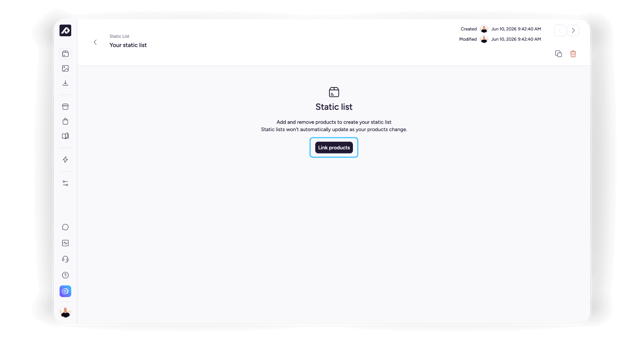
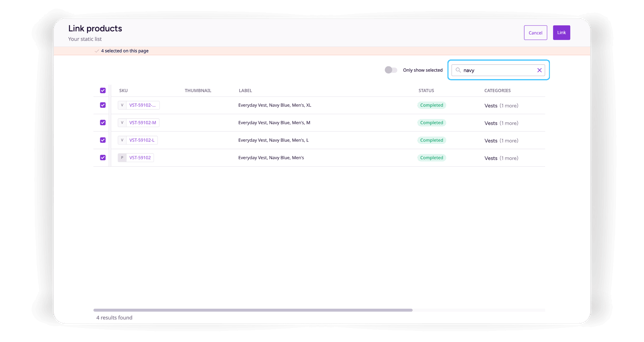
- Creating the new list brings you directly to the list's page. Here you can choose which products to link to your list. To do this, click on 'Link products.'
- Use the search bar to find products by SKU or label. Check the box next to a product's SKU to add it to the list. To finish, click 'Link.'
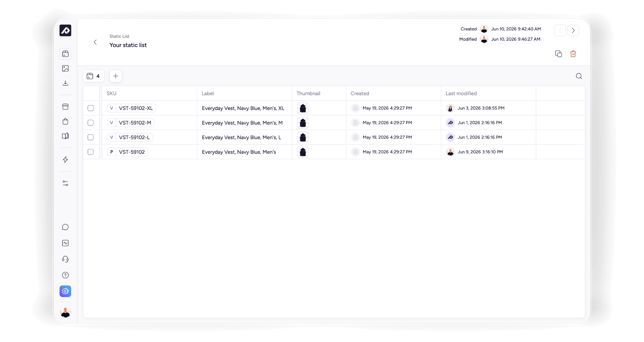
- The products you selected will now appear on the list page.
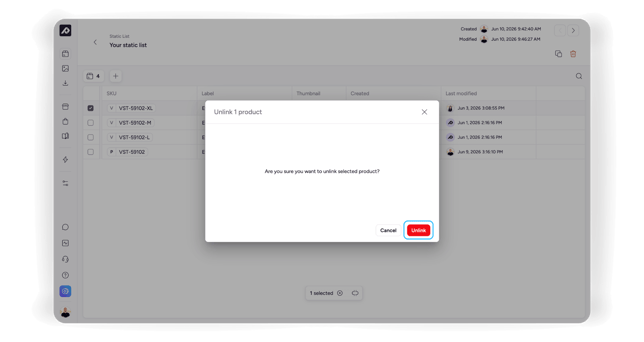
To remove products from a static list:
- Select the products you want to remove by checking the box next to their SKU.
- Click 'Unlink.'
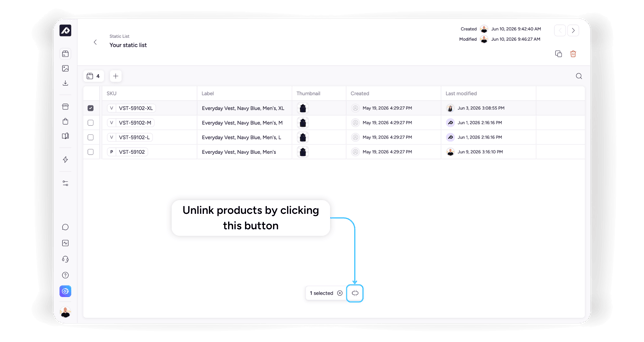
- Confirm by clicking 'Unlink' again in the popup window.
Renaming a Product List
You can rename a product list from within the list detail page:
- Click on the name of the product list you want to edit (this will take you to the list details page).
- On the product list detail page, click on the list name to edit.

- Type in the new name.
- Hit the enter key to save.
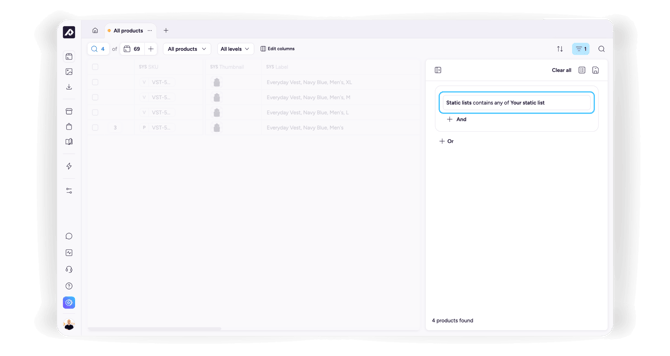
Loading a Product List in Product Overview
Find and edit product in a list by loading the list in the Product Overview table.
- From the Product Overview filters menu on the left click 'Load list.'
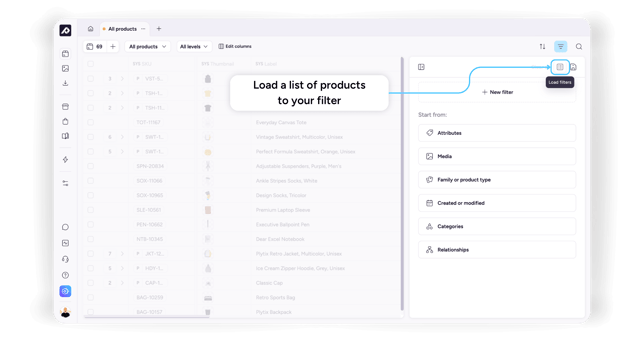
- Choose a list from the dropdown.
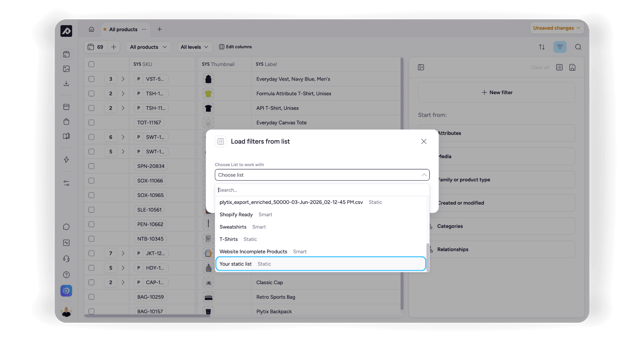
- Click 'Load.'
You can now view all the products in that list and perform bulk actions like editing and exporting. If a list is loaded, the name of the list will appear at the top of the filters area.
Additional List Actions - Delete and Duplicate
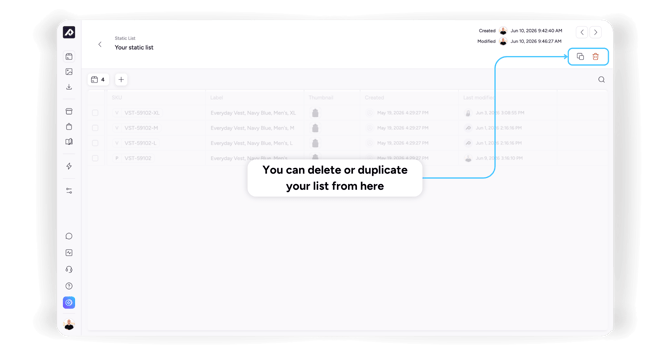
To delete a Product List:
- Check the box next to the list name.
- Click the red 'Delete' button that appears next to the trash can icon.
- Confirm by typing 'DELETE' and clicking 'Yes, delete now.'
To duplicate a Product List:
- Check the box next to the list name.
- Click the purple 'Duplicate' button that appears next to the page icon.
- Give the duplicated product list a new name and click 'Duplicate List.'
What's next?
- Learn how to add a product list to a channel
- Learn how to add a product list to a Brand Portal
- Learn about creating asset lists