
Channels is a module of Plytix where you can set up product feeds to syndicate information to different systems, marketplaces, and other platforms. In this article, we will show you how to add and set up channels.
Channel Type, Name, and Status
Types of Channels
There are 5 different types of Channels (not including our Shopify connector): XML, CSV/XLSX, NDJSON, and the Google Shopping template. Each has a similar basic set up, but the formatting section for each type of channel is a little different. This article will show you how to set up the basics. If you want to see more about the different format types, visit these articles:
- Output Format For CSV and XLSX Channels
- Defining the Data Format For XML Channels
- Defining the Data Format for NDJSON Channels
- Creating and Managing a Shopify Channel
-
Creating a Product Data Feed Using Plytix’s Google Shopping Template
ℹ️ CSV and XLSX are grouped into one channel type because they are interchangeable. You can choose the spreadsheet file format upon export or in the scheduling tab of the channel.
Adding a new Channel
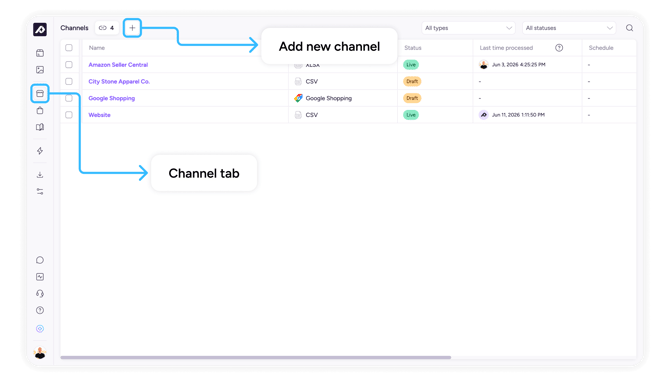
All Channels are managed in the Channels section of Plytix. This area can be found via the Channels icon in the left sidebar.
To create a new Channel:
- Go to the Channels section
- On the left corner of the screen, click the + button to Create channel.
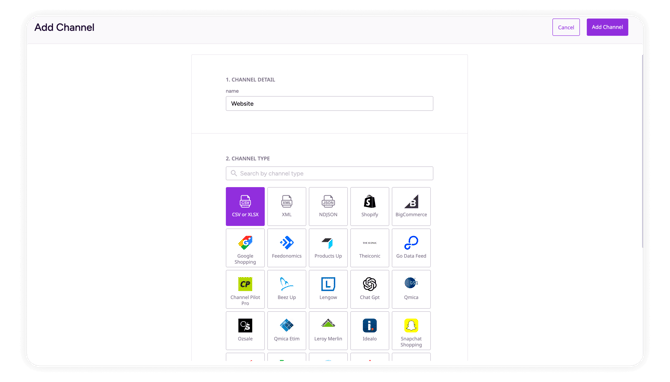
 3. Then give your Channel a unique name, and choose the type.
4. Click the Add Channel button to create the new Channel.
5. You will be taken to the Channel Detail View where you will be greeted with some instructions that will tell you how to set up your Channel. You can add products and attributes to configure you Channel and you can also configure the settings for how to process the Channel data.
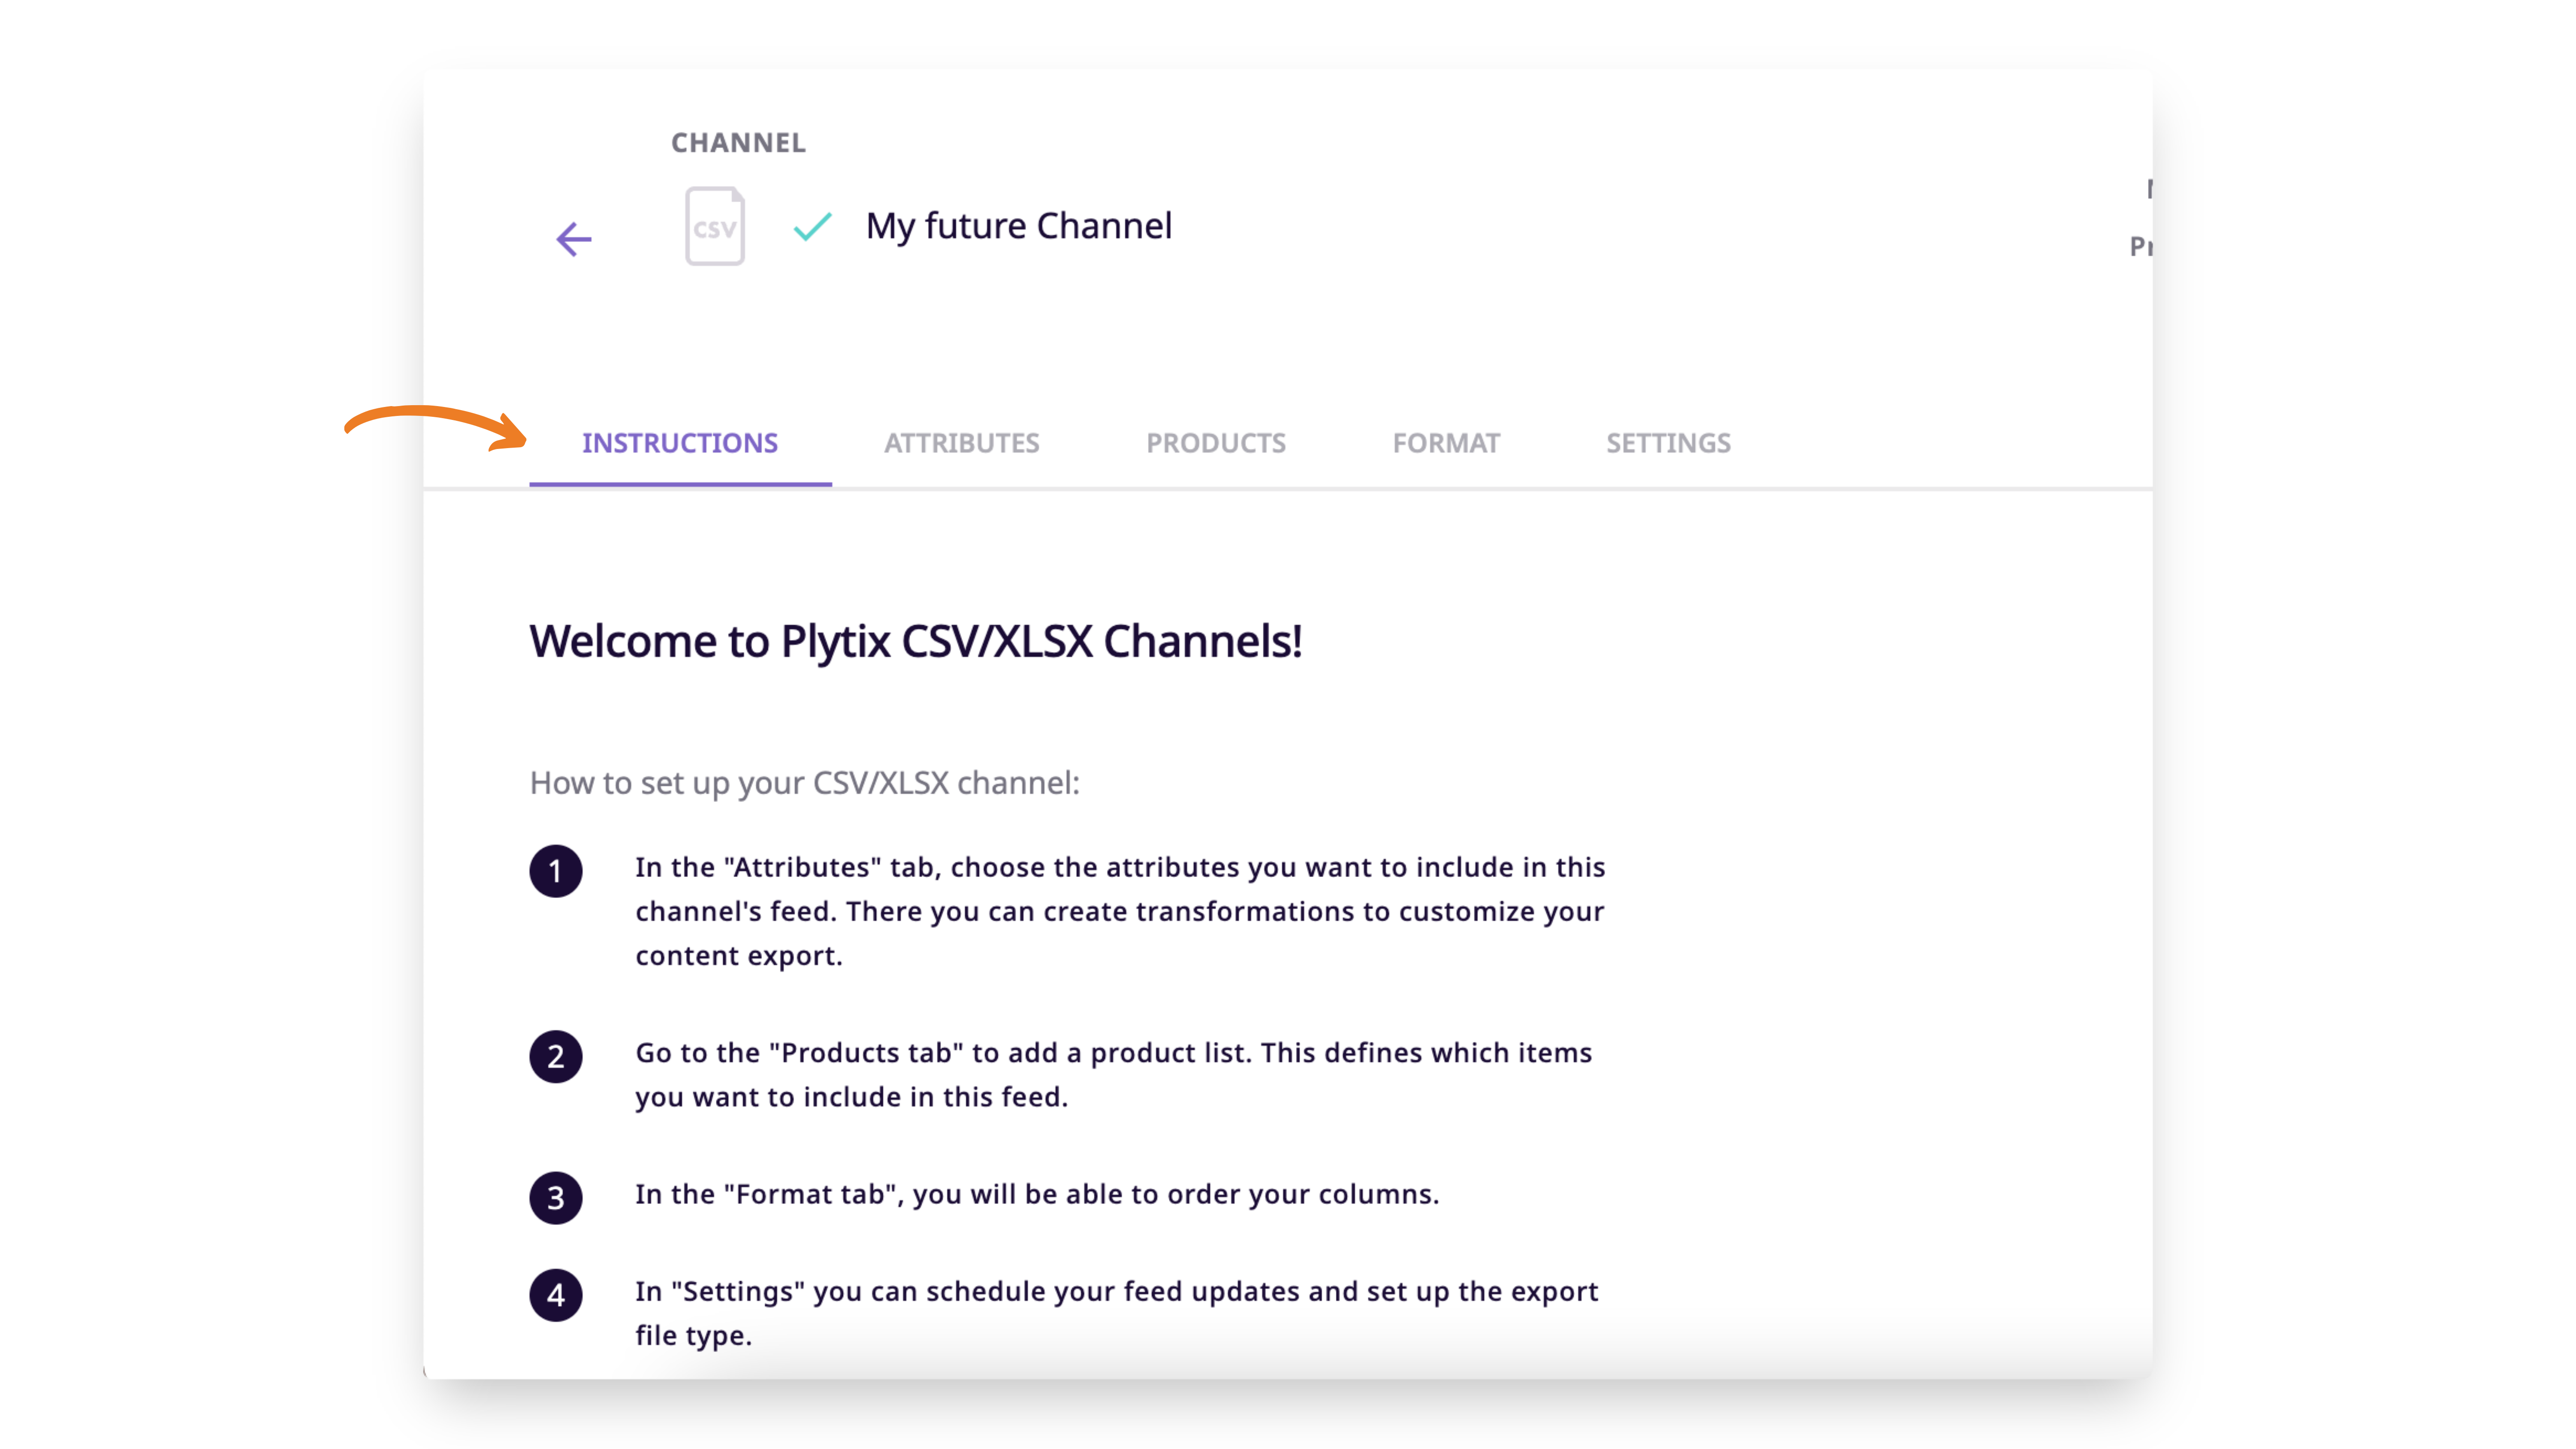
ℹ️ The Instructions tab becomes the Process Log tab after the channel is processed.
ℹ️ Channel tabs differ slightly by type. CSV, XLSX, XML, and NDJSON channels show Instructions (Process Log), Attributes, Products, Format, and Settings. Prebuilt templates, like the Google Shopping template, show Instructions (Process Log), Products, Mapping, and Settings instead, with attribute matching handled in Mapping. Prebuilt templates also come with their Mapping tab pre-populated with default attributes already matched to the platform's fields, so you're adjusting an existing setup rather than building one from scratch.
ℹ️ All channels are set to Draft by default before they are processed. Any channel that is in Draft will not be counted towards one of your Live Outputs. After you process your channel, it automatically becomes Live and is counted as one of your live outputs. Click to learn more about Live Outputs.
Channel Detail Header
Every Channel type has the same available areas in its detail view. We will give you a quick tour of what you can find in the header area.
- Channel Name, Status and Type
- Open link and Copy icons, next to the Channel name
- Channel Information
- View history, Preview, and Process (with a dropdown for scheduling)
- Navigation
- Duplicating and Deleting
- Channel Configuration Tabs: Instructions (which becomes the Process Log tab after the channel is processed), Attributes or Mapping, Products, Format (CSV/XLSX/XML/NDJSON only), Settings
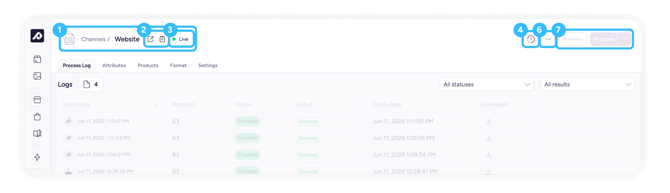
ℹ️ Next to the Channel name, the Open link icon opens the Channel's live URL directly, and the Copy icon copies that URL to your clipboard.
Channel Name, Status, and Type
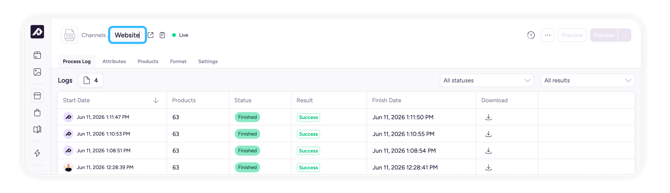
Here you can see what type of Channel you have created, if the Channel is active or not, and the name of the Channel.
Status
The status of the Channel is indicated below a channel's name as Draft in yellow or Live in green.
All channels are in Draft before they are processed. When a channel is in Draft, it does not count towards your live outputs.
Once a channel is processed, it becomes Live and is counted as one of your live outputs. A Live channel will have a URL that is available for use and if it runs on a processing schedule, then the processing will occur at the scheduled time.

Name
You can also edit the Channel name by clicking on it, and to save press the Enter key on your keyboard.
Channel Information
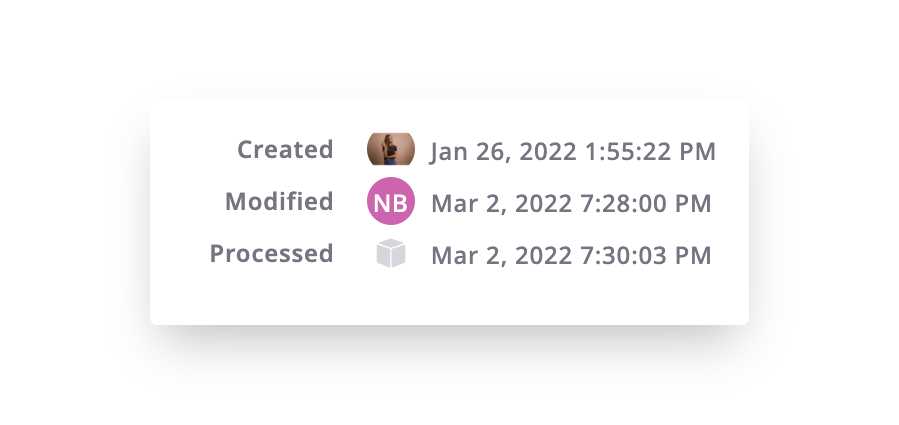
Here you can see when and by which user a Channel was created, last modified, or the last time the Channel was processed.
Process and Preview
The Process button will update the data in your Channel on command and will change your channel from Draft to Live.
The Preview button will let you see what your Channel output will look like before you process it. Per default, these are disabled because you need to select your attributes and assign products to the Channel before you can process it.
Preview
By clicking the preview, you can see how your information will appear before you process it. This preview will mimic the data output you have chosen, whether it is a spreadsheet or an XML file.
Processing
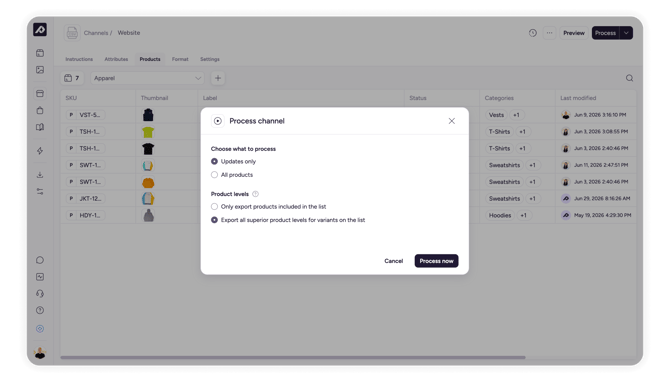
When you click Process directly, your Channel processes immediately using its current settings.
⚠️ Processing a channel will add it to your count of Live Outputs. Do not process your channel if you only want to keep it as Draft.
Scheduling Processing
Click the dropdown arrow next to Process to open the Schedule processing panel, where you can set up automatic, recurring processing instead of only processing on demand.
- Toggle Schedule processing on.
- Choose a frequency, for example Every 3 hours, daily, weekly, or monthly.
- Set the time and select your timezone.
- Optionally, click + Add one-time run to schedule a single run in addition to your recurring schedule.
Choose what to process:
- Updates only: export only products that are new or have had changes in your channel attributes since the last time it was processed.
- All products: export every product assigned to this Channel, regardless of whether they changed.
💡 Only sending updates keeps your processing times short.
Product levels:
- Only export products included in the list: export only the specific products assigned to this Channel.
- Export all superior product levels for variants on the list: also export the parent products for any variants assigned to this Channel, even if the parent itself isn't assigned.
💡 Some sales channels require parent products to always be included when processing variants. In this case, choose Export all superior product levels for variants on the list.
⚠️ If a channel is in Draft and you set up scheduled processing, this will automatically turn the channel into Live and it will count towards your number of Live Outputs.
Viewing History
Click the clock icon (View history) in the header to see a version history of your Channel's configuration over time.
Duplicating and Deleting
You can also duplicate and delete a Channel from the detail view.
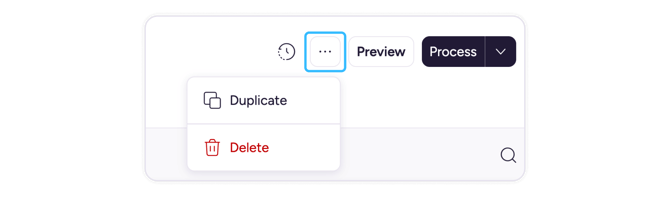
Duplicating a Channel will clone all the Channel settings down to the attributes and scheduling options. This is particularly useful if you have multiple storefronts or marketplaces that use the same type of set up.
ℹ️ Duplicating a channel does not include duplicating its status. If you duplicate a Live channel, its duplicated version will be in Draft and will only become Live after it is processed.
Deleting a Channel will require confirmation as this cannot be undone.
Attributes
ℹ️ CSV, XLSX, XML, and NDJSON channels use an Attributes tab. Prebuilt templates, like Google Shopping, use a Mapping tab instead, which comes pre-populated with default attributes already matched to the platform's fields, so you're adjusting an existing setup rather than starting from scratch.
Channels allow you to pull in select information from your catalog. The Attributes tab will allow you to select the different properties you want to include, that you can then adapt to the output labels for the Channels you wish to send your data to.
You can also upload a CSV template for any channel, that allows you to map your attributes against the information required for each channel.
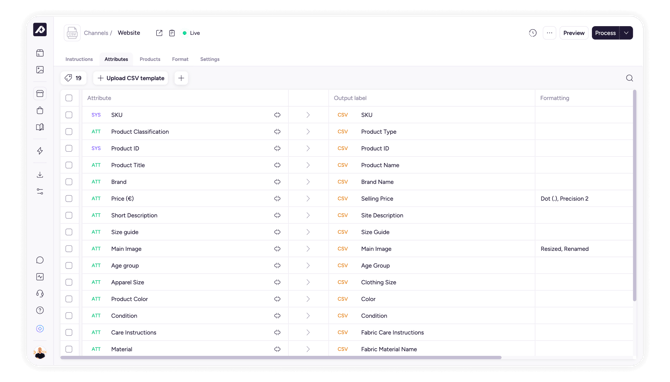
Here you can:
- Add/remove attributes in your Channel
- Change the output label of your attributes
- Create new attributes using formulas with Attribute Transformations
- Resize your assets
- Rename your assets
- Change image formats
- Change decimal and date formats
- Upload a CSV template of attributes in the right order and format required for your output
💡 If you want to remove attributes from your channel in bulk, you can select the checkbox next to multiple attributes (up to 100 at a time) and then click Remove Attributes.
💡 Search for a specific attribute in your channel by typing its name or output label in the search bar on the right side of the attributes tab.
Products
A Channel is a Destination, so products are added to it by assigning them directly, there's no separate product list step. In this tab, you'll see every product currently assigned to this Channel, so you can review them easily.
To add products to a Channel:
- Go to the Products tab and click the Add products button.
- In the Add products window, use the All products and Selected tabs to browse everything available or review what you've already checked off.
- Use the Search by SKU or label field to find specific products, or tick the Select all checkbox to select everything shown.
- Tick the checkbox next to each product you want to add.
- Click the Save button to confirm, or the Cancel button to back out.
While you're still in the Add products window, you can deselect a product before saving by heading to the Selected tab and clicking the X icon beside it.
To remove a product that's already assigned to the Channel, tick the checkbox next to it (or multiple checkboxes) in the Products table, then click the trash icon in the bulk action bar at the bottom of the screen and click the Remove from destination button to confirm.
⚠️ The attributes displayed in this view are fixed and cannot be customised.
💡 You can also assign products to this Channel from outside the Channel itself, for example, from Product Overview using the bulk action bar, from a product's own Detail page under its Destinations tab, or via an Automation. Learn more about all four assignment methods, plus filtering products by Destination and setting inheritance, in Understanding and Managing Destinations.
Format
This tab is where you can set up your Channel format in terms of order of items and attributes. These are different depending on your Channel type. To learn more about each Channel type, see the articles below:
- Defining the Format for XML Channels
- Defining the Format for CSV/XLSX Channels
- Defining the Format for NDJSON Channels
Settings
The Settings tab is organized into three sections: File, Connections, and Webhook.
File
- File name: the name of your output file.
- Add timestamp: check this to append a timestamp to your file name.
- Output format: choose CSV or XLSX (spreadsheet channels only).
- Column separator: choose how columns are separated, e.g. Comma (,).
- Text delimiter: choose how text values are wrapped, e.g. Double quote (").
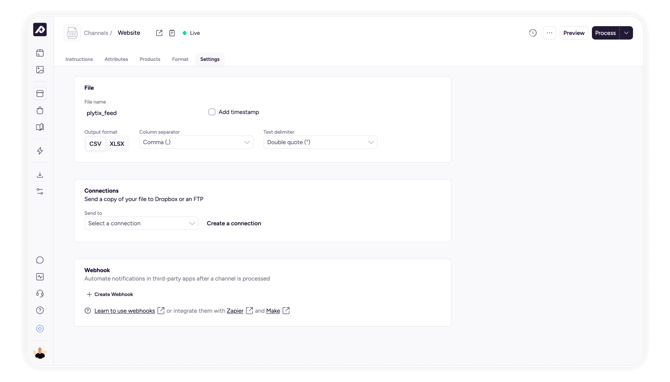
Connections
Send a copy of your file to Dropbox or an FTP. Click Create a connection to set one up. Learn more in establishing Channel connections to FTP and Dropbox.
Webhook
Automate notifications in third-party apps after a channel is processed. Click Create Webhook to set one up, or learn to use webhooks, including integrating them with Zapier and Make.
ℹ️ Scheduling automatic processing is no longer configured from Settings, it's managed from the Process button's dropdown. See Scheduling Processing above.
Process Log
After you have processed your Channel for the first time, the Instructions tab will transform into a Process Log where you can see:
- When a process started, and who ran it
- When a process finished
- The current status of a process: Syncing, Processing, Canceled, Finished, or Skipped
- How many products were processed
- The final result of the process
ℹ️ A process shows as Skipped when a scheduled sync was due while the channel was still processing a previous run. That scheduled sync won't be queued to run later, if you still need that data synced, process the channel manually or wait for its next scheduled run.
ℹ️ After you have processed your Channel for the first time, its status will change from Draft to Live and it will be counted towards your number of Live Outputs.
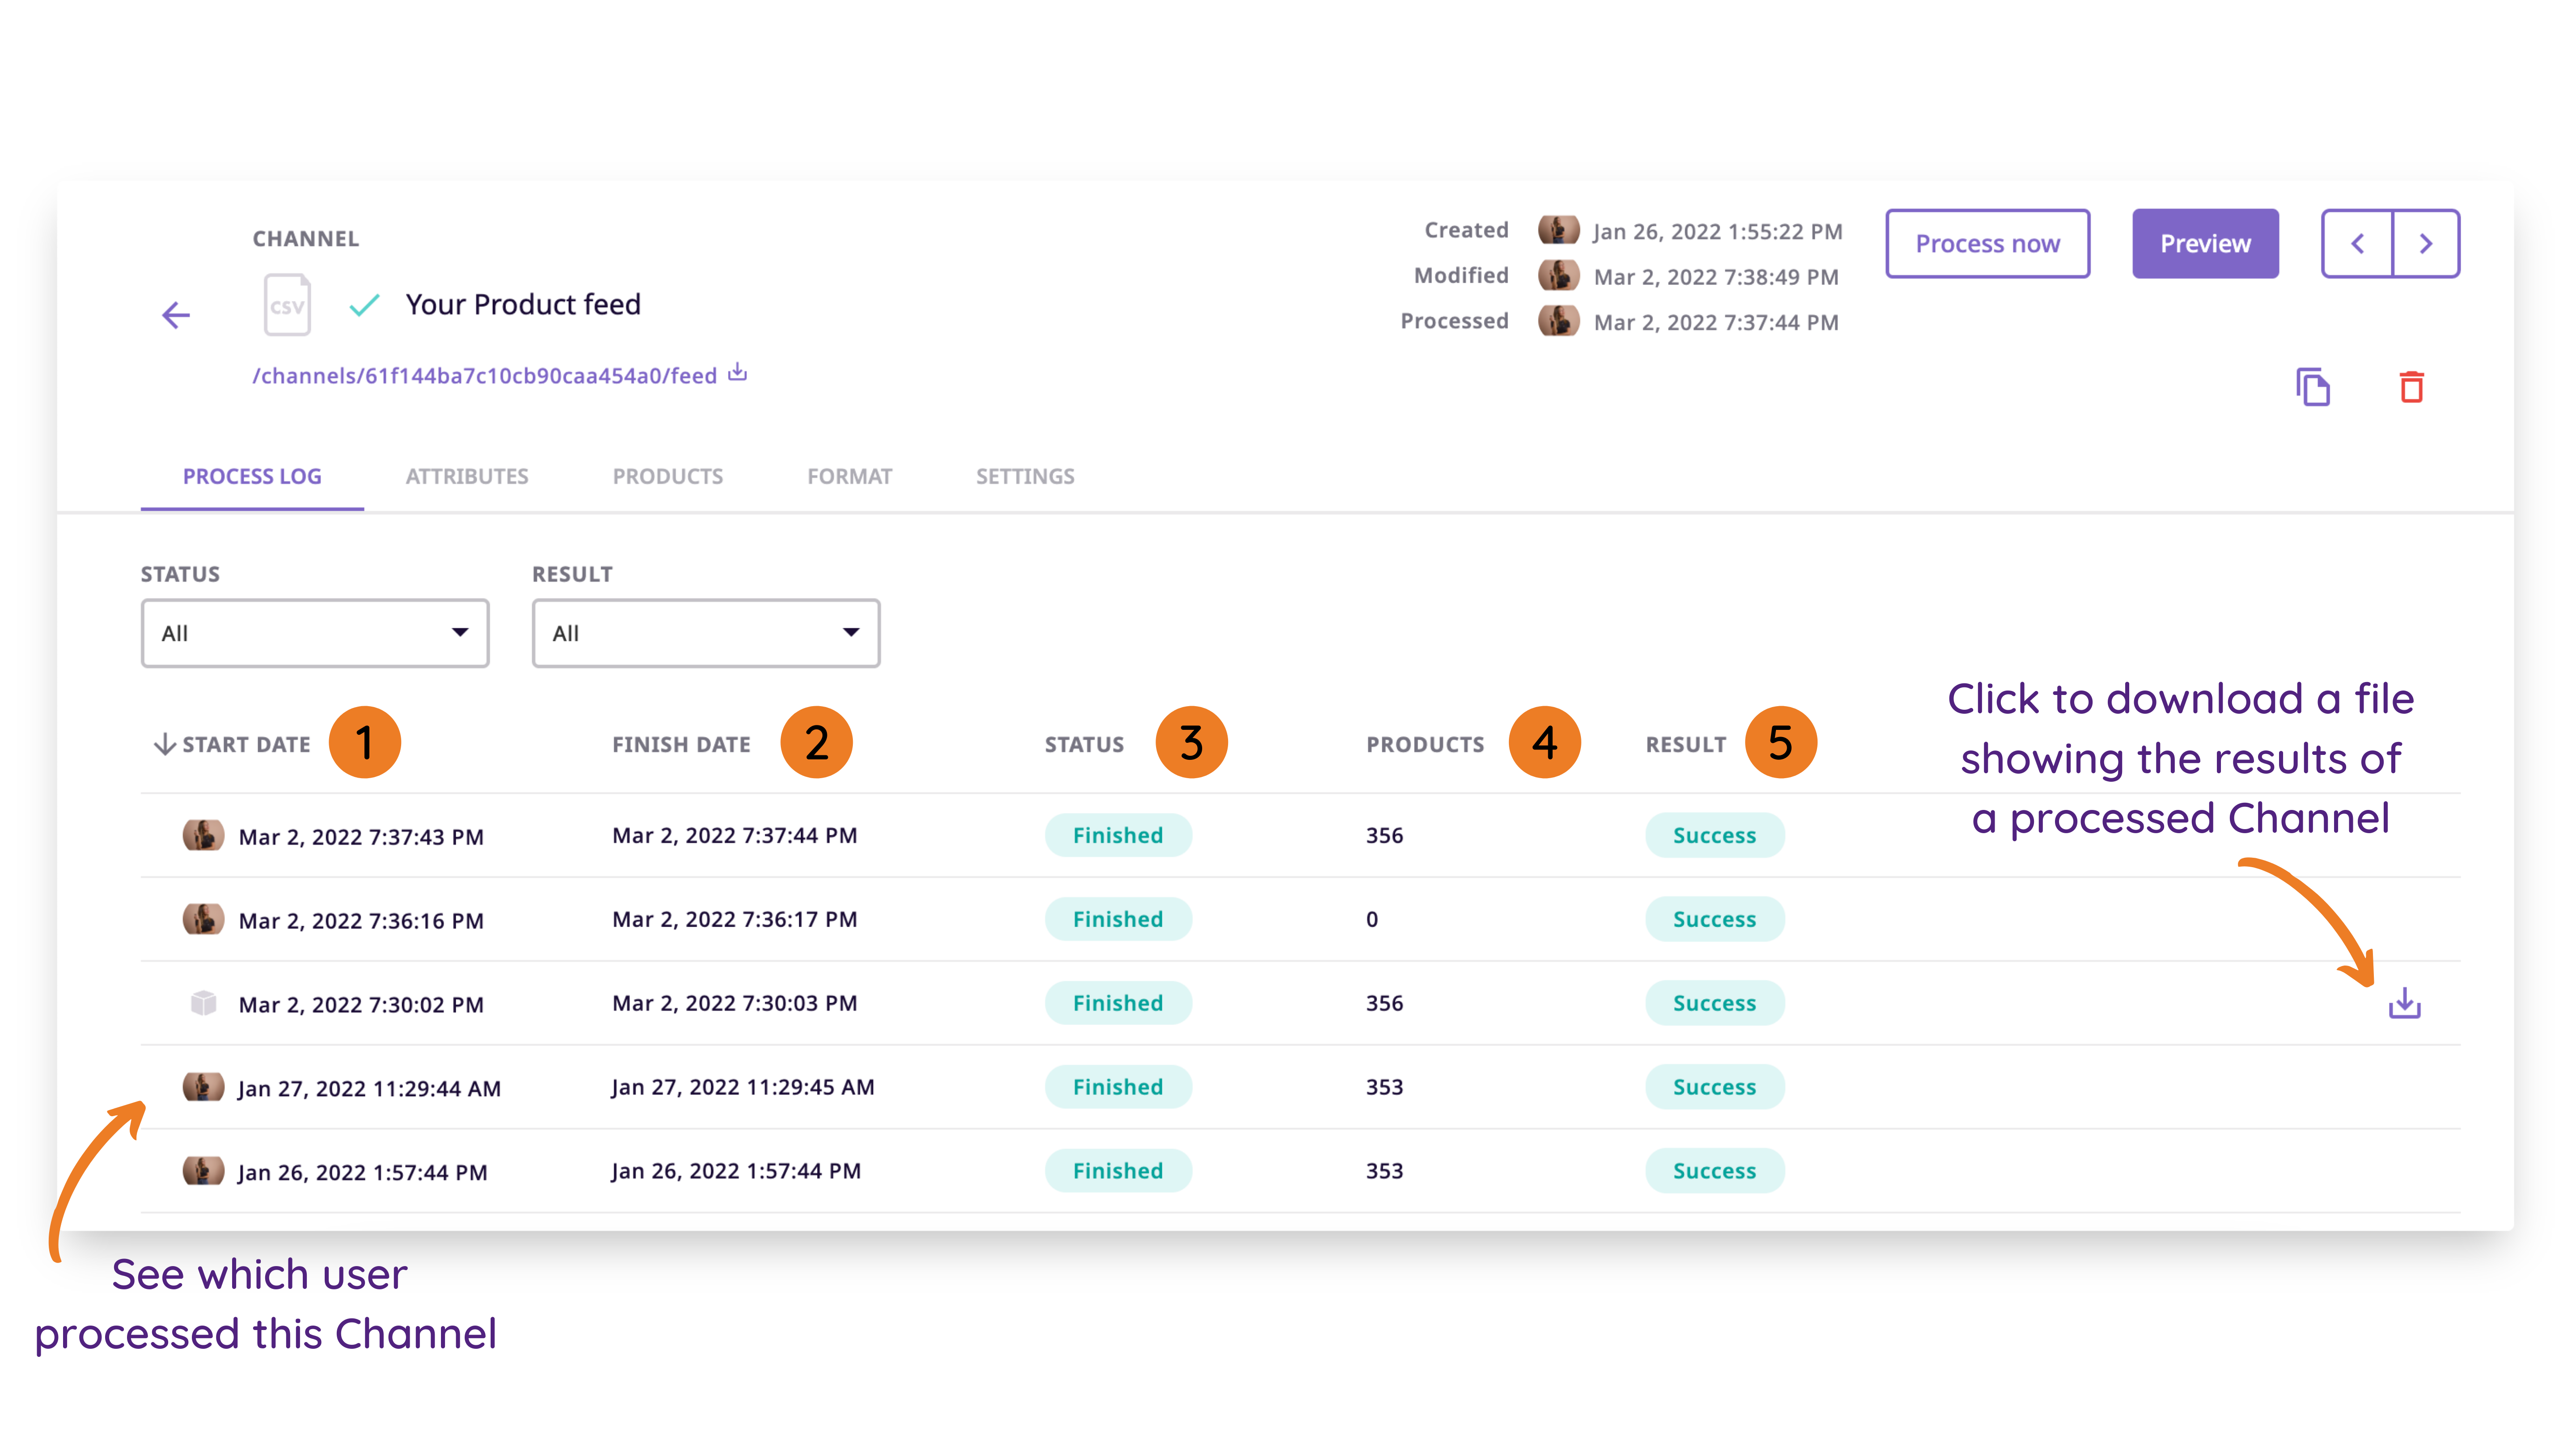
💡 You can download a file of any previous version of the channel within the log.
What's Next
- Learn about setting up FTP and Dropbox connections
- Learn how to set up a feed for Google Shopping
- Learn more about attribute transformations