Learn what product attribute groups are, and how to create and manage them in Plytix
Whether you have 20 or 20,000 Attributes in your PIM account, Attribute groups can make it easier to find, edit, and keep your product information up to date. In this article, we will show you where you can create, edit, and delete your product attribute groups.
ℹ️ To create product attribute groups you must first create Product Attributes.
Adding Attributes to Groups in Bulk
*Skip to any section in this article by clicking on the links above
Creating Attribute Groups
To create an attribute group:
- Navigate to 'Settings' in the top menu.
- The Settings area will automatically open in 'Product Attributes.' Click on the tab to the right called 'Groups.'

- Click on the '+ Add group' button.

- Name the group (you can change this later) and click 'Next.'
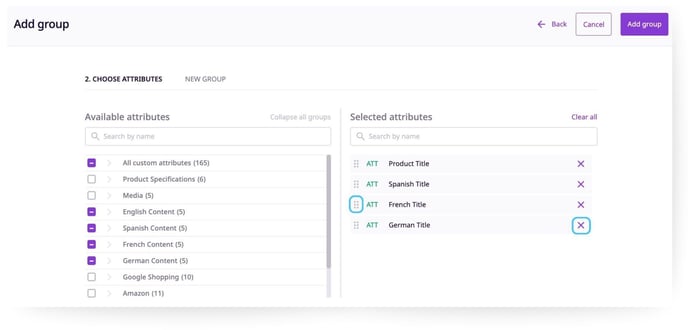
- Choose from attributes under "Available attributes." Chosen attributes will then appear on the right under "Selected attributes."

ℹ️ Please note that only custom attributes can be added to attribute groups.

7. When you are happy with the selection, click 'Add group.' You've now created a new attribute group.
ℹ️ New groups will go to the bottom of the 'Groups' list. You can drag and drop the group to sort it in the order you'd like.
Adding Attributes to Groups in Bulk
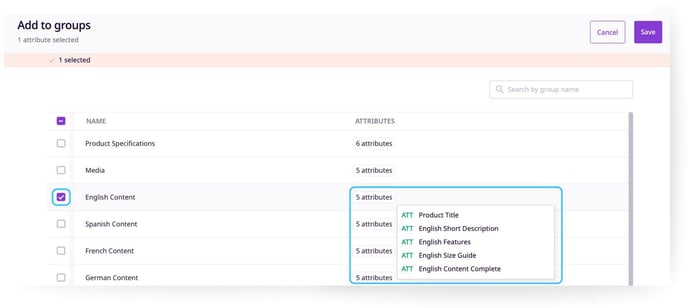
- To add attributes to one or more existing Attribute Groups in bulk, first navigate to the Settings area.
Next, select the attributes you'd like to add to a group and click 'Add to groups.'
.jpg?width=688&height=298&name=Adding%20Attributes%20to%20Groups%20in%20Bulk%20%20(1).jpg)

4. Click 'Save.'
Managing Attribute Groups
To rename an Attribute Group, click the name, make changes and hit the enter key.
Editing an attribute group
To edit an Attribute Group, click on the '...' button, then select 'Edit Group.'
Here you can:
- Add attributes to this group from available attributes.
- Delete attributes you have selected from this group.
- Change the order of the attributes selected.

Duplicating an Attribute Group
To clone an Attribute Group, click on the '...' button, then select 'Duplicate.'

💡 Duplicating your group saves time when you need to create a new group similar to one you already have.
Deleting an Attribute Group
To delete an Attribute Group, click on the '...' button, then select 'Delete.'

⚠️ Be very careful when deleting an attribute group as this cannot be undone.
What's next?
- Learn how to enrich your product information
- Learn about different attribute types
- Learn how to add attributes to your Brand Portals