
Product Attributes are fields that hold your product information in Plytix. These are the building blocks for your product content. Other systems may call these properties, values, or fields.
In this article, we will teach you how to create and manage custom product attributes in Plytix.
Renaming and Modifying Existing Attributes
Adding Attributes to Product Families
*Skip to any section in this article by clicking on the links above
Creating a New Attribute
There are two ways to create new attributes, either from Settings or upon import. To learn how to create attributes upon import click here.
Create a new attribute from Settings:
1. Navigate to 'Settings' in the side menu.
ℹ️ The Settings area will automatically open in the 'Attributes' tab. If not, you may not have permissions to manage attributes.
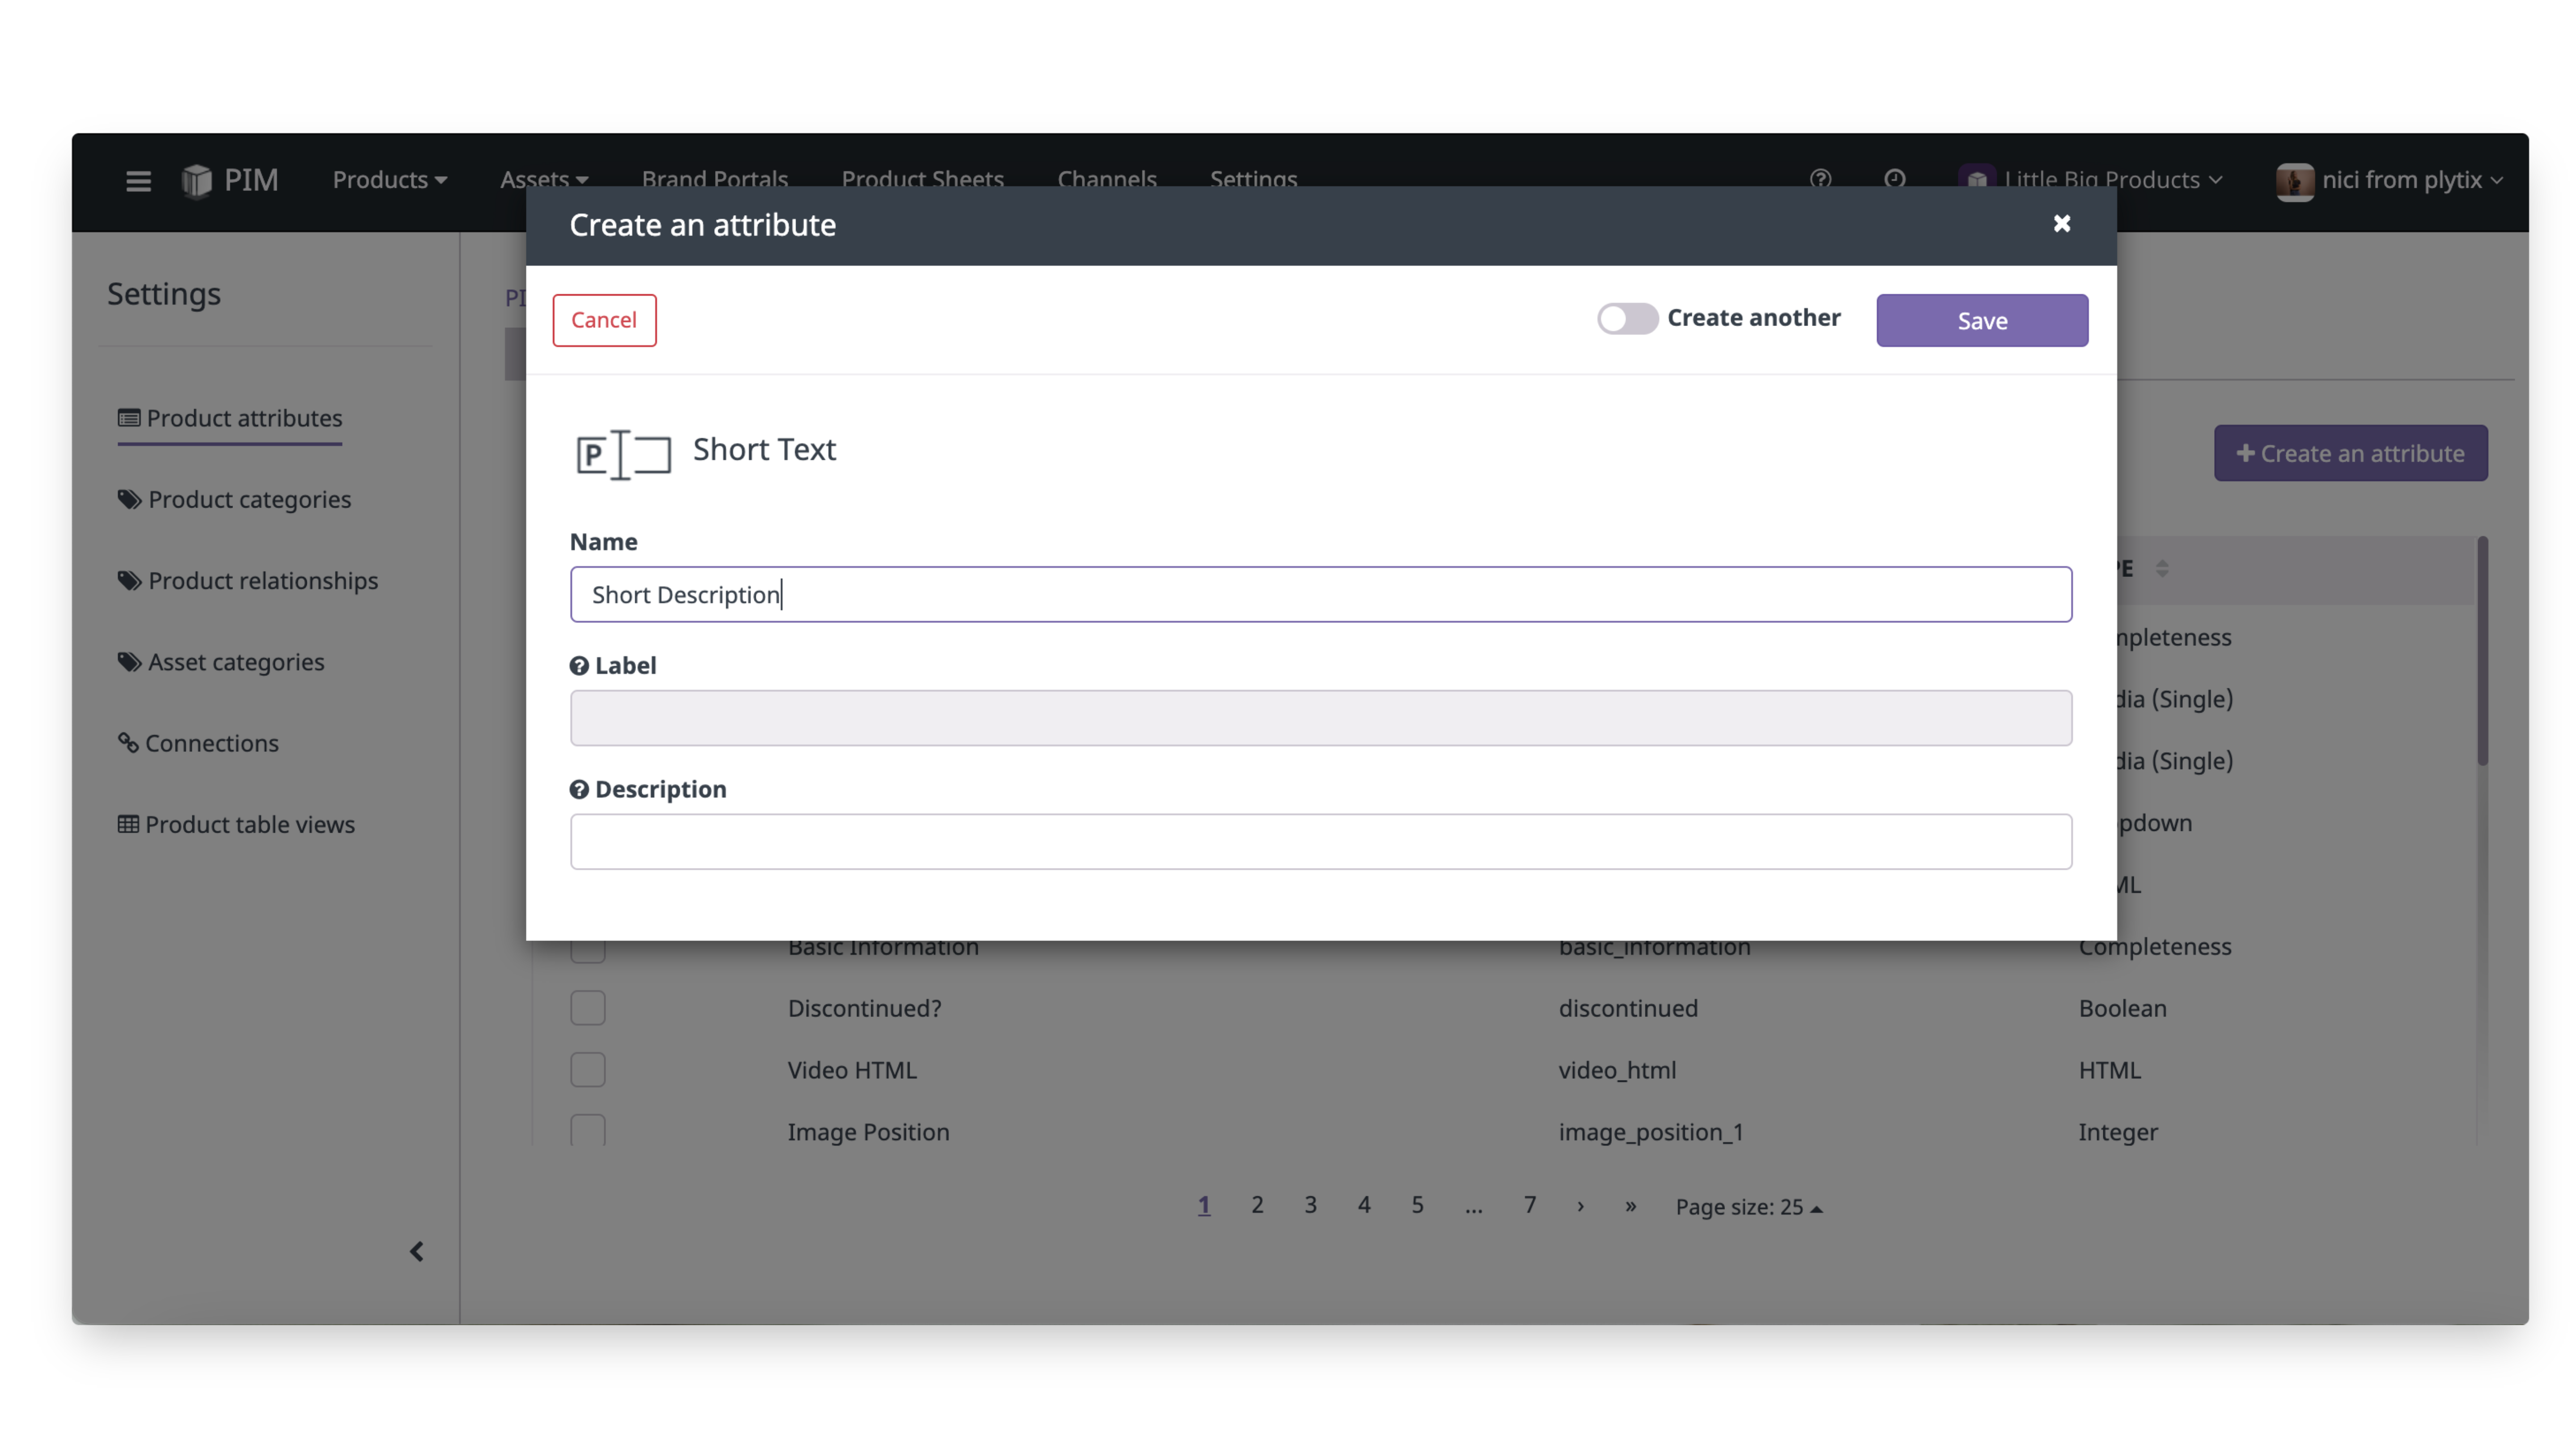
2. Click the 'Create attribute' button in the top left corner. This will open the attribute creation panel.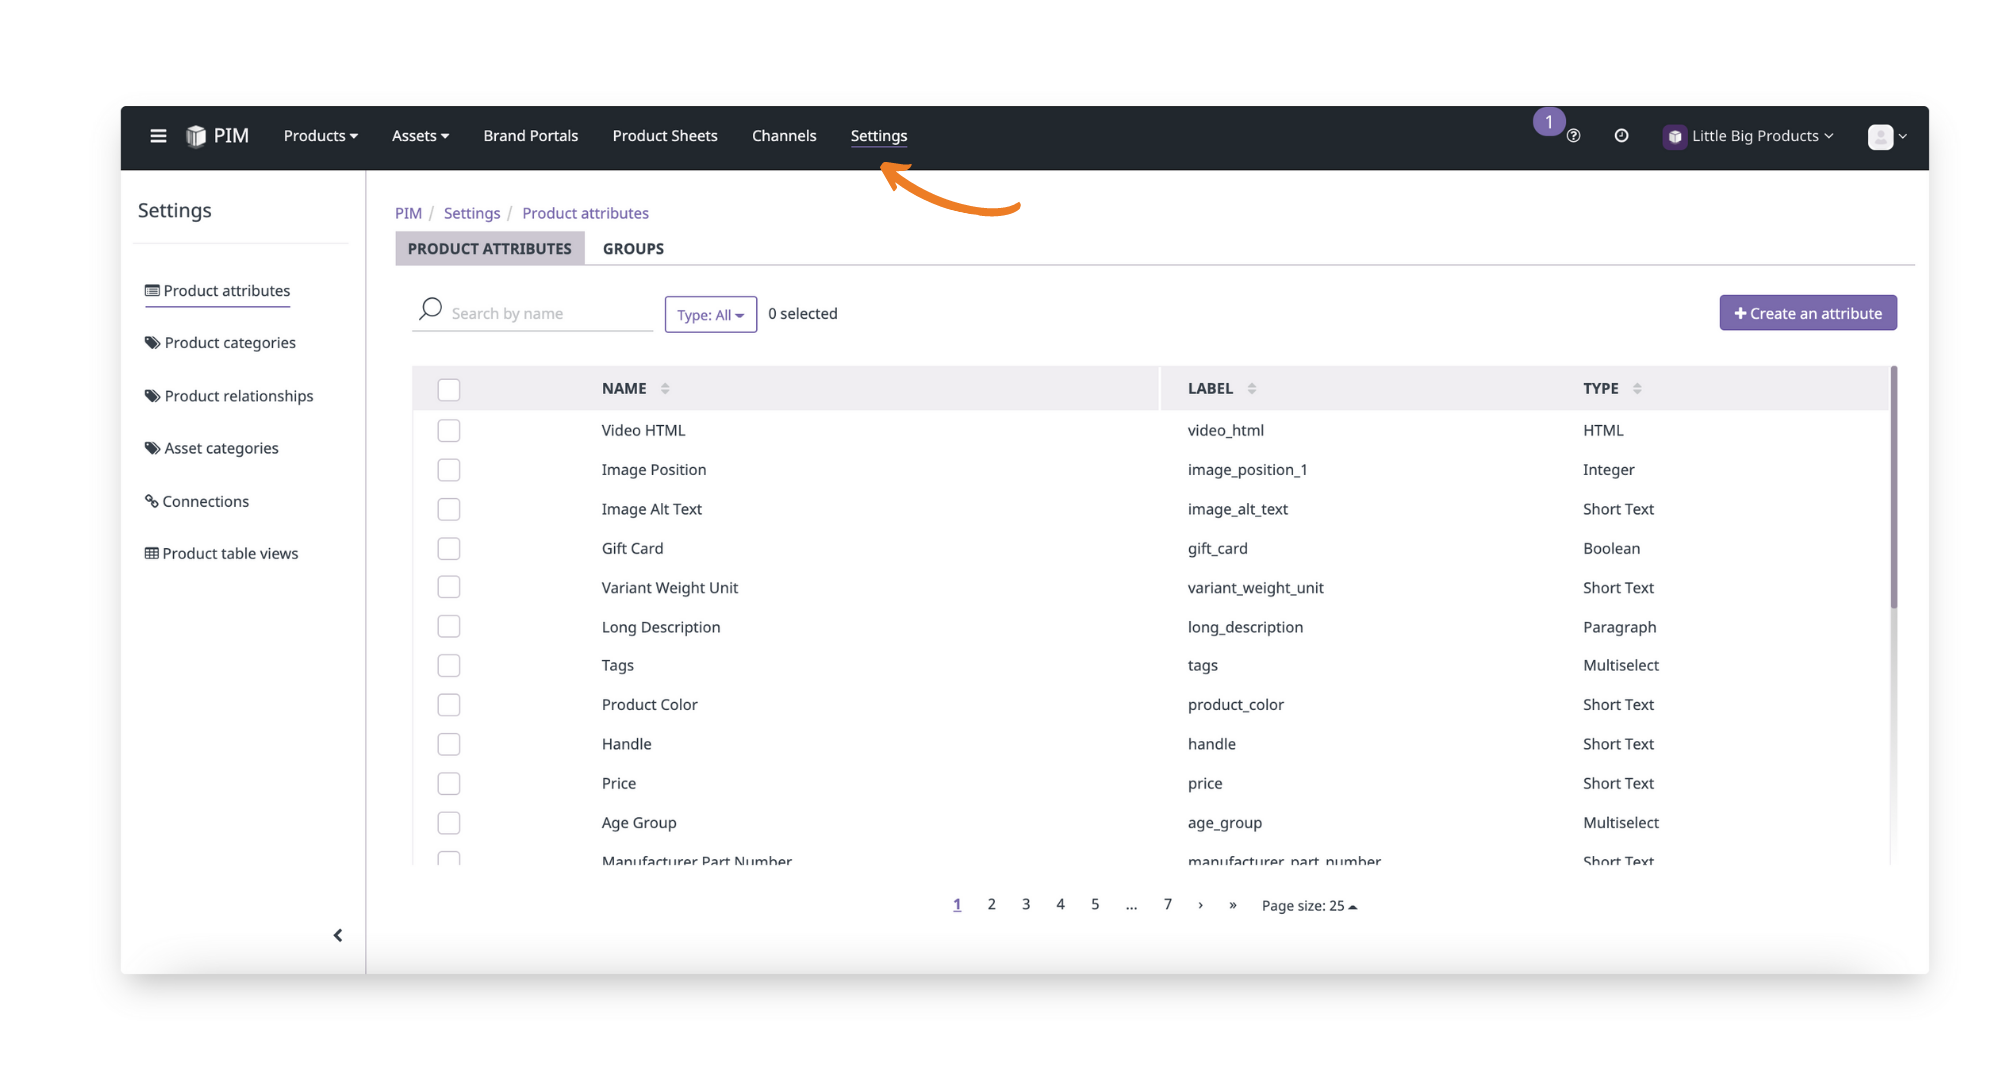
3. Choose the attribute type you want to create. Once selected, you'll see a brief description of that attribute type, along with the fields to fill in on the right.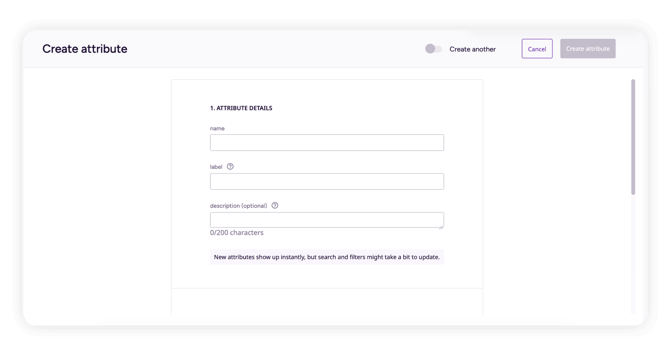
4. Type a name for your attribute and the label will be created automatically. You may also choose to add a description to help other users of your account understand what kind of information this attribute holds.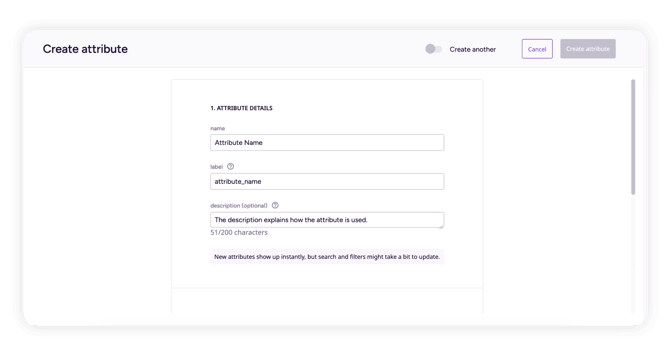
5. Depending on the attribute type you've chosen, you may see some additional settings:
-
- Short Text and Paragraph attributes let you tick 'Limit characters input' to set a maximum character count.
- Dropdown and Multiselect attributes let you define the selectable options, as well as how they're sorted and whether new options can be added on import. See Editing Attribute Options below for details.
- Completeness and Formula attributes can only be configured from Settings, they're not available to create upon import. Completeness attributes track how complete your product data is based on other attributes, while Formula attributes let you transform the output of other attributes.

If you want to create multiple attributes in a row, click the 'Create this and another' button to start the process over again.
⚠️ In order to keep your data clean and simple, it's not possible to create an attribute with the same name as an already existing one.
ℹ️ Labels will be automatically generated by the system based on the attribute name. So if your attribute name is "Product Description" the label will become "product_description". Labels cannot be edited after creation.
Editing Attribute Options
There are 3 attribute types that have options associated with them: Dropdown, Multi-select, and Completeness attributes.
Dropdown and Multi-select Options
These attribute types require you to define the different selectable options that will appear in the PIM. If you select one of these attributes, you will see the following options:
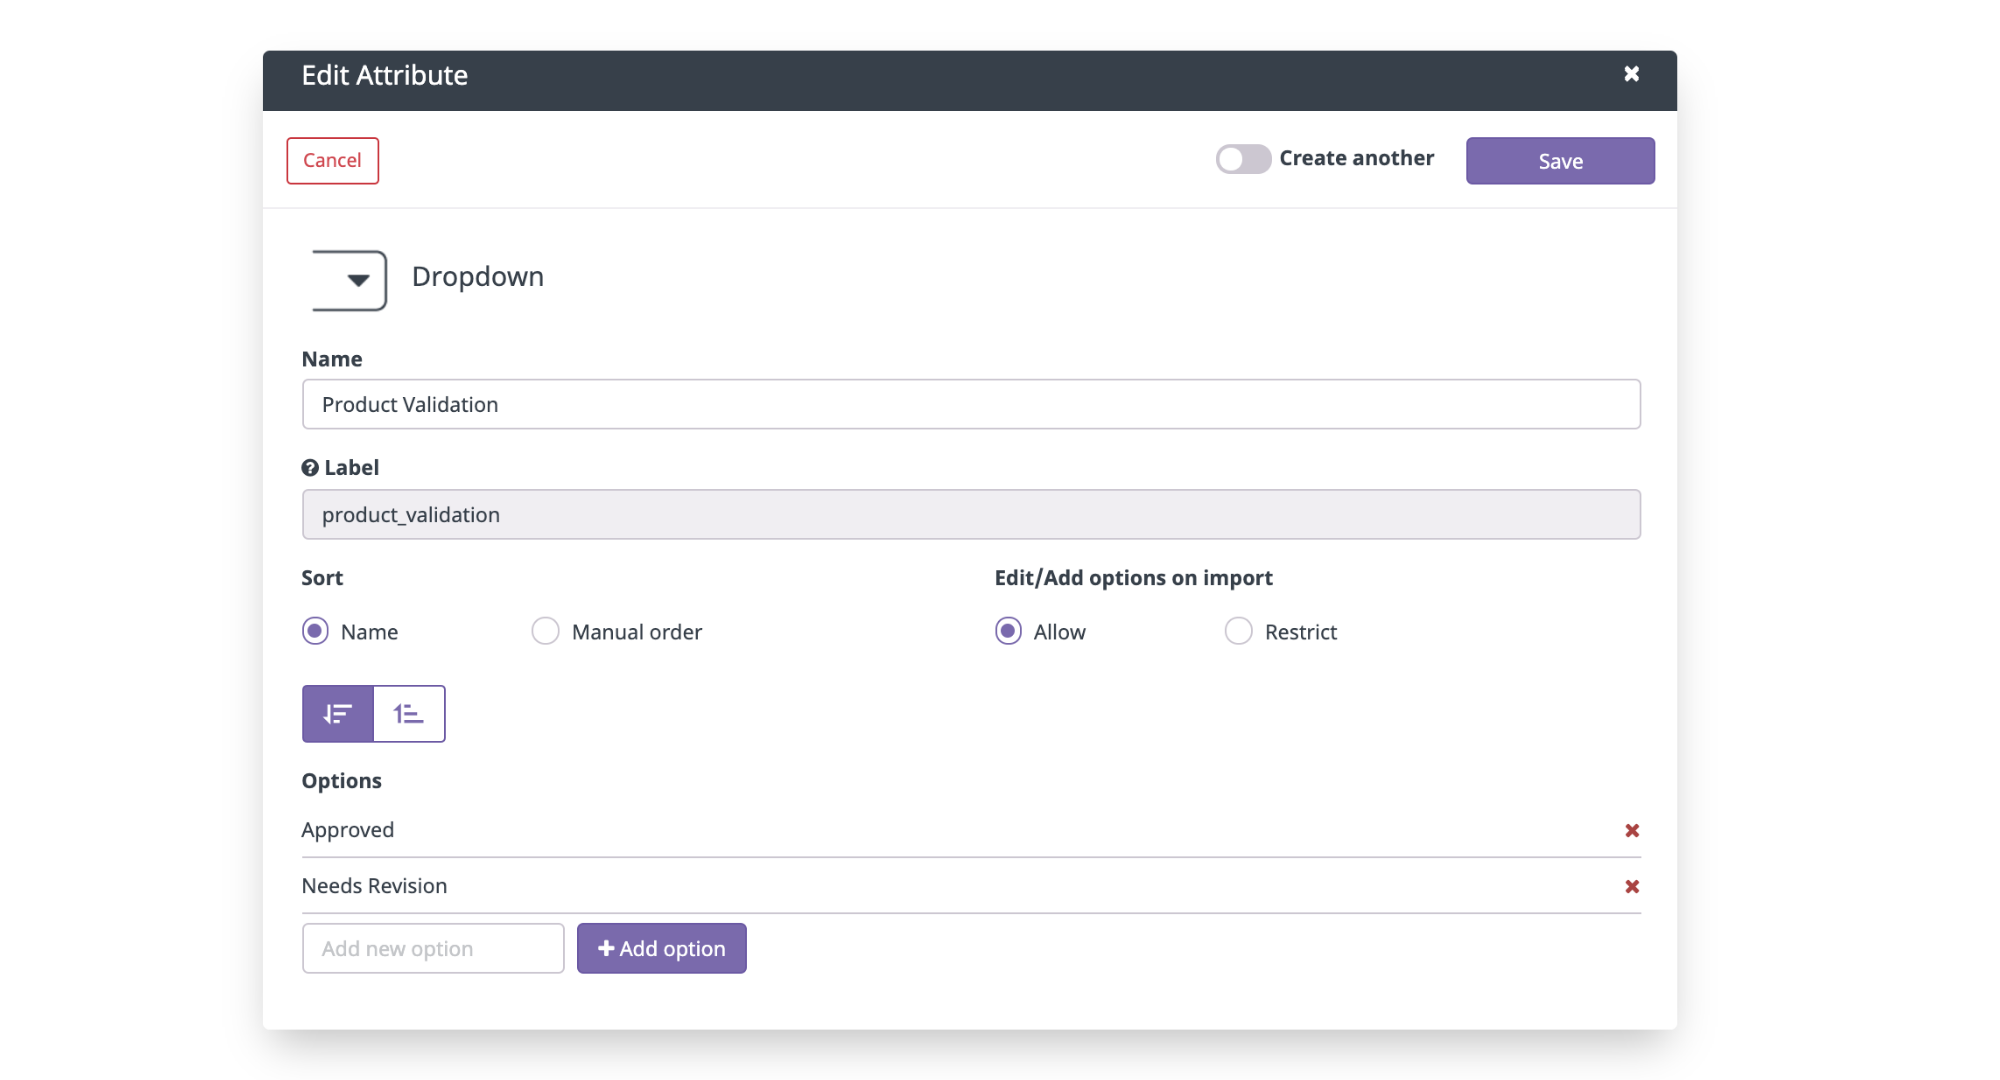
- 'Sort Options By' will determine how your options appear in the PIM.
You can choose to sort them by 'Name' (alphabetically, choose ascending or descending) or create your own 'Manual order' via drag and drop. - 'Add options on import' lets you restrict the options one can add upon import for your dropdown or multi-select attributes. When you 'Restrict' this option, users will not be able to import any options besides those already established in the system.
To add new options, write in the space provided and click '+ Add option" to apply a single option and then add a new one.
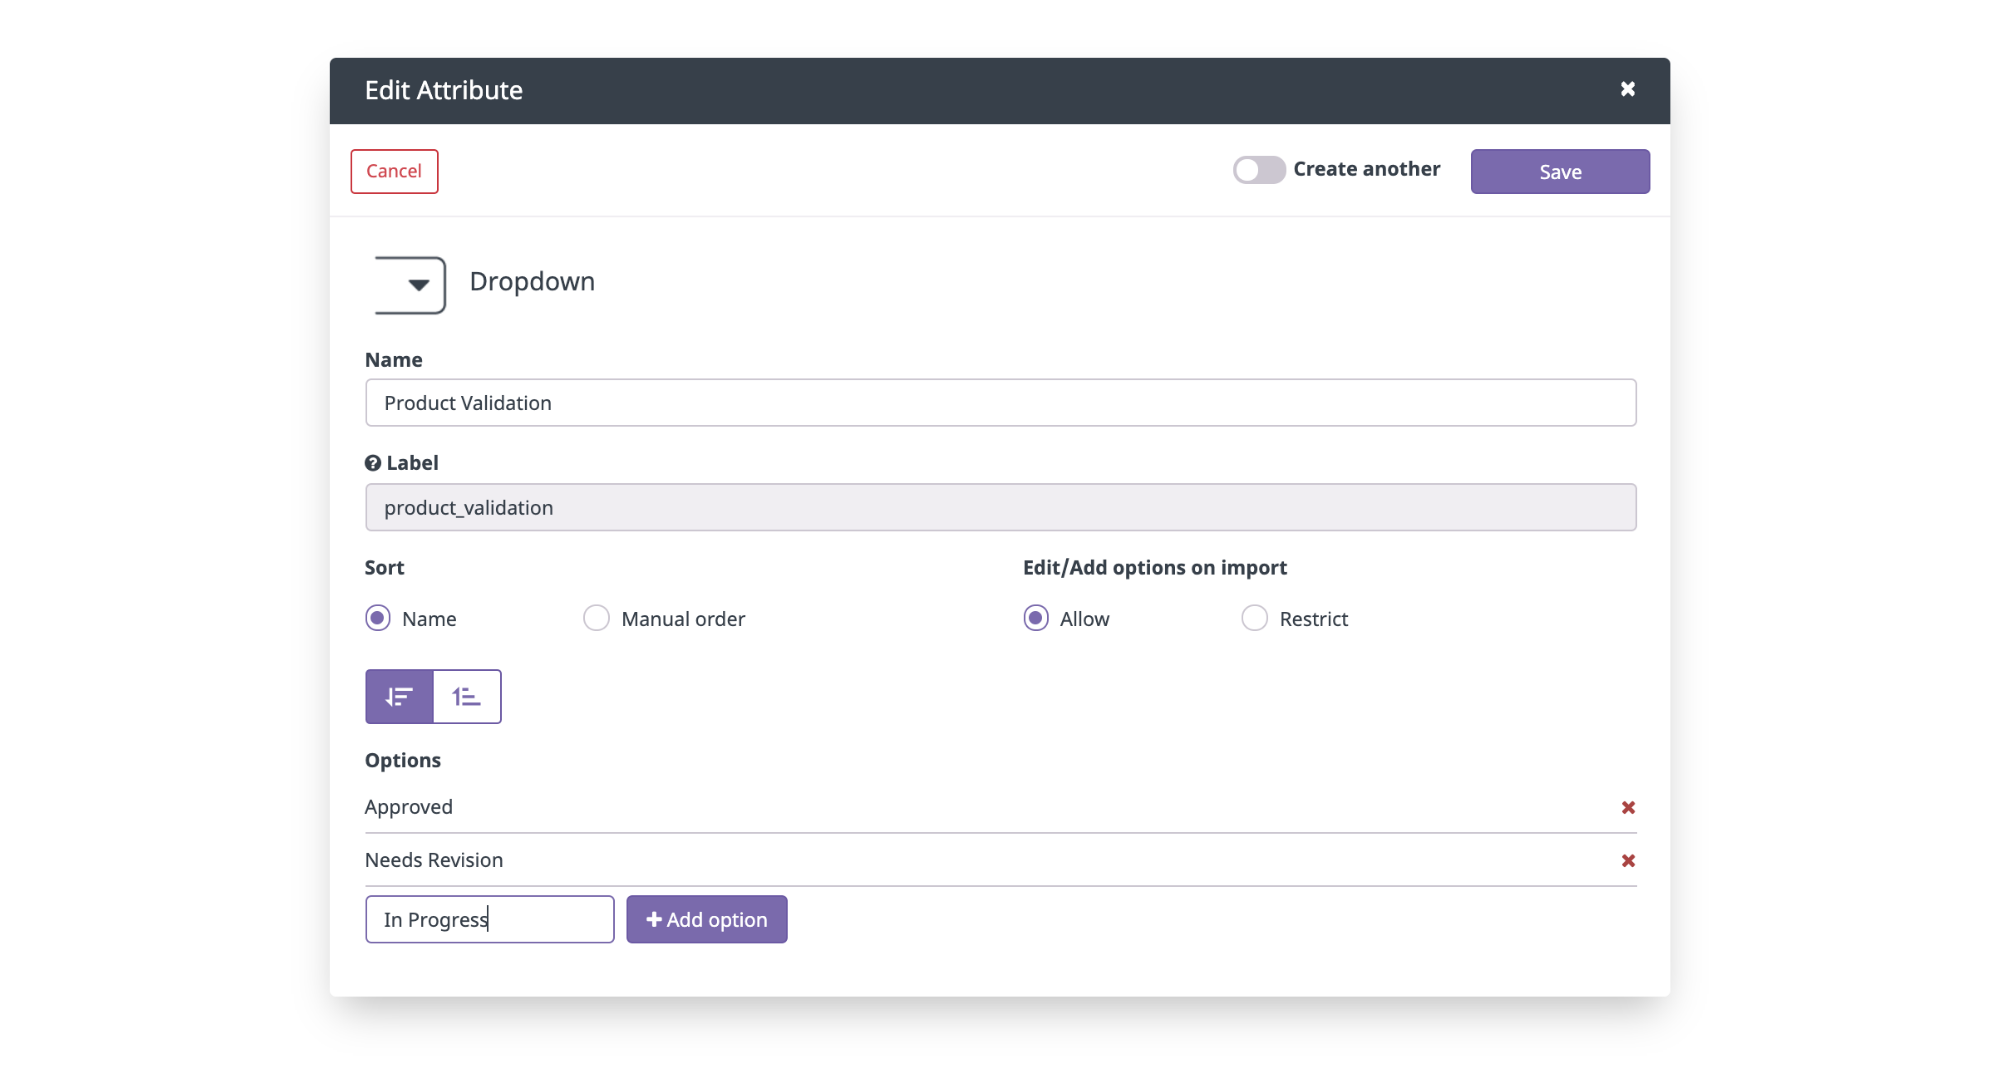
⚠️ Options are case-sensitive. Be careful with options to avoid creating the same Dropdown or Multi-select attribute, i.e. "Blue" and "blue".
💡Try restricting the ability to add options on import for more consistent, sanitized data in your Dropdown or Mulit-select attributes. Learn more about restricting your Dropdown or Multi-select attributes here.
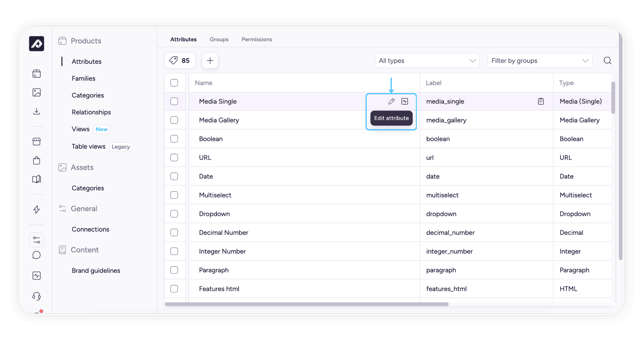
Renaming and Modifying Existing Attributes
All attributes can be modified after creation. Elements you can change are: the name and the attribute options.
To edit an attribute name:
- Go to 'Settings' in the side menu.
- Find the attribute you want to edit by scrolling or using the search bar.
- Click on the 'Name' of the attribute to modify the name.
- Hit 'enter' on your keyboard.
 To To modify attribute options:
- From the 'Attributes' area of the 'Settings' tab, find the attribute you want to edit.
- Click on the pencil icon.
- Modify your attribute options as desired and click 'Save Attribute'.
⚠️ If you remove an option from a Dropdown or Multiselect attribute, that value will also be removed from any products that currently contain that value.
Adding Attributes to Groups
To add attributes to attribute groups:
1. In Settings, go to the 'Attributes' tab. From the Attributes list, tick the checkbox next to the attribute or attributes you'd like to add to a group(s).
2. Then, click the option "Add to groups" that pops up in the toolbar.
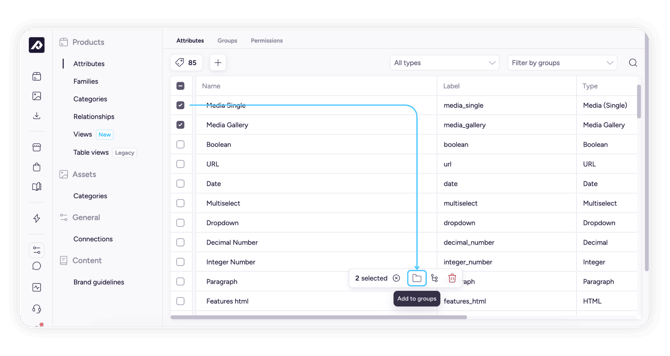
3. Select the groups you want to add your attributes to.

4. Click "Save."
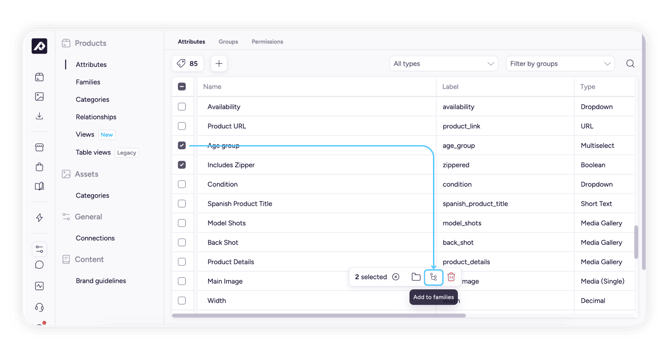
Adding Attributes to Product Families
To add attributes to product families:
1. In Settings, go to the 'Attributes' tab. From the Attributes list, tick the checkbox next to the attribute or attributes you'd like to add to a family. A menu will appear at the bottom of the screen showing how many attributes are selected.
2. Click on the "Add to families" icon that pops up in the toolbar. This opens the "Add to families" panel.
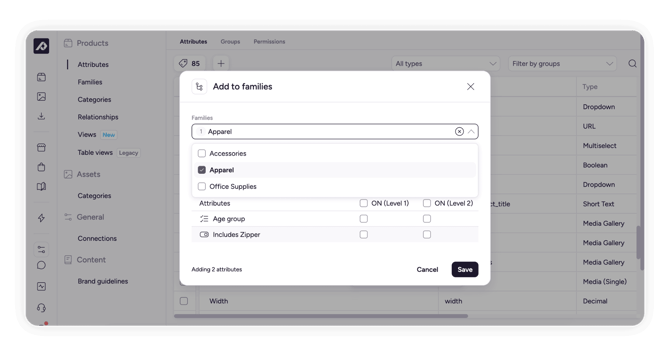
ℹ️ Completeness attributes cannot be added to product families.
3. Under 'Families,' select one or more families to add the attribute(s) to.
4. Under 'Set inheritance,' choose whether the attribute(s) should inherit automatically from the parent product to its variants. You can set this separately for Level 1 and Level 2 variants by ticking 'ON' next to each attribute.
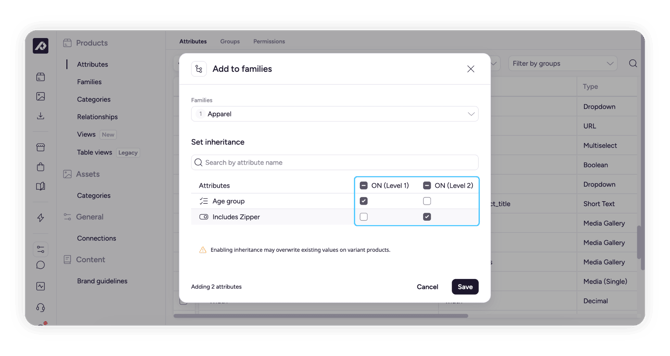
ℹ️ Learn more about setting the inheritance status here.
⚠️ Setting inheritance to ON for an attribute will cause the parent's value to overwrite whatever value the variant currently has for that attribute.
Deleting an Attribute
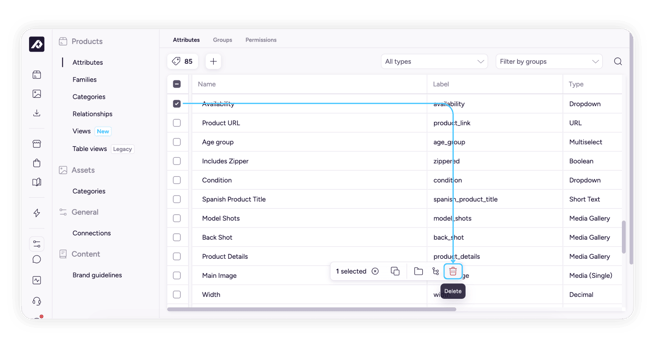
To delete an attribute:
- Go to 'Settings' in the side menu.
- Select the attribute you want to delete.
- Click the 'Delete' button that appears at the top of the table.
- Confirm your deletion by typing "DELETE" and clicking 'Delete'.
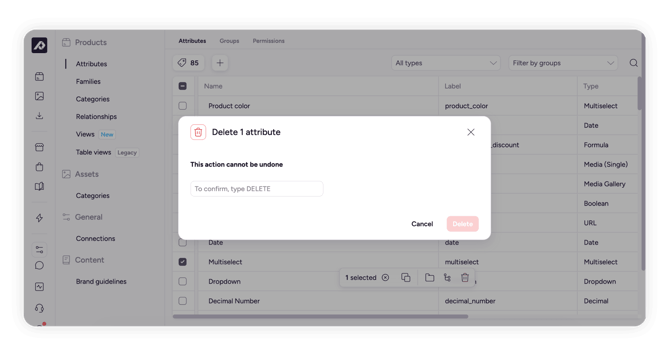
⚠️ If an attribute is being used in a Channel or a Brand Portal, they must be removed from those locations before they're deleted.
Attributes in Use
In Plytix, you can see the locations where each attribute is used.
To see attributes in use:
1. Go to 'Settings' in the side menu.
2. In the 'Attributes' area, find the attribute you want to see in use.
3. Hover over the attribute to reveal the 'See Locations' icon.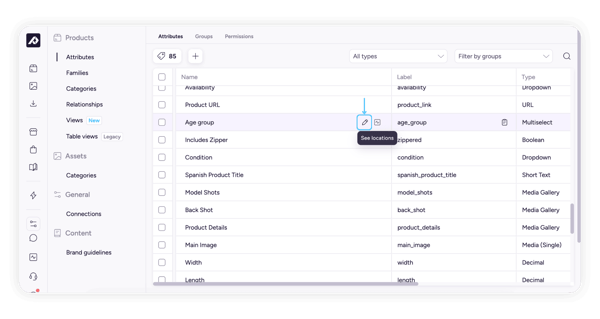
4. Click the icon to show everywhere this attribute is used.
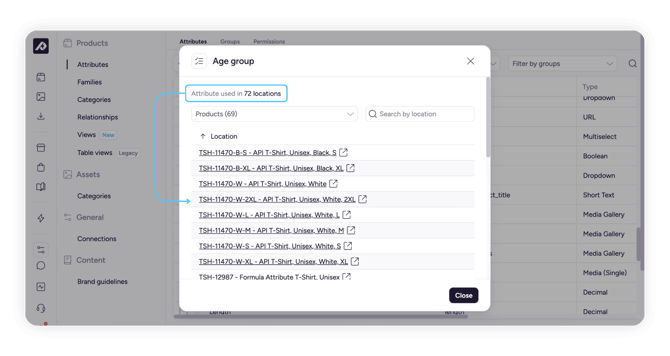
5. Click on the dropdown to filter by Products, Brand Portals, or Channels. You can click on the different sections to be taken to the Product, Channel, or Brand Portal where the attribute is used.
💡 Hover over an item to copy its URL.
What's next?
- Learn how to organize your attributes by group
- Learn about adding content to your products
- Learn how to use attribute filters to find information