
Through Plytix’s Google Shopping channel, you can set up a Google Merchant Center (GMC) feed to send data from Plytix to Google Shopping. The Google Shopping template supports flexible attribute mapping and automatically transforms supported attributes into the format required by Google Merchant Center.
Creating your Google Shopping Channel
*Skip to any section in this article by clicking on the links above
💡 This guide explains how to set up a Google Shopping channel using Plytix's Google Shopping template, which maps your attributes and generates the XML feed required by Google Merchant Center. If you prefer to build a custom XML feed manually, click here.
Creating your Google Shopping Channel
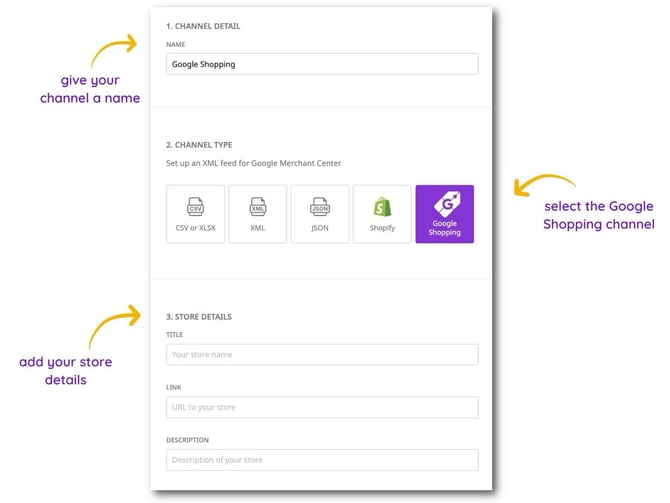
- To access Plytix's Google Shopping channel, click the Channels icon in the left sidebar.
- Click the Add Channel button.
- Then give your Channel a unique name, and choose Google Shopping.
- Fill in your store details information: your store title, store link, and a description. You can also change these details later under the Settings tab.
Channel Overview
After adding your Google Shopping channel, you will get to your channel detail page.
ℹ️ You can learn more about creating and managing channels here.
In your Google Shopping channel, you will find the following tabs:
Process Log
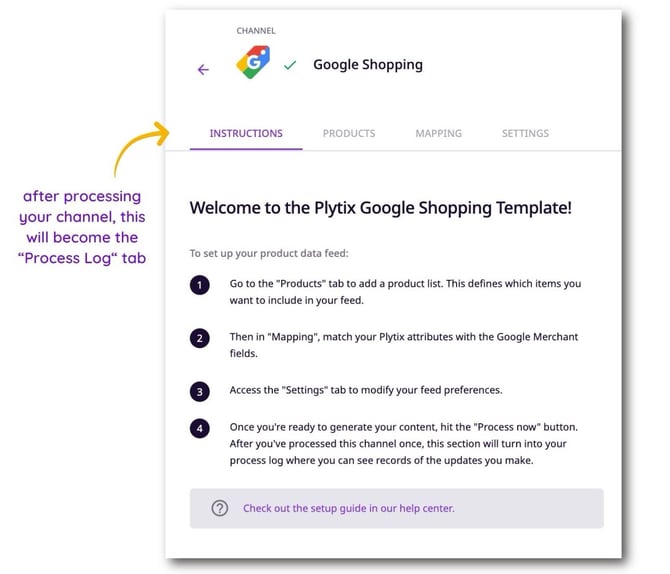
Before you process your channel for the first time, this tab will be the Instructions tab, where you can find general information about your channel and the step-by-step to process it.
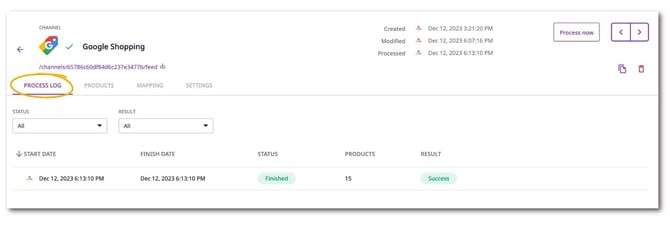
After your channel has been processed, this tab will automatically change to become your Process Log.
In this tab you can find:
- The date and time your channel started and finished processing
- The status of each processing
- The number of products that were processed
- The result, whether your channel was successfully processed or failed
Products
A Google Shopping channel is a Destination, so products are added to it by assigning them directly, there's no separate product list step.
- Click the Add products button.
- In the Add products window, use the All products and Selected tabs to browse everything available or review what you've already checked off.
- Use the Search by SKU or label field to find specific products, or tick the Select all checkbox to select everything shown.
- Tick the checkbox next to each product you want to include in the feed.
- Click the Save button to confirm, or the Cancel button to back out.
While you're still in the Add products window, you can deselect a product before saving by heading to the Selected tab and clicking the X icon beside it.
To remove a product that's already assigned to the channel, tick the checkbox next to it (or multiple checkboxes) in the Products table, then click the trash icon in the bulk action bar at the bottom of the screen and click the Remove from destination button to confirm.
💡 You can also assign products to this channel from outside the channel itself, for example, from Product Overview using the bulk action bar, from a product's own Detail page under its Destinations tab, or via an Automation. Learn more in Understanding and Managing Destinations.
⚠️ Make sure to process your channel again whenever you change your product list to ensure your feed is updated with these changes.
Mapping
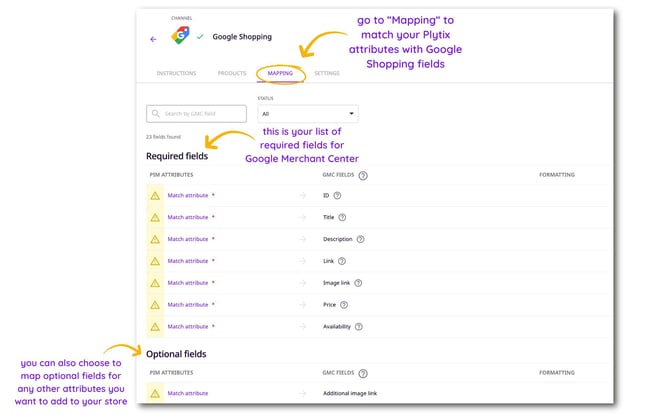
Go to the Mapping tab to configure which product attributes are included in your Google Shopping feed. The tab is divided into two sections:
- Default attributes
- Custom attributes
Default attributes:
The Default attributes section contains the standard Google Merchant Center fields included in Plytix's Google Shopping template, such as:
- ID
- Title
- Description
- Link
- Image link
- Price
- Availability
You can map your Plytix attributes to these fields directly, or apply attribute transformations that only affect this channel.
ℹ️ Depending on the products you sell and the countries you target, Google Merchant Center may require additional attributes beyond those included in the template. We recommend reviewing Google's documentation for country-specific and category-specific requirements.
Custom attributes:
The Custom attributes section allows you to add attributes beyond the standard Google Shopping template fields, which can be useful if you want to include extra product information in your feed.
When adding custom attributes, Plytix automatically validates output field labels to help prevent XML formatting issues during feed processing. For example:
-
unsupported formatting,
-
invalid field names,
-
or restricted characters and spaces may trigger validation warnings before processing.
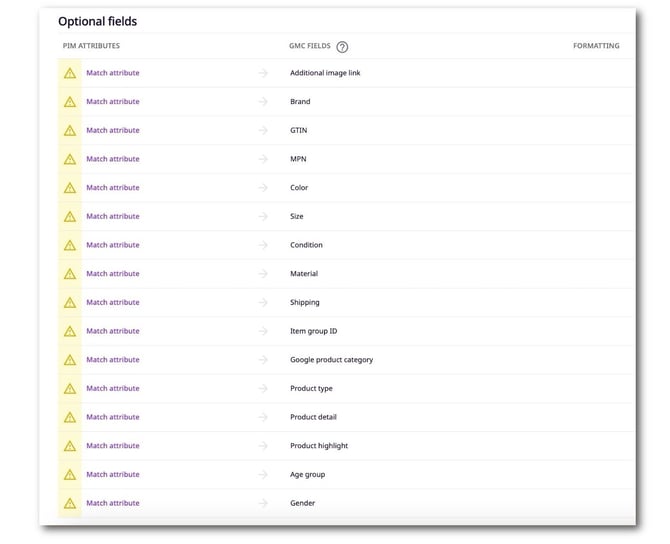
⚠️ Google Merchant Center has specific formatting requirements for attribute labels. Plytix helps validate custom field names, but we recommend reviewing Google's documentation to confirm compatibility with your GMC setup.
Settings
In the Settings tab, you can manage the following information:
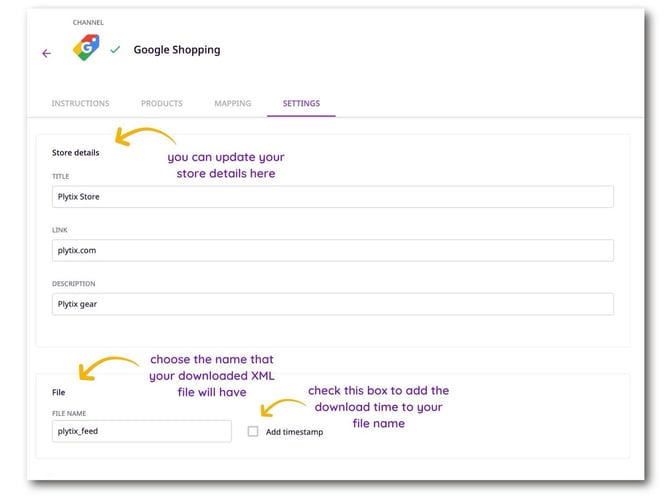
- Store Details: Here you can modify your store Title, Link, and Description (which you entered during the Channel creation).
⚠️ Remember to always process your channel again whenever you update your store details.
- File: You can customize how your file will be named when you download it. You can also choose to add a timestamp to the file name for reference.
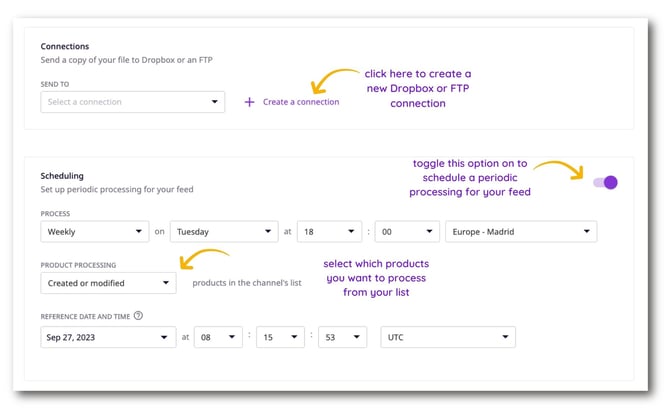
- Connections: If you have a FTP or Dropbox account, you can send a copy of your GMC file. To do so, click the + Create a connection button to establish an FTP/SFTP or Dropbox connection.
- Scheduling: You can choose to set up a periodic processing for your feed if you wish to have your channel processed automatically at a specific set time.
Processing your channel
To process your feed, you will follow the same steps you would for another channel type.
ℹ️ Learn more here about processing a channel in Plytix.
To process your GMC feed:
- Assign the products you want to include in this feed (we recommend filtering by a completeness attribute in Product Overview, then using the bulk action bar to assign only the products that are ready to your Google Shopping channel!)
- While Plytix’s Google Shopping channel already includes a list of required fields for a product data specification feed, additional fields may be required depending on what kind of products you are managing and what country you are selling them to. We recommend checking the Google documentation for specifications on which attributes are required for your product type and according to each country.
- After you have mapped your attributes, click the Process now button or set up scheduled processing in the Settings tab.
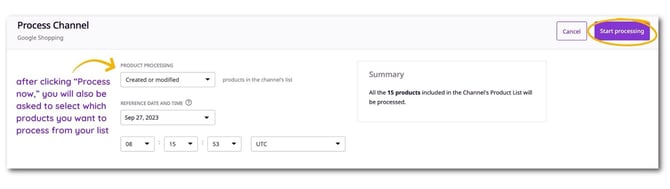
4. Once your channel has been processed, you will have access to your feed URL under your channel name. Copy your feed URL and paste it into your GMC account.
.jpg?width=670&height=419&name=GMC%20Channel%20(1).jpg)
ℹ️ No matter how many times you process your channel, your feed URL remains the same.
What's next?
- Learn how to generate a backup of your Plytix data
- Learn how to upload a CSV template into a CSV or XML channel
- Learn how to manage different channels in Plytix