How to export your data from Shopify and import it into Plytix
Depending on which data you store in Shopify, you may need to export that information from Shopify if you want to manage it directly in Plytix. Yet, Shopify exports multiple rows of data per product in its CSV file, while Plytix requires one row per product to recognize the data upon import. Although Shopify and Plytix apply different file sorting methods, you can follow the guide below to learn how to export data from Shopify and import it into Plytix.
ℹ️ While this article provides the step-by-step of how to import a Shopify CSV file into Plytix, remember that your designated implementation specialist will be happy to assist you with it. Reach out to your account manager for more information, or book a demo with us to learn more about our onboarding process!
Before Importing Shopify Products
*Skip to any section in this article by clicking on the links above
Before Importing Shopify Products
First, go to your Shopify store and export your products in CSV.
Then, duplicate the CSV file you just exported from Shopify. Name one spreadsheet “Parents and Singles” and the other one “Variants.” There are a few tweaks you’ll need to make in the two different spreadsheets before importing them into Plytix.
In the “Parents and Singles” spreadsheet:
- Duplicate your “Handle” column. Name the first column “SKU” and keep the second column named “Handle”.
- Rename your “Variant SKU” column as “Future Single SKU”
In the "Variants" spreadsheet:
⚠️ Before moving forward with the next steps, look out for these two conditions in your spreadsheet:
- There aren’t duplicate variants in the “Variant SKU” column
- There aren’t values in “Option1 Value” when we filter by “Title” in the “Option1 Name” column
- Rename the column “Handle” to “Variation of”
- Find the “Option1 Name” column and select it. Select the “filters” icon in your CSV reader. Click “Clear all filters.” Then, make sure the “Title” option is checked.
ℹ️ We recommend using a CSV reader platform to edit your spreadsheets - the example below was done using Google Spreadsheets.
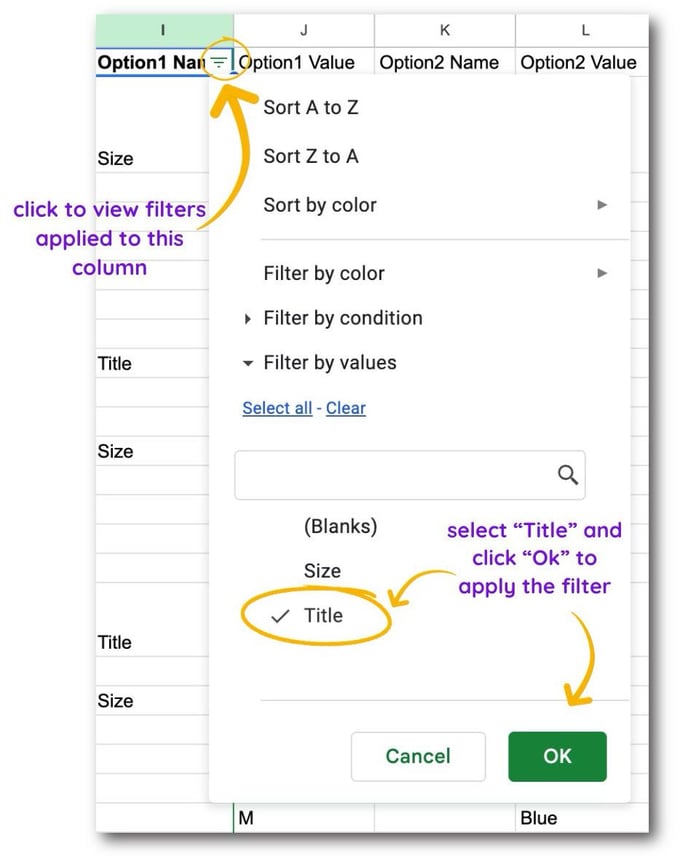
3. Now, while the “Title” filter is selected for the “Option1 Name” column, find the “Variant SKU” column. Select all values in that column and delete them, but keep “Variant SKU” as the column header.
4. Then, remove the filter applied on the column “Option1 Name”.
5. Finally, rename the column "Variant SKU" to just "SKU".
6. We also recommend duplicating your “Variant Image” column and naming the duplicate column “Shopify Variant Image” (or another recognizable name for a Media Single attribute). This way, when importing your CSV file into Plytix, you’ll be able to match one column to the Thumbnail system attribute and the duplicate column as a new attribute for future reference and better management of your Shopify variant images.
Importing Parents and Singles
After making the changes to your two spreadsheets, you will need to import both spreadsheets into Plytix, starting with the one named “Parents and Singles”.
- Drop the “Parents and Singles” sheet into the Plytix importer. Continue through steps 1 and 2 of the importer until you reach the data matching section.
- In the data matching section, create new attributes or match the following columns with existing attributes:
- SKU: will automatically be matched with the system attribute SKU
- Handle: match with an existing short text attribute or create a new one
- Title: we recommend matching this field with the system attribute Label or create a short text attribute
- Future Single SKU: match with an existing short text attribute or create a new one
- Option1 Name, Option2 Name, and Option3 Name: we recommend matching these fields with a dropdown attribute or create a new one
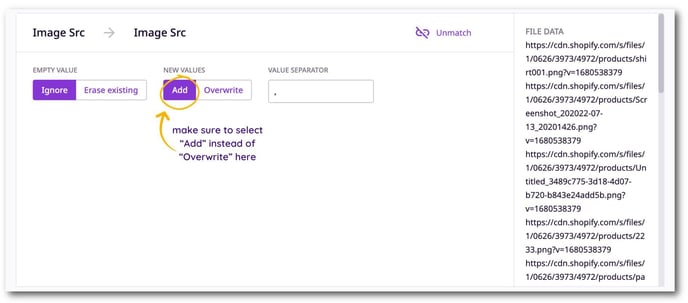
- Image Src: we recommend matching this field with a Media Gallery attribute or create a new one
⚠️ After matching, adjust import settings for Image Src to “Add” new values rather than “Overwrite” like the image below shows. Otherwise, if you have more than one image for a product, the images will be overwritten during import.
4. Click ‘Start Import’.
Importing Variants
After importing the “Parents and Singles” sheet into Plytix, you can import the “Variants” CSV file.
- Drop the “Variants” sheet into Plytix’s importer. Continue through steps 1 and 2 of the importer until you reach the data matching section.
- In the data matching section, create or match attributes for the following columns:
- SKU: will automatically be matched with the system attribute SKU
- Variation of: will automatically be matched with the system attribute “Variation of”
- Title: Match with the system attribute “Label”
💡 We recommend matching the “Title” with the same attribute you matched for the "Title" column in the "Parents and Singles" CSV file.
- Option1 Value, Option2 Value, Option3 Value: Create a new dropdown attribute or match it with an existing one (as long as the values of these attributes don’t exceed 1000 options!)
- Variant Image: We recommend matching this field with the Thumbnail attribute, and matching the column you duplicated in the CSV file to a Single Media attribute.
Beyond this list, you can add any other attributes you want your variants to have in Plytix. These may include Option1 Name and Description (if they contain values), for example.
⚠️ Note that many products from your import of the “Variants” sheet will be marked as “Failed” in the import log. This is intended because of the values removed when you edited the “Variants” sheet for the creation of variant products.

Filtering out Single Products
Now that you have imported both your “Parents and Singles” and “Variants” CSV files into Plytix, you will do a third and final import of products, but using a Plytix feed. This is done to create the single products from your Shopify into your PIM.
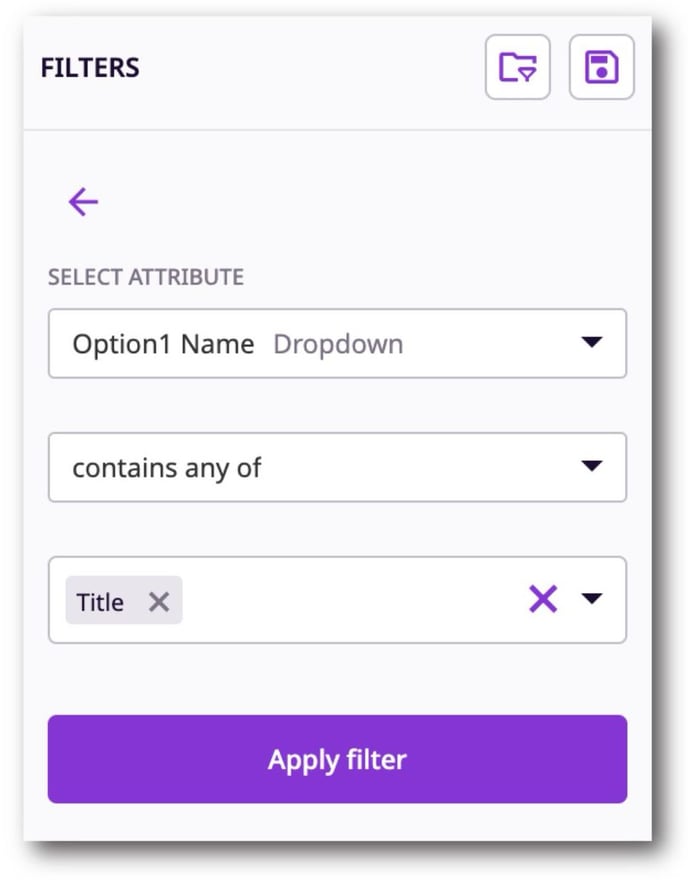
- Head over to your Product Overview page. In the filters tab, run a filter with “Option1 Name” > “Contains any of > “Title”
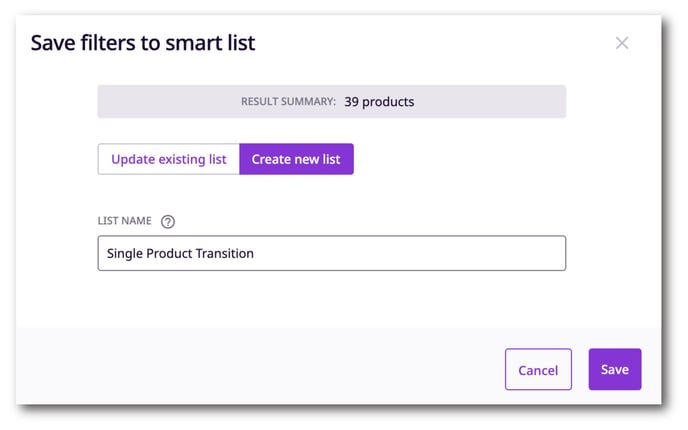
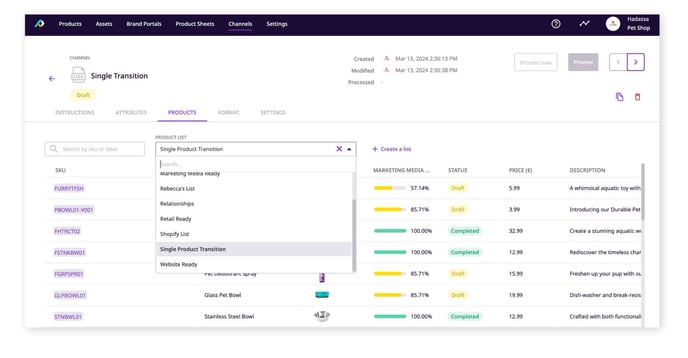
2. Click on 'Save Filters' to save this selection of products as a Smart List. Name the Smart List “Single Product Transition”.
3. Once you have your list, head over to the “Channels” tab. Create a CSV channel called “Single Transition”.
4. In the attributes tab of your channel, add all the attributes you want your single products to have, such as:
- SKU
- Title
- GTIN
- Thumbnail
- Categories
- Label
- Variant Image
- Handle
- Future Single SKU
- Image Src
💡 Make sure to include any relevant attributes for your single products that aren’t variant-specific.
5. Then, in the “Products” tab of your channel, select your smart list “Single Product Transition”.
Now you will import the CSV file you downloaded from your channel back into Plytix.
- Click on “Products” and select 'Import'.
- Upload the file you downloaded from your channel and follow the steps until you reach the “Data matching” section.
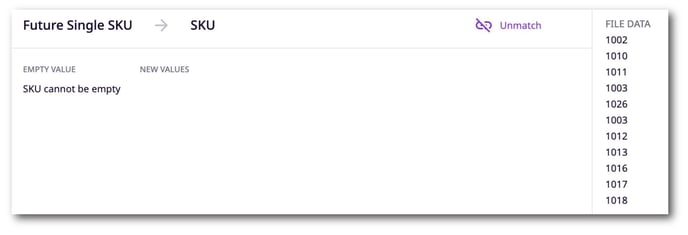
- In the data matching section, you will notice the “SKU” column will be automatically matched with Plytix’s SKU system attribute. However, you will need to match a different column with the SKU attribute. For this reason, unmatch the SKU column.
- Find the “Future Single SKU” column and match it with Plytix’s “SKU” attribute.
5. After doing that, all other attributes should be automatically matched. If all your attributes are matched, click ‘Start Import’.
Deleting Duplicate Products
To make sure everything is correct, the next step is to run another filter, before you can delete duplicate products to only keep the newly imported single products.
- From the Products Overview Page, load your Smart List “Single Product Transition”. Make a note of the number of products that match these conditions.
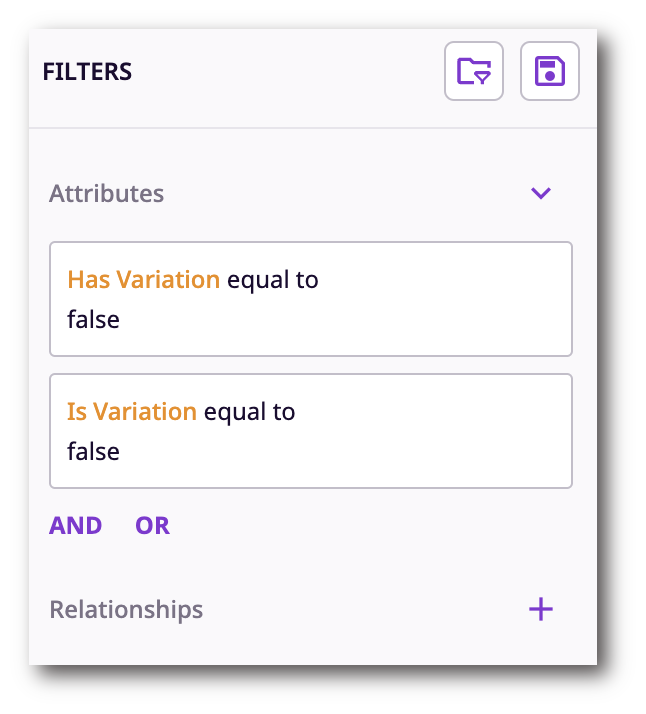
- Clear your filters. Then, run the filter “Has variation” > equal to > false AND “Is variation” > equal to > false. Make a note of the number of products that match these conditions. The result should be all of the single products you initially exported from Shopify.
Now that you have successfully imported all single products and parent products with their variations from Shopify into Plytix, you can set up a Shopify channel to connect your Plytix data with your Shopify store! Learn more about creating and managing a Shopify channel here.
What's next?
- Learn how to process a Shopify channel
- Learn how to map Shopify fields
- Learn how to get the API access token from your Shopify store
Is there anything you were hoping to find in this article that is missing? Did this article answer the questions you had? Let us know in our Help Center feedback form! 🙌
If you have any questions just contact us by clicking on the chat icon in the bottom-right corner and we'll get back to you as soon as possible...
and please let us know 👇