How to associate a large amount of assets with existing products in Plytix
The fastest ways to link assets and products together in Plytix are either by choosing criteria in your asset file names to link them to products automatically, or by importing asset URLs in a CSV file. This article will discuss these two methods for bulk asset mapping, as well as what to do if you need to generate URLs for your assets using the PIM.
Autolinking Assets to Products
Linking Assets in Bulk via CSV Import
Linking Assets in Bulk via CSV Import without URLs
*Skip to any section in this article by clicking on the links above
Autolinking Assets to Products
If you have a standard naming convention for your assets, then you can link them to your products by using the information contained in their file names, such as SKU, GTIN, or handle.
ℹ️ In order to use this feature, your asset file names must include text that matches an attribute value stored in Plytix. If your asset file names contain more than just this value, it must be separated from the rest of the text by a unique right or left delimiter, or both. For example: watercolor_set#RM9730008-1.jpg (delimiters for the SKU value here would be "#" and "-".)
- Starting from the Assets overview, select which assets you want to link, then click 'Link to...' and select 'Products.'
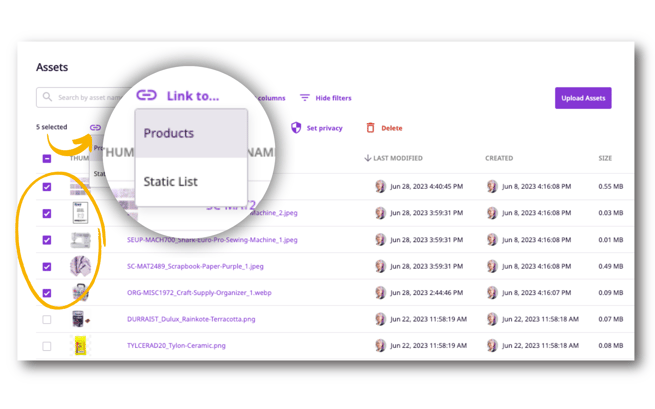
- Next, click the 'Based on asset name' option on the left side of the screen.
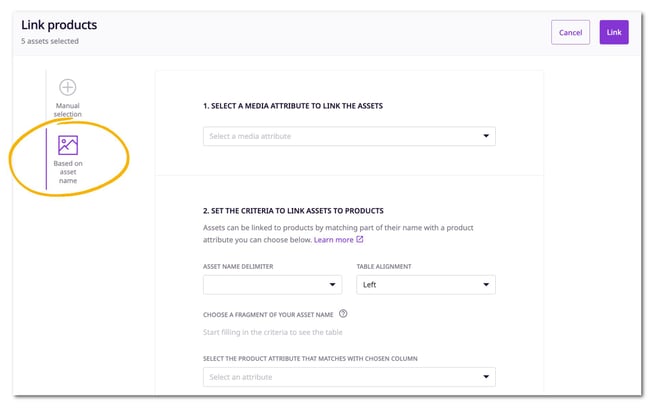
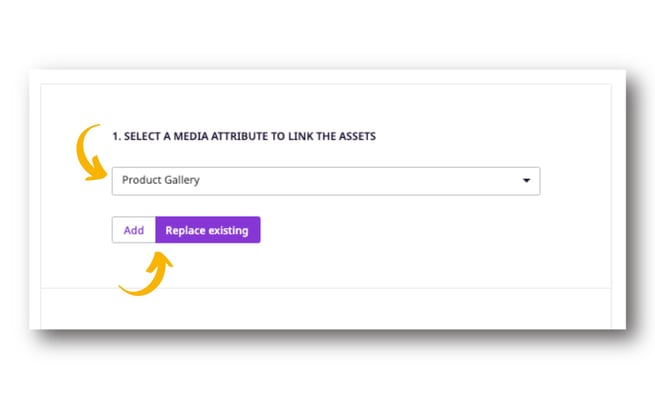
- In section 1, choose the attribute to which you want to assign your assets and decide if you want to add assets to the media gallery or use them to replace existing assets in the media gallery.
- In section 2, select which criteria will be used by the system to match products to assets.
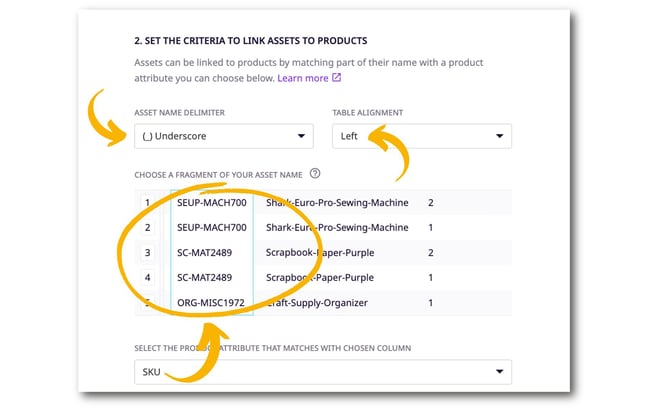
- 'Asset Name Delimiter' - choose between dash, underscore, dot, or hashtag
- 'Table Alignment' - choose between Left or Right
- 'Choose a Fragment of Your Asset Name' - define which column contains the information you want to match to an attribute in Plytix
- 'Select the Product Attribute that Matches with the Chosen Column' - Choose from any short text type attribute.
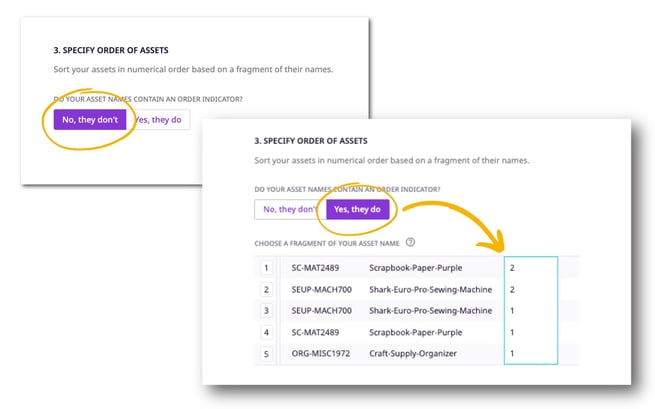
- In section 3, specify the order in which assets should be arranged in a gallery if applicable.
- 'No, they don't' - asset names don't specify order in which assets should be linked to a product or you don't want to order them
- 'Yes, they do' - choose which column contains the numbers that order your assets
- Lastly, click 'Link.'
.jpg?width=688&height=430&name=Linking%20Assets%20to%20Products%20in%20Bulk%20(2).jpg) You will be taken back to the Assets overview and will see a message that your changes are being processed.
You will be taken back to the Assets overview and will see a message that your changes are being processed..jpg?width=688&height=430&name=Linking%20Assets%20to%20Products%20in%20Bulk%20(1).jpg)
After the linking process has finished, you'll see a notification message at the bottom of the screen to tell you how many assets and products were linked. Assets you linked will now show how many products they are linked to in the "Linked Products" column.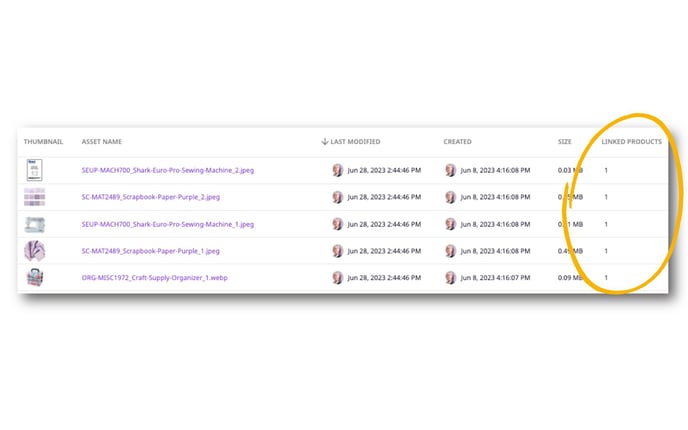
ℹ️ You can autolink up to 1000 assets at a time.
ℹ️ Note that if you are linking an asset to a media single attribute, you will not see the options to 'add' or 'replace exisiting' because these attributes can only contain one file. This means the existing asset will be replaced by the new one you are linking.
Linking Assets to Products in Bulk via CSV Import
Linking Thumbnails to Products
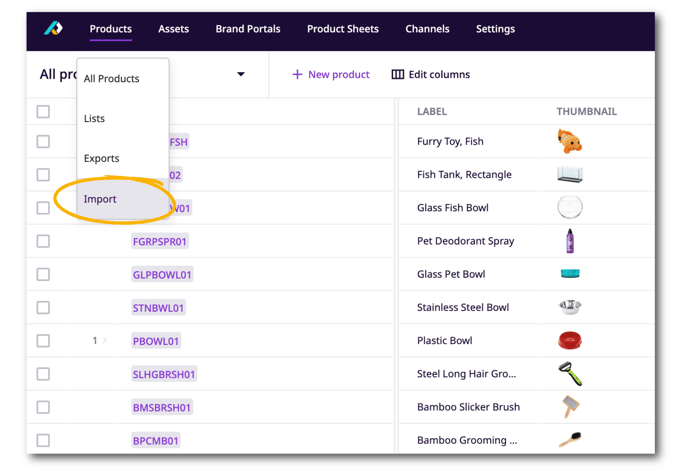
First, you'll need a CSV file with the SKUS of your products in one column and the links to your assets in another column. Import this file by selecting 'Import' from the 'Products' tab in the main navigation bar.
Select the CSV file you want to import.
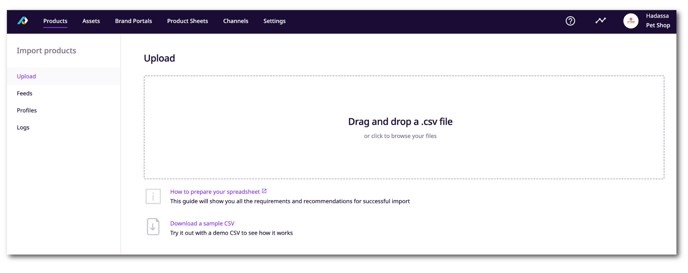
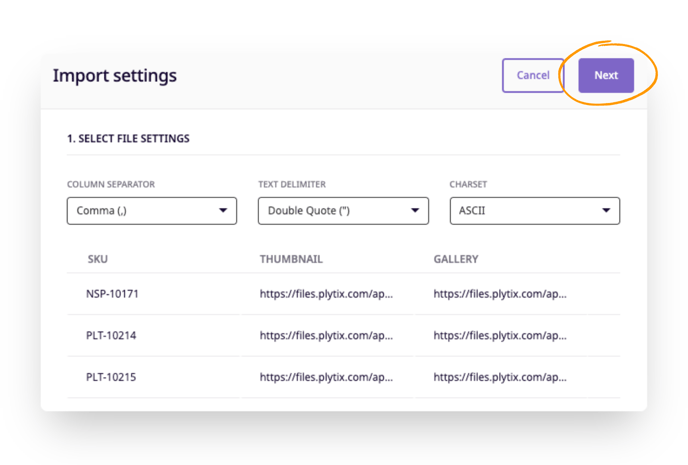
On the following screen you'll see a preview of your file. Click 'Next.'
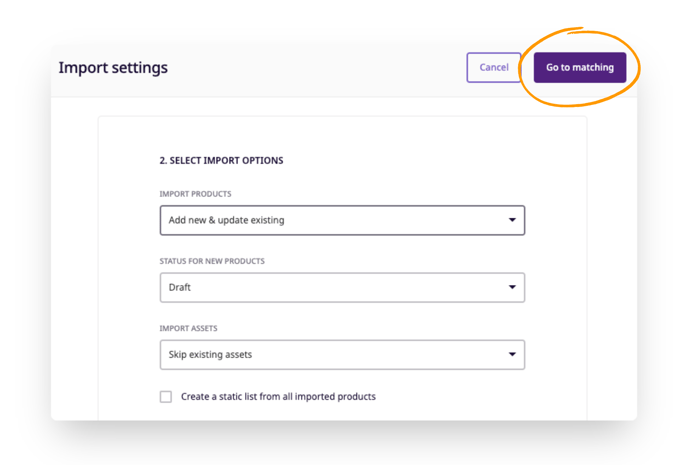
There is no need to change import options. Click 'Go to matching.'
To associate a single image with a product, match your SKU column to the 'SKU' attribute. Match your column of image links to the 'Thumbnail' attribute.
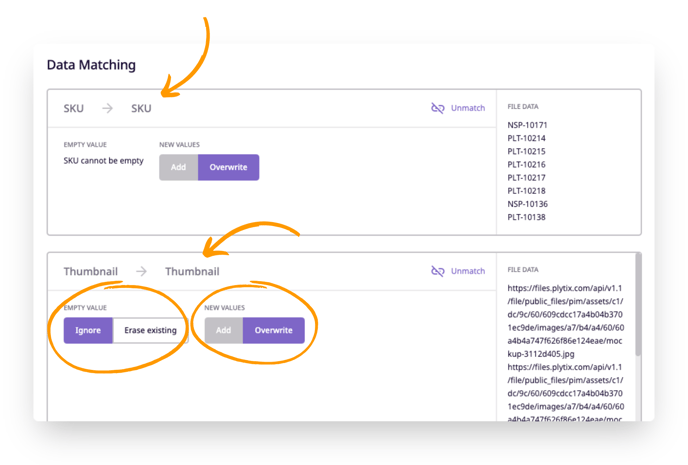
💡 If any of your product SKUs do not have assets, you can choose to ignore them, or erase existing assets associated with them. If you've previously associated assets with any of your SKUs, you can choose to add new assets or overwrite the old ones.
For linking multiple files with a product, keep reading.
Linking Multiple Assets to Products
To associate multiple images (and/or videos) with a product, match your SKU column to the 'SKU' attribute and your column of links to a custom 'Media Gallery' attribute or 'Media Single' attribute.
If using a media single attribute with multiple asset links, be sure to choose 'Add' in the "New Values" selector rather than 'Overwrite.' Selecting 'Add' will create a new media single attribute for each imported asset.
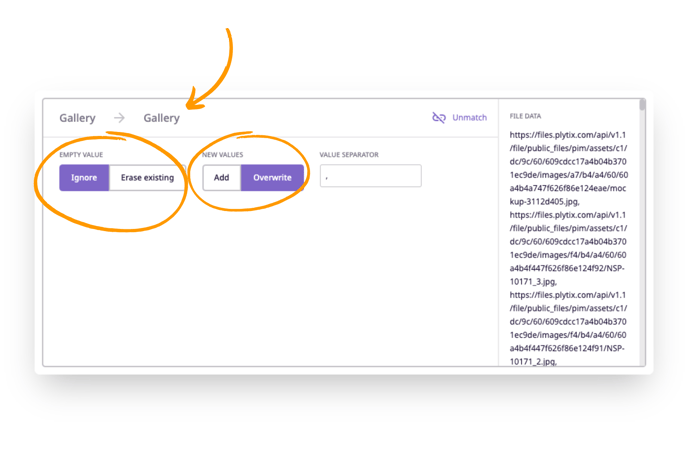
💡 If any of your product SKUs do not have assets, you can choose to ignore them, or erase existing assets linked to them. If you've previously linked assets with any of your SKUs, you can choose to add new assets or overwrite the old ones.
Viewing Uploaded Assets
Your newly uploaded assets will now appear on the product detail page of linked products and in the columns of the product overview table.
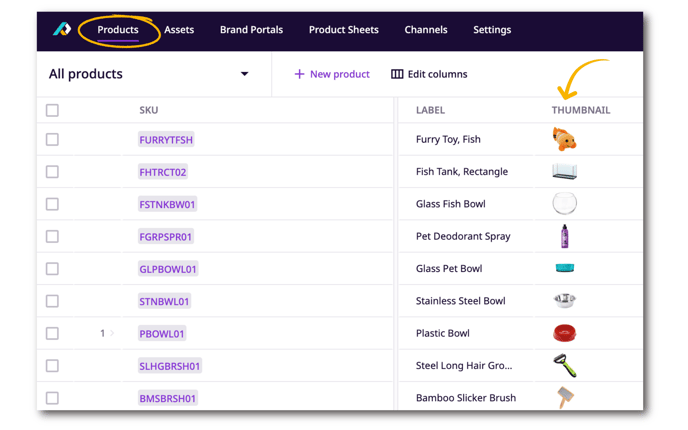
In addition, you can find all the assets you've uploaded in the 'Assets' tab of the main navigation bar.
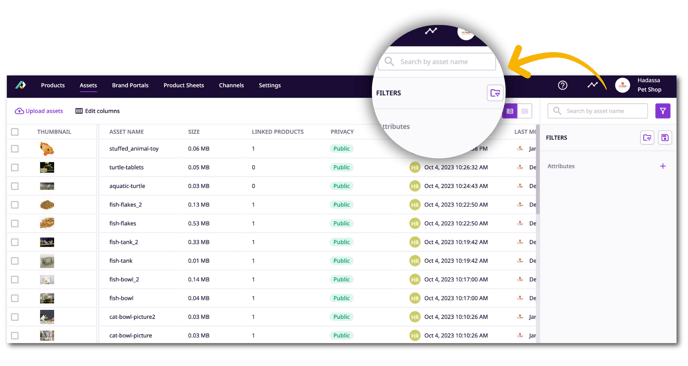
Here you can search for assets by name or sort them using filters. You can view when each asset was created or modified, and by which user. By clicking on an asset, you can also view all of its linked products.
ℹ️ Note that Plytix does not have a built in video player for previewing video attributes. This means that you cannot view videos within the system, but they will appear with the rest of your assets when exported.
Linking Assets in Bulk via CSV Import without URLs
ℹ️ This method requires you to have the SKU in the file name.
If your assets use a naming convention where the SKU is included in the file name, this the fastest way besides autolinking to organize your files when you are first setting up Plytix.
What you need:
- Your files accessible from a local device
- Your files with the SKU you'll use in Plytix included in the file name (e.g 4562WE2_blue.png)
- A Plytix account
What you need to do:
First you will need to generate URLs and put them into a CSV file. To do this:
- Take all of your files and upload them into Plytix following the steps from the first section of the article Uploading and Importing Assets.
- The from the 'Assets' tab, select all assets.
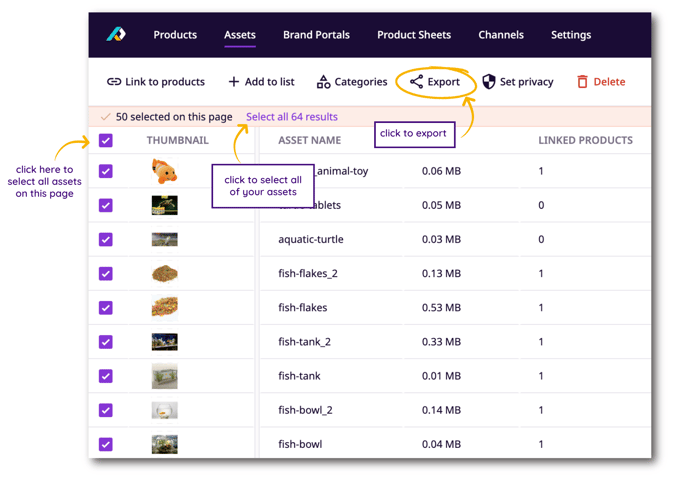
3. Click 'Export.'
4. Choose the 'CSV' option (XLSX is also good if you work directly with Excel).
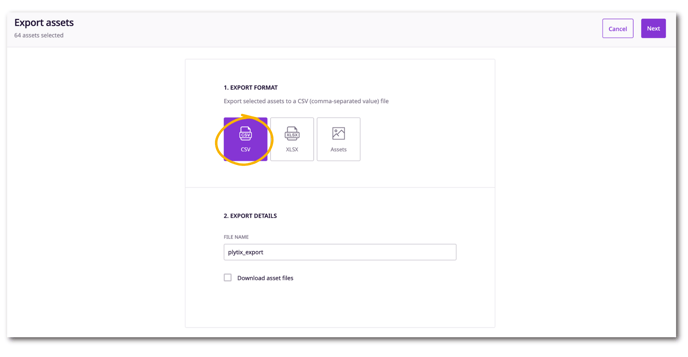
5. Select the asset attribute 'File Name' to include in the CSV.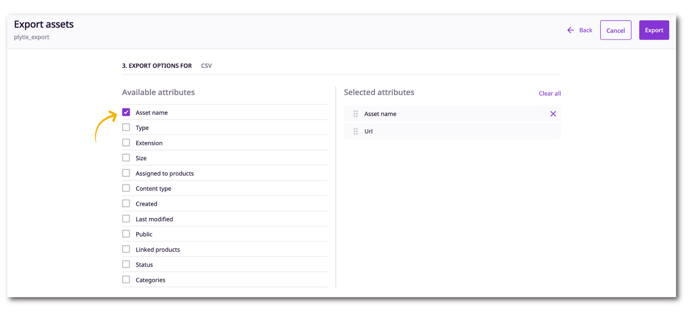
6. Click 'Export.'
Your CSV will be automatically downloaded in the browser or you will receive an email, depending on the size of the file requested.
💡 When exporting, use filters with the "Create Date" if you already have assets in the system that you don't want to include in this process.
Once you've downloaded your file, you will need to open it in a spreadsheet to format the file for import.
To do this:
- Open your CSV or XLSX as a spreadsheet. Excel or Google Sheets is recommended.
- Choose the "Asset Name" column.
- Split the asset name to isolate the SKU in its own column (see tip below).
- Then find the column that holds your SKU and name it "SKU".
- Rename the "URL" column to the attribute you want to import on, for example the "Thumbnail" system attribute.
- Delete any unnecessary columns.
- Export the file as a CSV.
💡 Use these links to learn how to split text into separate columns:
⚠️ You may need to trim white space and perform other actions to make sure that your SKU column is properly isolated and formatted.
Now you are ready to import the CSV file into Plytix. When your import has completed, all the files will be linked to your products.
What's next?
- Learn how to import and upload assets to Plytix
- Learn how to link and unlink assets with products manually
- Learn how to export assets