
In Plytix, transforming your images is quick and simple. With AI Edit, you can automatically remove image backgrounds, relight images, create custom prompts, upscale resolution, and optimise images for Shopify, all without leaving the platform.
You can apply this to a single image or process multiple images at once, so your product catalog stays consistent and channel-ready.
ℹ️ Please note that these are beta features. If any of these features are not yet available in your account, please contact your Account Manager.
Relighting Your Images
Creating a Custom Prompt
Shopify Ready
Editing Images in Bulk
*Skip to any section in this article by clicking on the links above
Removing Image Backgrounds
Automatically clear out image backgrounds with AI to make your products stand out in your sales channels.
To remove a background from a single image:
1. Select an image from the All assets page. (You can also edit the image directly from its asset detail page).
2. Click the "AI Edit" (🪄) icon.
3. In the modal, choose "Remove background".
4. To generate the result, click "Generate".
ℹ️ This action consumes credits.

This will create a copy of your original asset with the applied edits. The original image is not overwritten and remains unchanged.
Relighting Your Images
Relighting your images with AI in Plytix helps you quickly improve and adjust the lighting of your product photos in just a few clicks. This makes it easy to create more consistent visuals across your catalog, especially when images come from different environments or setups.
To relight a single image:- Select an image from the All assets page. (You can also edit the image directly from its asset detail page)
- Click the "AI Edit" (🪄) icon.
- In the modal, choose "Relight".
- A panel will appear. On the left side, you will see the configuration options, including Relight styles and editable parameters. On the right side, you will see the preview of the result.

5. Click "Preview" to test your settings.
6. Click "Generate" to apply the changes and create the new asset.
ℹ️ This action consumes credits.
This will create a copy of your original asset with the applied edits. The original image is not overwritten and remains unchanged.
Creating a Custom Prompt
With AI Edit in Plytix, you can create your own custom prompts to define how your images should be transformed. You simply describe the result you want, and the Plytix AI applies it to your asset. This gives you more flexibility to adjust and enhance product images so they better match your needs.
To create a custom prompt for a single image:
1. Select an image from the All assets page. (You can also edit the image directly from its asset detail page).
2. Click the "AI Edit" (🪄) icon.
3. In the modal, choose "Custom prompt".

4. In the text field, describe the transformation you want applied to the image or click Saved prompts to load a prompt you've used before (check out Saved prompts below).
5. Click Preview to see the result before generating, then click Generate to apply.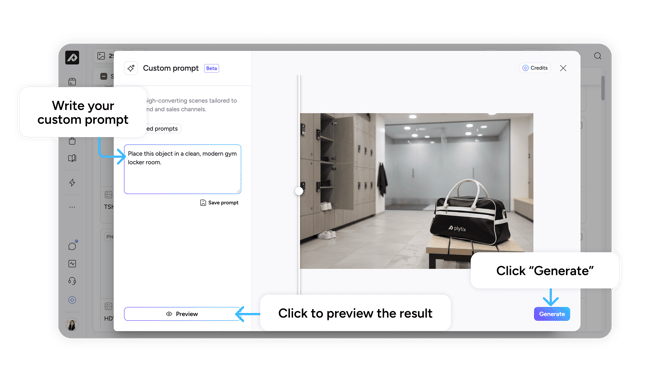
Not sure what to write? Custom prompts work best when you're specific about the result you want. Here are some examples to get you started:
- "Place the product on a white marble surface with soft shadows"
- "Add a warm sunset background"
- "Keep the background but remove the mannequin"
ℹ️ This action consumes credits. This will create a copy of your original asset with the applied edits. The original image is not overwritten and remains unchanged.
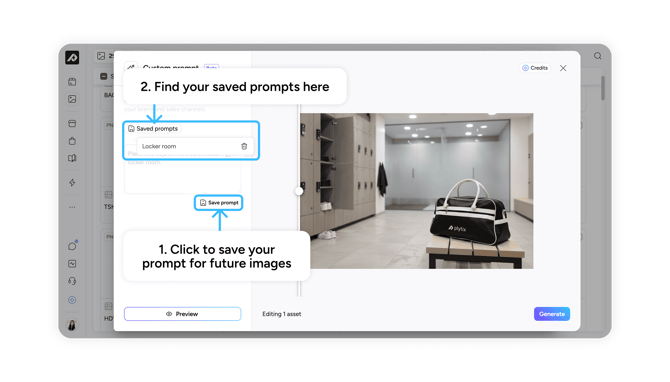
Saved prompts
If you write a prompt that works well, you can save it to reuse later rather than writing it from scratch each time. Saved prompts are especially useful when you're applying the same transformation across multiple assets. For example, placing all your products on the same background or applying a consistent style across a catalogue shoot.
To save a prompt, write it in the text field and click Save prompt before generating. To use a saved prompt, click the Saved prompts button above the text field and select the one you want, it will load into the field, where you can edit it further if needed before generating.
⚠️ Users can save up to 10 prompts per account.
Upscaling Your Images
AI Upscale increases the resolution of your images without losing visual quality. This is useful when your original assets are too low-resolution for certain channels or print requirements.
To upscale a single image:
- Select an image from the All assets page. (You can also edit the image directly from its asset detail page.)
- Click the AI Edit (🪄) icon.
- In the modal, choose Upscale.
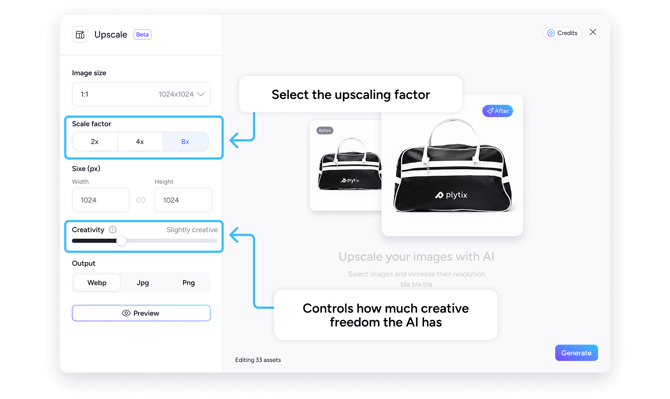
- Configure your upscale settings:
- Image size: Select a ratio from the dropdown (e.g. 1:1, 2:3, 3:2, 3:4, 4:3). The pixel dimensions will fill automatically based on your selection, but you can adjust them manually.
- Scale factor: Choose between 2x, 4x or 8x upscaling.
- Added Detail: Controls how much creative freedom the AI has when generating texture, edges and fine visual information at the new resolution.
- Minimal: stays close to the original, adding only what's needed for a clean upscale.
- Balanced: adds more texture and sharpness while staying faithful to the original.
- Maximum: most creative freedom, sharper results but further from the original.
- Click Generate to create the upscaled asset.
💡 Use Minimal/Balanced for accuracy (e.g. product photography), Maximum for visual impact over fidelity.
ℹ️ This action consumes credits.
This will create a copy of your original asset with the applied edits. The original image is not overwritten and remains unchanged.
Shopify Ready
Get your images ready for Shopify. Shopify Ready automatically optimises your images to meet Shopify's recommended image standards, so your assets are listing-ready without any manual resizing or converting. Choose a product listing, banner, or collection preset to apply recommended Shopify image settings, then adjust if needed.
To use Shopify Ready on a single image:
- Select an image from the All assets page. (You can also edit the image directly from its asset detail page.)
- Click the "AI Edit" (🪄) icon.
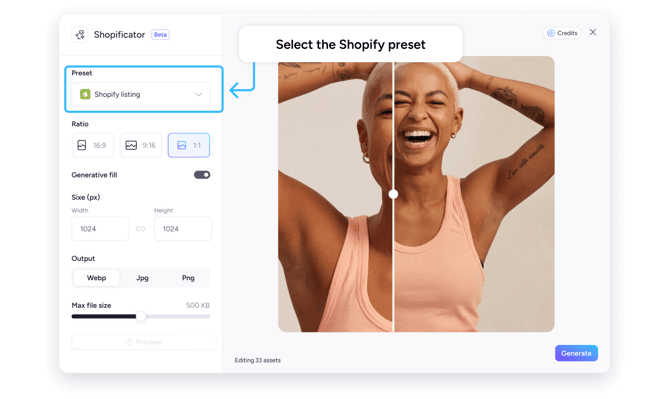
- In the modal, choose "Shopify Ready".
- Select a preset from the dropdown:
- Shopify listing (2048×2048)
- Shopify banner (1920×1080)
- Shopify collection (1024×1024)
- Adjust the ratio, pixel dimensions, format, and max file size if needed.
- Click "Preview" to check the result.
- Click "Generate" to create the optimised asset.
ℹ️ This action consumes credits.
This will create a copy of your original asset with the applied edits. The original image is not overwritten and remains unchanged.
Editing Images in Bulk
To edit multiple images at once using AI:
1. Head to the “All Assets” page
2. Choose the images you want to edit.
3. In the bulk actions menu, click "AI Edit", and select one of the editing options..jpg?width=670&height=338&name=Bulk%20action%20%20(1).jpg)
Follow the same steps to generate your transformed images and save them to your library.
Managing AI Image Jobs
Depending on how many images you’re transforming at once, your AI progress may continue running in the background after you’ve saved your edits.
You can continue working in Plytix while your new images are processed. In the meantime, you can:
-
Track progress: You can monitor active jobs in the "Process Queue" section through the "Activity Log" button.
-
Cancel jobs: To stop an AI bulk image transformation that is currently running, click “Cancel” in the Process Queue.

-
Review results: Once the process is complete, you’ll get an in-tool notification. Check the newly generated assets to make sure they meet your quality standards.
Frequently Asked Questions
Will AI overwrite my original images?
No, AI edits will not overwrite your images. AI-generated image transformations are saved as new assets. Original images remain unchanged.
What happens if some images fail to process?
Failures may occur due to low image quality or unsupported formats. You can retry the transformation or contact our support team at help@plytix.com
Can I apply AI edits to any image?
Yes, you can edit images using AI for all the image formats supported in Plytix. Check out all our supported file types. Please note that only image files can be edited with AI in Plytix. Currently, remove background only supports standard product images.
What's next?
-
Learn how to manage and organize your assets
-
Learn how to assign assets to products
-
Learn how to transform your images for different channels