
This article covers everything you need to manage your team: inviting users, changing roles, removing users, and transferring account ownership.
You may skip to a specific section of this article by clicking on the links below.
ℹ️ Only Owners and Admins have permissions to complete these actions.
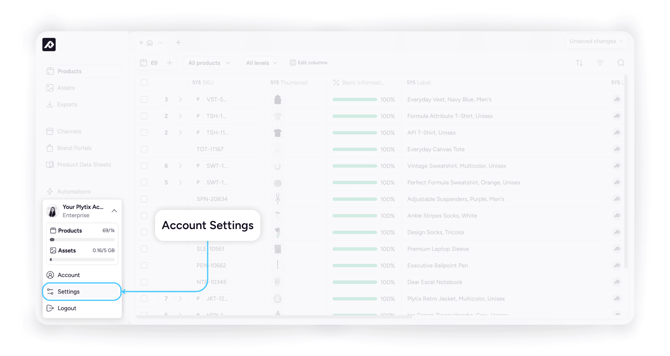
Accessing team settings
2. Click on the settings icon
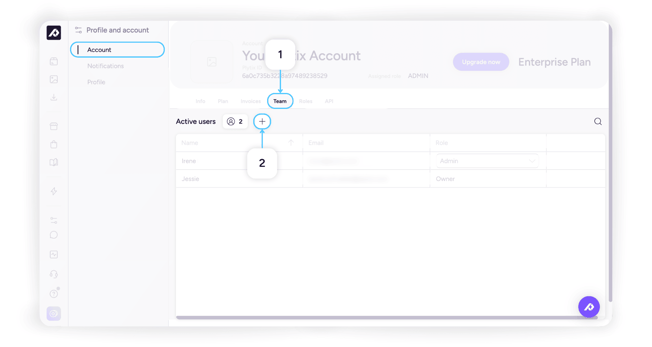
Inviting a new user
- In the Team tab, click the + button next to the active user count
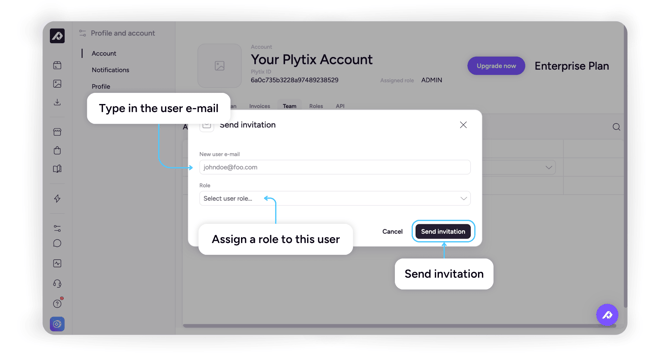
- A Send invitation pop-up will appear. Enter the new user's email address, select a role (we will go over how to change the user role in the next section)
- Click Send invitation
ℹ️ The invited user will receive an email with a link to join the account. The link can only be used once and expires after 15 days. If it expires, you'll need to resend the invitation.
To view invitations that are still awaiting acceptance, click the pending invitations button at the top of the Team tab. A panel will slide in showing each invitation's email, assigned role, and the date it was sent.
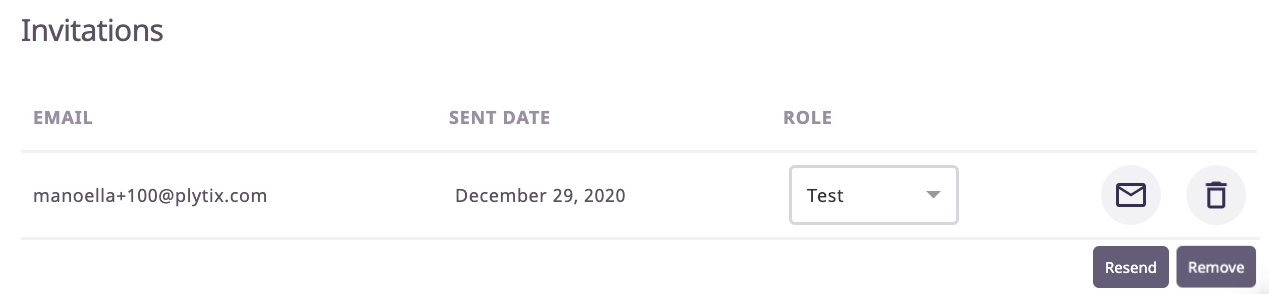
Clicking ··· next to any pending invitation gives you three options:
- Copy invitation link: share the link manually instead of by email
- Resend invitation: send a fresh invitation email
- Delete invitation: cancel the invitation entirely
Changing a user's role
You can change a user's role, or an invitee's role before they've accepted, at any time from the "Team" tab. Choose from a set of pre-created system roles or any custom team roles you've created.
To change a user's role:
💡 You can also assign roles to API keys.
Deleting an existing user
Owners and Admins can remove any user from the account, regardless of that user's role. Deleting a user removes their access to this account only, if they belong to multiple accounts, they must be removed from each one separately.
ℹ️ Account owners cannot be deleted. Ownership must be transferred to another user first.
To delete a user:
-
In the Team tab, hover over the user's row
-
Click the bin icon that appears on the far right
-
Type DELETE in the pop-up window
-
Confirm your decision by clicking DELETE
⚠️ Deleting a user cannot be undone, but you can always re-invite them later.
Transferring account ownership
Only the current account Owner can transfer ownership. This can be done at any time.
To transfer ownership of an account:
- In the Team tab, hover over the row of the user you'd like to make the new Owner
- Click the user icon to the left of the bin icon
- Confirm by clicking TRANSFER OWNERSHIP
.png)
Ownership transfers immediately. The previous Owner is automatically reassigned the Admin role.
⚠️ Transferring ownership does not delete the previous owner. If you want to remove them from the account, you must do so manually.
What's next?
Now that you'll be collaborating with a team:
- Learn how to create custom Team Roles
- Check out the different permission types for roles
- Discover how our process logs can help you keep track of your account activity