Working Collaboratively with Plytix PIM
Learn how to use Plytix as a collaboration tool for your team!
When considering effective product information management, one of the first things that comes to mind is collaboration among various teams. In your own company you probably have various departments who are responsible for different aspects of product information, such as sales, marketing, operations… you name it. We understand the importance of teamwork for managing and optimizing product data. That's why one of the standout benefits of using Plytix is the ability to have unlimited users in a single account at no extra cost.
In this article, we will explore how to make the best use of Plytix's features to streamline your PIM workflow. From creating key attributes to setting up attribute groups tailored to different purposes, leveraging smart lists for dynamic data organization, defining team roles and permissions for controlled access, to utilizing attribute transformations for automated data processing, we'll guide you through maximizing Plytix's capabilities for efficient collaboration and information management.
Creating a Set of Key Attributes
Creating Workflows with Smart Lists
Assigning Team Roles
Commenting on Products
*Skip to any section in this article by clicking on the links above
💡 Set up a quick training! Book some time with your Account Manager and work together to come up with the best setup for your company's collaboration needs.
Creating a Set of Key Attributes
In Plytix, you can create different attributes with the right type for your needs. When working with different teams, it is helpful to create a set of key attributes to help set up the foundation for your collaboration; you can then use those attributes to create filters and smart lists that will help you work together.
The following are some examples of key attributes you can create, which you can tailor based on your teams and industry:
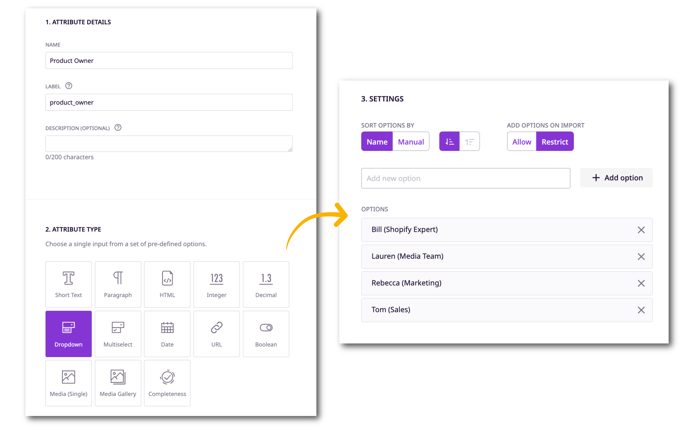
- Product Owner: This will establish who the owner of the product is
- We suggest setting this up as a Dropdown attribute type if only one person is responsible for owning a product at a time. If you have different people owning a product, you can use a Multi-Select attribute.
- Make the options of this attribute your team members' names. This will clearly show who is responsible for this product at any given time.
You can set up a Dropdown attribute and assign a product to one of your team members. Find an example of this attribute below.
- Product Lifecycle: These are the stages you want your product to pass through
- We suggest a Dropdown for this one too, since a product is only in one individual stage at a time.
- Examples of stages could be :
- ERP Data: Product has just been added from ERP and only has a few attributes assigned to it.
- Basic Content: Attributes like Short Description, Brand, Title, and Price have been added.
- Rich Content: Product now has Images, Long Marketing Descriptions, Details, Unique Selling Points, etc.
- Sales Ready: Product now has the sufficient data to be sold B2B.
- E-Commerce Ready: Product is ready to be sold online.
- Product Validation: This reflects the subjective completion of the product
- We also suggest a Dropdown here, because it is unlikely that it will be in multiple stages of approval. You can also have it as a Short Text attribute so that the team member validating a product can type out their name.
- Examples of Validation could be "Pending”, “Approved," and “Needs Revision”.
- Department Involved: Adding tags to filter what department is involved.
- This works best as a Multiselect. This way, you can tag multiple departments at the same time.
- Examples of Department Involved could be: R&D, Marketing, Sales, E-Commerce, Finance, etc.
💡 Name these as you see fit; they should be simple, explanatory names for personal reference.
Beyond dropdown and multi-select attributes, you can also create different completeness attributes for content that is specific to certain teams. This way, you can create to-do lists of product information.
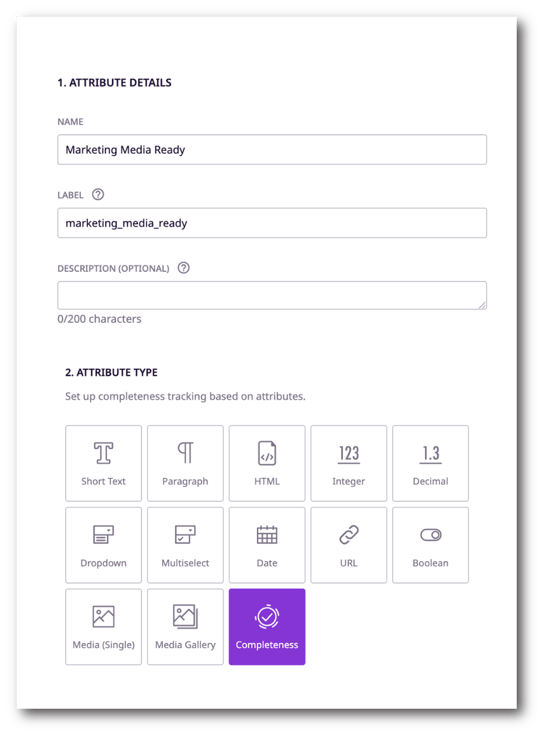
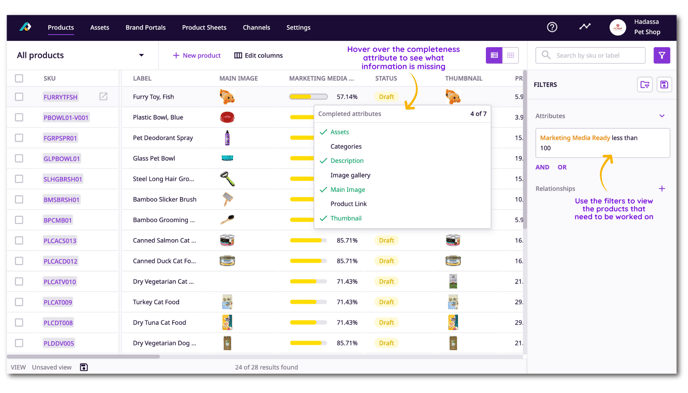
An example would be creating a “Marketing Media Ready” completeness attribute with the conditions that products must have all required media included. Then, your Marketing team can work on products that have missing values for their media by checking their completeness percentage (in this case, any product with a Marketing Media Ready percentage of less than 100 would need to be worked on).
See more about it below! 👀
1. Start by creating a new attribute and choosing the “Completeness” attribute type.
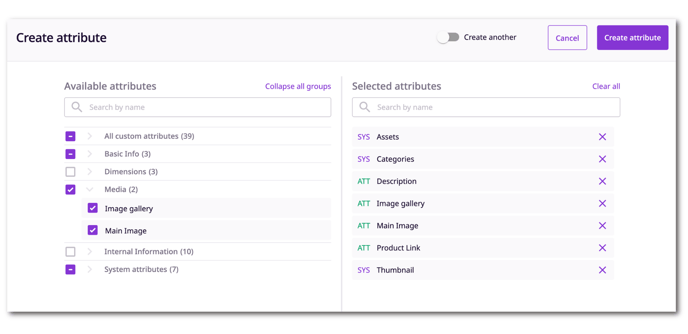
2. Then, select the attributes that you want to include to assess when a product is “complete”.
3. You can then use the filters on the product overview page to see which products aren’t 100% complete with the information you need.
💡 You can also use attribute transformations in feeds that you set up to automatically assign a product owner or validation status when certain conditions are met. E.g.: If a product has assigned values for the attributes “Media Gallery,” “Description,” “Unique Selling Points” and “Product URL,” enter the name “Ready for Sales Manager” in the “Product Lifecycle” attribute.
Setting Up Attribute Groups
Not only can attribute groups be used to gather similar attributes together referring to your products, but you can also create different groups based on the most relevant information for your teams.
For example, you may want to create an “Internal Information” attribute group to include some of the attributes we mentioned earlier (such as Product Owner and Product Lifecycle Stage). Or you can create a group that contains all of your Media attributes so that this information can be easily found by your teams.
.png?width=688&height=345&name=new-attribute-group%20(1).png)
These attribute groups can then be used to find and optimize a product’s information in the PIM.
Below is an example of how you could manage and edit the attributes mentioned above directly from a product’s detail page 👇
Creating Workflows with Smart Lists
This is the fun part 😉
Once you have created the Attributes and the Attribute Groups, it's time to set up Smart Lists that will update automatically. These lists will allow each user to create their own working lists and to move products forward in your workflow. It also allows each user to quickly find the SKU list that is relevant to them.
ℹ️ You can create both smart and static product and asset lists too!
Here are some examples of smart lists you can create:
- Department Specific Lists: For example, create a list that shows you the products that Marketing needs to take care of, so that the team can assign ownership to their team members. Fill in incomplete data and move it forward in the pipeline.
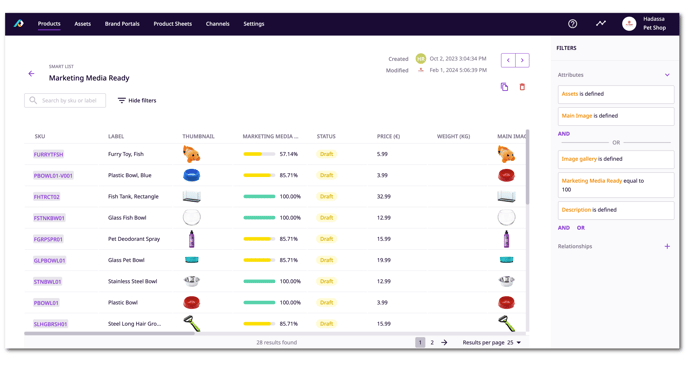
- User Specific Lists: Using the example above, the marketing manager can assign the products to a colleague so that they add the pictures to it.
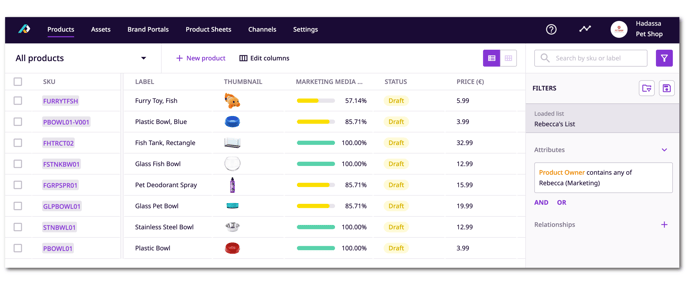
After you create your lists, you can load them on the Product Overview page and start working with them.
ℹ️ Click here to learn how to work with smart lists.
When you load a smart list, simply editing the products will automatically update which list the product appears on. Lists will decrease or increase depending on your updates.
There are 3 ways you can make those changes.
- Editing Products Manually – E.g.: Change Owner to "Risa"
- Editing Products in Bulk – E.g.: Bulk editing 55 products to "Validated"
- Importing a CSV file with the edits – E.g: Importing SKU with "ERP Content" field
You can also create smart lists based on completeness attributes mentioned above to create a to-do list for different teams.
For example, you can start with the ERP Content team who are responsible for completing attributes like “SKU”, “Price”, “Label” and “Status”. Then, the Content Team would handle those products once those attributes are complete, and will be responsible for adding on to them by completing attributes such as “Thumbnail”, “Description” and “Product URL” — and so on.
This way you can have dozens of people working together on thousands of different products in perfect harmony 😌
Assigning Team Roles
Now that you have the system set up with the right attributes and relevant smart lists, create the right Team Roles to support that.
Having the right Team Roles with the relevant access permissions will allow each team member to take action on the relevant aspect of the team they are working on and will prevent human errors.
Examples:
- Editor: someone with access to all the PIM settings, but not to the Admin section
- Collaborator: Someone with only access to the Products Editing, but nothing else.
- Sales: Giving them access to the Catalogs section and View Only to the Products
- E-commerce: Editing access to both Products and Channels.
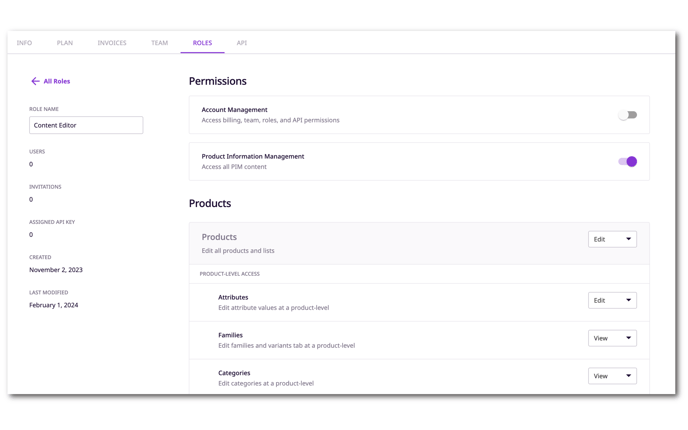
While these are just some examples of team roles you can create, each company has a unique setup and structure, so we recommend talking to your dedicated Account Manager to create the right roles for your teams.
Commenting on Products
You can collaborate directly within product pages to streamline communication, share feedback, and keep track of important notes.
You can write comments on your products and use "@" to tag users so everyone is on track of what needs to be reviewed or done.You can learn more about this feature in our dedicated article about commenting on products

What's next?
- Learn how to create and edit your profile settings
- Learn how to create multiple accounts
- Learn how to see which user modified an item